©
202 0 Escalad e Sports
Fo r Custome r Servic e Cal l 1-888-996-2729
9
All Rights Reserved.
P1
C1
P11
P2B
FIGURE 6
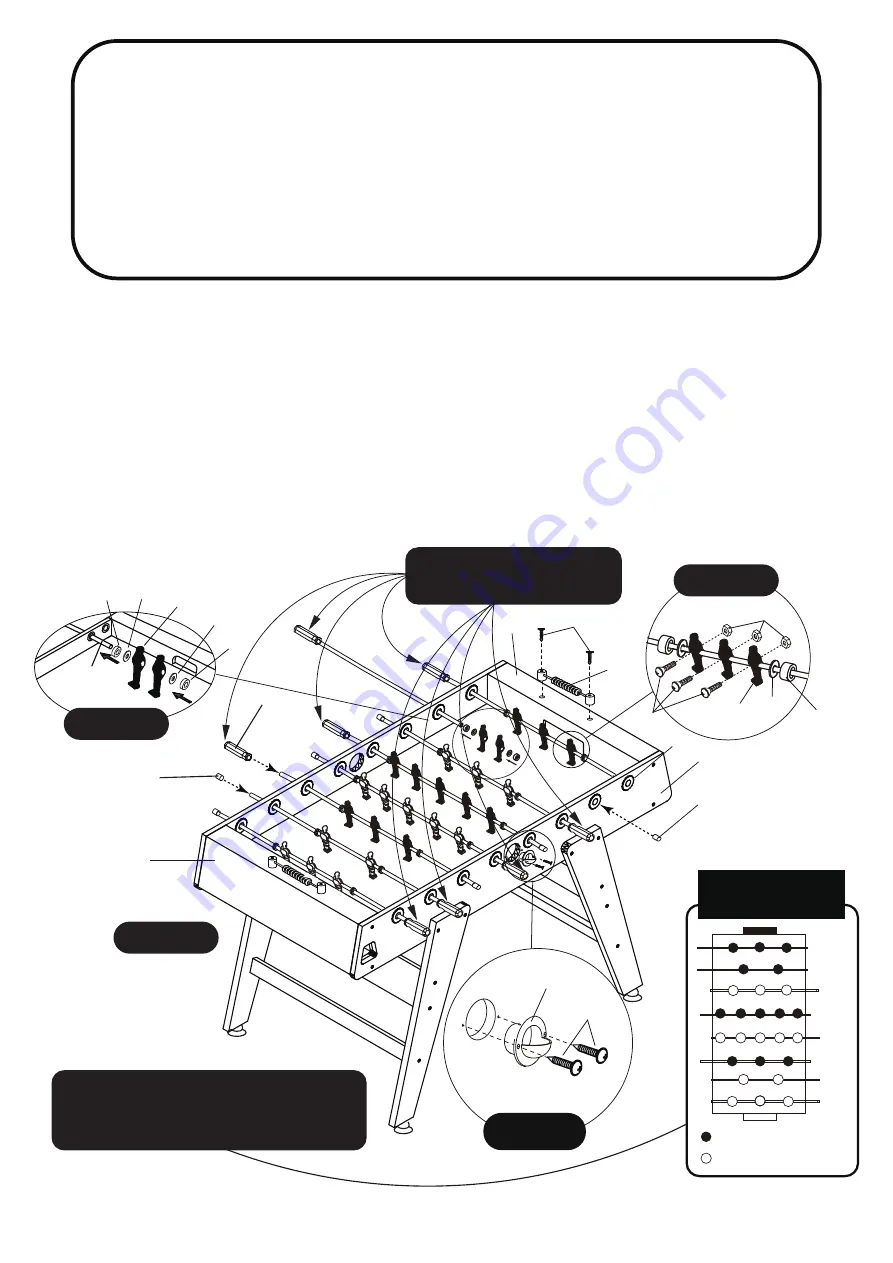
STEP 6
Slide
P12
5-Hole Rod,
P13
2-Hole Rod,
P14
3-Hole Rod through Rod Bushing of
P1
Side
Apron,
P17
Rod Bumper,
P18
Rod Washer,
P15
Blue Player or
P16
White Player,
P18
Rod
Washer,
P17
Rod Bumper and
P1
Side Apron as shown in
FIGURE 6, Detail C.
Secure
P15
Blue Player and
P16
White Player onto rods using
H1
Round Head Bolts and
H2
M4 Nylock Nuts as shown in
FIGURE 6, DETAIL B.
Attach the
P19
Ball Entry Cup on
P1
Side Aprons using pilot hole with
H6
Phillips Round
Head Screw as shown in
FIGURE 6, DETAIL A.
Attach the
P8
Manual Scorers to
P2A
End Apron and
P2B
End Apron with
Logo Emblem
using
H7
Phillips Round Head Screws as shown in
FIGURE 6.
Tighten, but do not strip out screws.
26pcs -
H1
Round Head Bolt
26pcs -
H2
M4 Nylock Nut
4pcs -
H6
Phillips Round Head Screw
4pcs -
H7
Phillips Round Head Screw
PARTS REQUIRED
8pcs -
P10
Player Rod Handle
8pcs -
P11
Rod End Cap
2pcs -
P12
5-Hole Rod
2pcs -
P13
2-Hole Rod
4pcs -
P14
3-Hole Rod
2pcs -
P8
Manual Scorer
13pcs -
P15
Blue Shirt Player
13pcs -
P16
White Shirt Player
16pcs -
P17
Player Rod Bumper
16pcs -
P18
Player Rod Plastic Washer
2pcs -
P19
Ball Entry Cup
P11
P2A
P10
H7
P8
P14
P14
P14
P14
P12
P12
P13
P13
= Blue Shirt / White Short Player
= White Shirt / Black Short Player
DETAIL A
P19
H6
P15
P17
P18
H1
H2
5B
P15
P18
P18
P17
P17
P13
DETAIL B
DETAIL C
Order of Players
(Overhead View)
NOTE: Correct placement
of Player Rod Handle.
NOTE: Install players onto Player Rods
exactly as per this diagram for correct
soccer play.


