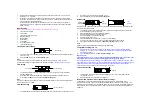
Date
(flashing)
Weekday
(flashing)
•
Recommended distance to any interfering sources like computer monitors or TV sets is a
minimum of 1.5 - 2 meters.
•
Within ferro-concrete rooms (basements, superstructures), the received signal is naturally
weakened. In extreme cases, please place the unit close to a window and/or point its front or
back towards the Frankfurt transmitter.
•
During night time, the atmospheric disturbances are usually less severe and reception is
possible in most cases. A single daily reception is adequate to keep the accuracy deviation
below 1 second.
Manual setting
When pressing the SET key, the following manual setting can be changed:
•
12/24 hour time display
•
Time setting
•
Time zone setting (±12 hours)
•
Weekday setting
•
Month setting
•
Date setting
•
Year setting
•
ºC/ºF temperature setting
•
LCD contrast setting
12/24 hour display setting
1.
The
“12”
or
“24”
will be flashing (Default setting 24). Choose the desired time display mode by
use of the
+
key.
2.
Press the
SET
key to enter the
Time Setting
mode.
Note:
If 12 hour time display has been selected, the calendar will be:
weekday, month and date.
If 24 hour time display has been selected, the calendar will display:
weekday, date, and month
.
Time setting
1.
The hour digits will start flashing. Set the desired hours by pressing the
+
key followed by
pressing the
SET
key.
2.
Now the minute digits will start flashing. Set the desired minutes by pressing the
+
key
3.
Press again the
SET
key to enter the
Time Zone Setting
mode.
Note:
If the DCF-77 time signal is already received by the Weather Station and is correctly displayed, then
the time setting can be omitted.
Time Zone Setting
1.
The display
“Zo 0”
will start flashing (Default setting “0h”). The time zone can be set
±
12 hours
2.
Use of the
+
key to select the required time zone.
2.
Press the
SET
key to enter to the
Date setting
mode.
Date Setting
If the DCF-77 time signal is already received by the Weather Station and is correctly displayed, then
the date setting can be omitted.
1.
The weekday digits will start flashing (weekday will only be displayed in German). Select the
desired weekday by pressing the
+
key.
2.
Press the
SET
key. The month will now start flashing.
3.
Select the desired month by pressing the
+
key.
4.
Press the S
ET
key. The day starts flashing.
5.
Select the day with the
+
key.
6.
Press the
SET
key to select the year. The year will start flashing.
7.
Select the year with the + key. A range from 2000 through 2020 can be chosen
8.
Press again the S
ET
key to enter the
“Temperature setting in °C/°F”
mode.
Note:
The Moon phase will be displayed accordingly to the date setting.
Temperature setting in °C/°F
1.
All indoor/outdoor, minimum and maximum temperature values will start flashing (Default
setting in “ºC”). Using the
+
key, select the temperatures to be displayed in degrees Celsius or
in degrees Fahrenheit.
2.
Press
the
SET
key to enter the
LCD contrast setting
mode
.
Important note:
The temperature icons “ºC” or “ºF” will not be displayed with the temperature values. Only the
temperature values will be displayed and will toggle accordingly to the setting.
When toggling between the two settings, if lower temperature values are displayed in the both indoor
and outdoor temperature sections, it means the temperature setting has been set in degree Celsius. If
higher temperature values are displayed in both the indoor and outdoor temperature sections, it
means the temperature setting has been set in degree Fahrenheit.
LCD contrast setting
1.
The digit “LCD 5” will start flashing (default setting). Use the + key to select the required
contrast from 0-7 level.
2.
Press the SET key to exit the manual setting mode
Minimum and maximum indoor temperature recordings:
Underneath the current indoor temperature reading are the minimum and maximum indoor
temperature recordings. These are simultaneously displayed for constant and easy reading. This
feature is useful for displaying the recorded temperatures of the room which the Weather Station has
been placed. When a new temperature low or high is reached, it will be automatically updated and
displayed.
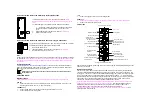
“24h” (flashing)
Time zone (flashing)
Flashing
Hour (flashing)
Minutes (flashing)
Year
(flashing)

