Hardware Installation
2. Hardware Installation
Read the safety instructions at the beginning of this document carefully,
before you start with the hardware installation!
Danger!
Electric shock risk. Never carry out work while power supply voltage is switched on!
Attention !
Electrostatic discharges may cause damage to electronic components. To avoid
this, please discharge the static electricity from your body by touching the metal
case of the
PC
before
you touch the CAN-PCI/200.
Procedure:
1.
Switch off your computer and all connected peripheral devices (monitor, printer, etc.). Switch
off the connected CAN devices.
2.
Discharge your body as described above.
3.
Disconnect the power supply of the PC from the mains.
If the computer does not have a flexible mains cable, but is directly connected to mains,
disconnect the power supply via the safety fuse and make sure that the fuse cannot switch
on again unintentionally (i.e. with caution label).
Danger!
Never carry out work while power supply voltage is switched on!
4.
Open the case.
5.
Select an open PCI slot and remove the slot cover at the back of the PC. Unfasten the screw
which fixes the slot cover and retain it for fixing the module afterwards.
The CAN module can be inserted into every PCI slot.
6.
Insert the CAN-PCI/200 board into the selected PCI
slot. Carefully push the board down until
it snaps into place.
7.
Attach the board.
Use the screw you removed from the slot cover in step 5.
8.
Close the computer case again.
9.
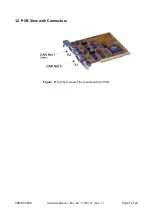
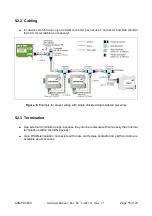
Connect the CAN cable. Please note the wiring hints in chapter 5.
The first CAN interface (CAN net 0) has to be connected via the lower DSUB connector (X1)
and the second CAN interface (CAN net 1) has to be connected via the upper DSUB
connector (X3).
10. Connect the computer to mains again (mains connector or safety fuse).
11. Switch on the computer and the peripheral devices.
12. End of hardware installation.
Continue with the software installation.
Page 8 of 23
Hardware Manual • Doc. No.: C.2021.21 / Rev. 1.1
CAN-PCI/200


