background image

Correct Wiring of Electrically Isolated CAN Networks

7.2 Heavy Industrial Environment (

Double

 Twisted Pair Cable)

7.2.1 General Rules

NOTICE

esd only grants the compliance with directive 2014/30/EU, if the CAN wiring is carried out 
with single shielded 

double twisted

 pair cables that match the requirements of ISO 11898-

2.

The following  

general rules

  for the CAN wiring with single shielded  

double

  twisted pair cable

should be followed:

1

A cable type with a wave impedance of about 120 Ω ±10% with an adequate conductor cross-section
(≥ 0.22 mm²) has to be used. The voltage drop over the wire has to be considered.

2

For heavy industrial environment use a four-wire CAN cable. 
Connect  


two twisted wires to the data signals (CAN_H, CAN_L) and 
the other two twisted wires to the reference potential (CAN_GND) and
the cable shield to functional earth (FE) at least at one point.

3

The reference potential CAN_GND has to be connected to the functional earth (FE) at exactly  

one

point. 

4

A CAN bus line must not branch (exception: short cable stubs) and has to be terminated with the
characteristic impedance of the line (generally 120 Ω ±10%) at both ends (between the signals CAN_L
and CAN_H and 

not

 to CAN_GND).

5

Keep cable stubs as short as possible (l < 0.3 m).

6

Select a working combination of bit rate and cable length.

7

Keep away CAN cables from disturbing sources. If this can not be avoided, double shielded cables are
recommended.  

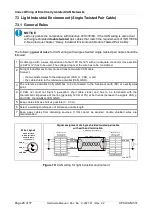
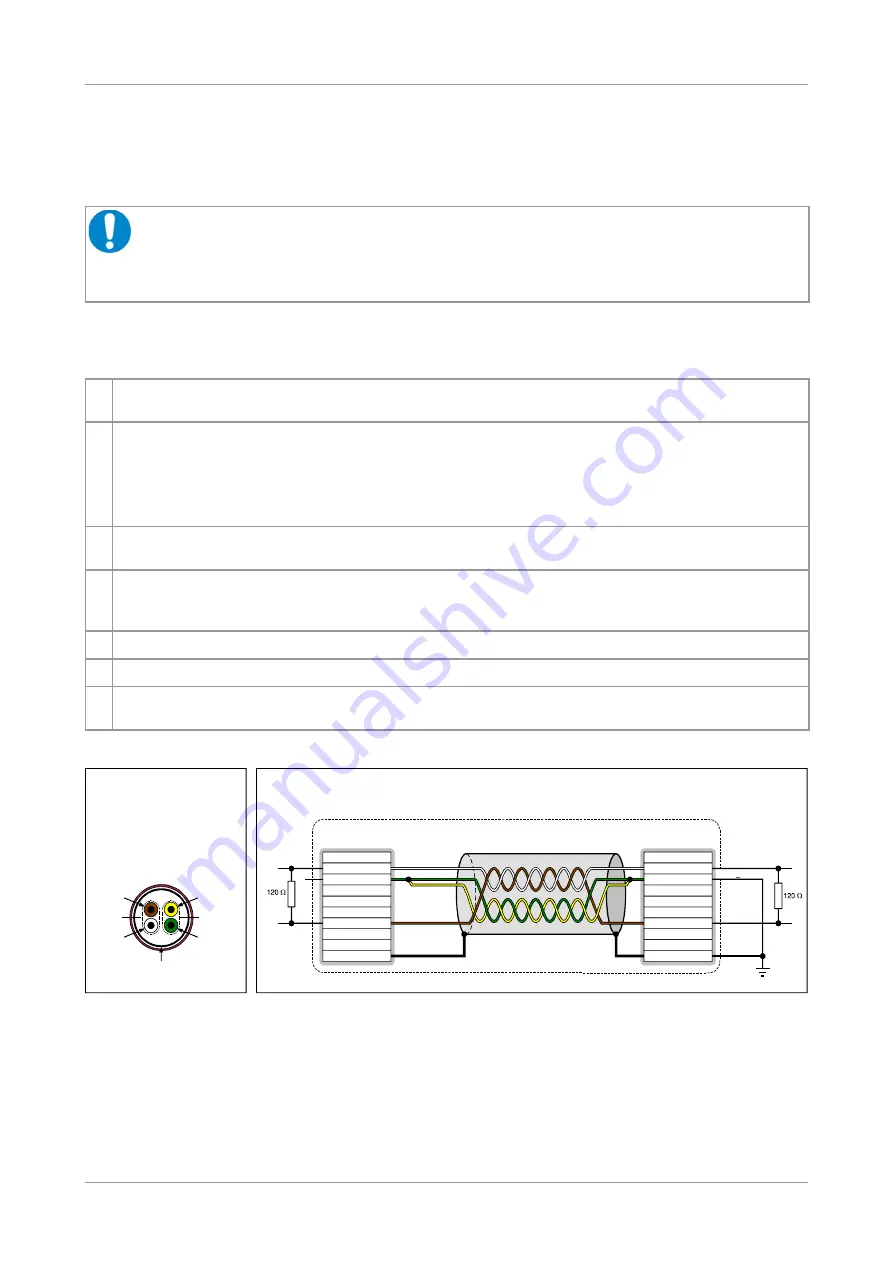
Figure 8:

 CAN wiring for heavy industrial environment

Page 26 of 37

Hardware Manual • Doc. No.: C.2027.21 / Rev. 2.2

CPCI-CAN/331

CAN  GND

CAN_L

CAN_H

CAN_GND

n.c.

n.c.

n.c.

n.c.
n.c.

n.c.

n.c.

n.c.

n.c.
n.c.

CAN_L

CAN_H

CAN_GND

Shield

CAN_GND

twisted

twisted

5

6

7

9

8

1

4

3

2

9

1

4

5

6

7

3

8

2

n.c.

n.c.

Single shielded 

double twisted pair cable

(four-wire cable,

2x 2x 0.22mm²)

wire shield

Wire Layout

(Example)

Signal assignment of single shielded double twisted pair cable

 with earth and termination

n.c. = not connected

DSUB9 connector

(female or male)

pin designation

connector case

DSUB9 connector

(female or male)

pin designation

CAN cable with connectors

connector case

earth (FE)

Summary of Contents for C.2027.02

Page 1: ...ion and Technical Data to Product C 2027 02 C 2027 04 C 2027 05 CPCI CAN 331 Hardware Manual Doc No C 2027 21 Rev 2 2 Page 1 of 37 esd electronic system design gmbh Vahrenwalder Str 207 30165 Hannover Germany http www esd eu Phone 49 0 511 3 72 98 0 Fax 49 0 511 3 72 98 68 ...

Page 2: ...ronic system design gmbh Vahrenwalder Str 207 30165 Hannover Germany Phone 49 511 372 98 0 Fax 49 511 372 98 68 E Mail info esd eu Internet www esd eu This manual contains important information and instructions on safe and efficient handling of the CPCI CAN 331 Carefully read this manual before commencing any work and follow the instructions The manual is a product component please retain it for f...

Page 3: ... of the facts only Rev Chapter Changes versus previous version Date 2 2 Safety Instructions and classification inserted 2015 12 07 2 Chapter completely revised 3 3 DeviceNet option deleted 3 4 Chapter updated 5 2 Note inserted 6 Chapter DeviceNet Option deleted 7 CAN wiring hints for double twisted pair cables 9 New chapter Declaration of Conformity 10 Chapter Order Information moved and revised T...

Page 4: ...ements indicate a hazardous situation which if not avoided will result in death or serious injury WARNING Warning statements indicate a hazardous situation that if not avoided could result in death or serious injury CAUTION Caution statements indicate a hazardous situation that if not avoided could result in minor or moderate injury NOTICE Notice statements are used to notify people on hazards tha...

Page 5: ...CAN 331 may become warm during normal use Always allow adequate ventilation around the CPCI CAN 331 and use care when handling Do not operate the CPCI CAN 331 adjacent to heat sources and do not expose it to unnecessary thermal radiation Ensure an ambient temperature as specified in the technical data DANGER Hazardous Voltage Risk of electric shock due to unintentional contact with uninsulated liv...

Page 6: ...ntially explosive materials is not permitted The operation of the CPCI CAN 331 for medical purposes is prohibited Service Note The CPCI CAN 331 does not contain any parts that require maintenance by the user The CPCI CAN 331 does not require any manual configuration of the hardware Unauthorized intervention in the device voids warranty claims Disposal Devices which have become defective in the lon...

Page 7: ...Interface at DSUB9 X400 X401 23 6 2 2 CAN Bus Interface to CompactPCI Board Connector X101 X400A X400B X410A X410B 24 7 Correct Wiring of Electrically Isolated CAN Networks 25 7 1 Standards concerning CAN Wiring 25 7 2 Heavy Industrial Environment Double Twisted Pair Cable 26 7 2 1 General Rules 26 7 2 2 Device Cabling 27 7 2 3 Termination 27 7 3 Light Industrial Environment Single Twisted Pair Ca...

Page 8: ...10 Order Information 37 Page 8 of 37 Hardware Manual Doc No C 2027 21 Rev 2 2 CPCI CAN 331 ...

Page 9: ...ng many other features of CAN interfaces the bit rate can be set by software The CAN interface is electrically isolated from the other potentials by means of optocouplers and DC DC converters CPCI CAN 331 Hardware Manual Doc No C 2027 21 Rev 2 2 Page 9 of 37 5 V 5 V Microcontroller 68331 SRAM Arbiter 5 V 5 V C A N B U S CAN CAN IRQ A Physical CAN Layer C A N B U S electrical isolation DC DC Conver...

Page 10: ...Overview 1 2 PCB View with Connectors X401 CAN 1 Option X400 CAN 0 Figure 2 View of PCB layer CPCI CAN 331 2 without a front panel Page 10 of 37 Hardware Manual Doc No C 2027 21 Rev 2 2 CPCI CAN 331 ...

Page 11: ...c Switch off the connected CAN devices of the network the CAN module is to be connected to 2 Discharge your body as described above 3 Disconnect the power supply of the computer from the mains DANGER Hazardous Voltage Risk of electric shock due to unintentional contact with uninsulated live parts with high voltages Disconnect all hazardous voltages mains voltage before opening the computer If the ...

Page 12: ...arth connection like the CAN_GND Please pay attention to the notes on correct wiring of CAN networks see from page 25 The first CAN interface CAN network 0 is connected via the DSUB connector X400 and the second CAN interface CAN network 1 is connected via the DSUB connector X401 9 Connect the computer to mains again mains connector or safety fuse 10 Switch on the computer the peripheral devices a...

Page 13: ...el I O X400 DSUB9 male CAN network 0 X401 DSUB9 male optional CAN network 1 X400A X400B 3 pole male connector bridge signals from network 0 to X101 X410A X410B 3 pole male connector bridge signals from network 1 to X101 The following connectors are only for service purposes X200 4 pole SMD female con serial interface X201 10 pole male con BDM interface X501 5 pole pin strip ISP programming Dimensi...

Page 14: ...31 1 1 CAN interface CPCI CAN 331 2 2 CAN interfaces CAN controller SJA1000 CAN protocol ISO 11898 1 Basic CAN2 0A B Physical interface physical layer in accordance with ISO 11898 2 transfer rate programmable from 10 Kbit s to 1 Mbit s Bus termination has to be set externally Electrical insulation of the CAN interface from other units the two possible CAN interfaces are electrically insulated from...

Page 15: ...ed CAN 2 0A only for Solaris SGI IRIX6 5 AIX and QNX 4 INFORMATION The CAN layer 2 NTCAN API software installation and the software drivers are described in the NTCAN API manual esd order No C 2001 21 NTCAN API Part 1 Application Developers manual and NTCAN API Part 2 Installation Guide CANopen software packages are available CPCI CAN 331 Hardware Manual Doc No C 2027 21 Rev 2 2 Page 15 of 37 ...

Page 16: ...Position and colours of the LEDs LED Colour Name Display function when LED off LED on LED1D green Power no power supply power supply is available LED1C red not implemented LED1B yellow not implemented LED1A red not implemented Table 4 Display functions of the LEDs Page 16 of 37 Hardware Manual Doc No C 2027 21 Rev 2 2 CPCI CAN 331 CAN Net1 X401 Optional CAN Net 0 X400 ejection handle LED1D green L...

Page 17: ...e module or other components of the CompactPCI system might be destroyed Figure 4 Possible assignment of connector X101 represented only in network 0 In the following chapters the possible assignments of I O connector X101 will be described CPCI CAN 331 Hardware Manual Doc No C 2027 21 Rev 2 2 Page 17 of 37 X100 CompactPCI Board Connector X101 CompactPCI Rear Panel I O Connector CompactPCI Interfa...

Page 18: ...re the ISO11898 interface and be assigned to X101 For this available resistors have to be removed and new ones have to be equipped NOTICE Any intervention in the device by unauthorized persons voids warranty claims It is therefore recommended to send the CPCI CAN 331 to esd for the change of the resistors The changes can be made by esd at your expense 5 2 1 Comparison of Different Signal Assignmen...

Page 19: ...1 Signal Assignment 1 Unidirectional Signals to Local CAN Interface Figure 5 Signal assignment 1 Resistor values CAN network 1 R403 10 kΩ RX403 0 Ω RX414A 0 Ω RX415A 0 Ω CAN network 0 R402 10 kΩ RX402 0 Ω RX404A 0 Ω RX405A 0 Ω CPCI CAN 331 Hardware Manual Doc No C 2027 21 Rev 2 2 Page 19 of 37 ...

Page 20: ...ignment 2 Unidirectional Signals to X101 Figure 6 Signal Assignment 2 Resistor values CAN network 1 R403 10 kΩ RX403 0 Ω RX414B 0 Ω RX415B 0 Ω CAN network 0 R402 10 kΩ RX402 0 Ω RX404B 0 Ω RX405B 0 Ω Page 20 of 37 Hardware Manual Doc No C 2027 21 Rev 2 2 CPCI CAN 331 ...

Page 21: ...al Assignment 3 Resistor values CAN network 1 RX403 0 Ω R405 10 kΩ R409 10 kΩ R410 220 Ω R411 10 kΩ RX414B 0 Ω RX415B 0 Ω RX416 0 Ω RX417 0 Ω CAN network 0 RX402 0 Ω R404 10 kΩ R406 10 kΩ R407 220 Ω R408 10 kΩ RX404B 0 Ω RX405B 0 Ω RX406 0 Ω RX407 0 Ω CPCI CAN 331 Hardware Manual Doc No C 2027 21 Rev 2 2 Page 21 of 37 ...

Page 22: ...8 9 10 11 12 13 14 15 16 17 18 19 20 21 22 R01 T10 R00 T11 T01 R10 T00 CAN_H0 CAN_L0 CAN_GND0 CAN_H1 CAN_L1 CAN_GND1 R11 GND GND GND GND GND GND GND GND GND GND Signal description T10 R10 T11 R11 CAN signals which can be assigned to X101 from CAN controller network 0 by changing the resistors T00 R00 T01 R01 CAN signals which can be assigned to X101 from CAN controller network 1 by changing the re...

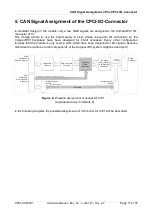
Page 23: ...in Assignment Signal Pin Signal 1 reserved CANx_GND 6 2 CANx_L CANx_H 7 3 CANx_GND reserved 8 4 reserved reserved 9 5 Shield Signal Description CANx_L CANx_H CAN signal lines of CAN net x CPCI CAN 331 1 x 0 CPCI CAN 331 2 x 0 1 CANx_GND reference potential of the local CAN physical layer x Shield shielding connected with the case of the 9 pin DSUB connector reserved reserved for future application...

Page 24: ...ge 10 Assignment of connector X400A and X400B net 0 Signal Pin X400A X400B CAN_GND0 CAN_L0 CAN_H0 1 2 3 1 2 3 Assignment of connector X410A and X410B net 1 Signal Pin X410A X410B CAN_GND1 CAN_L1 CAN_H1 1 2 3 1 2 3 Signal Description CAN_H0 CAN_L0 CAN_GND0 ISO11898 CAN signal of CAN net 0 CAN_H1 CAN_L1 CAN_GND1 ISO11898 CAN signal of CAN net 1 Page 24 of 37 Hardware Manual Doc No C 2027 21 Rev 2 2 ...

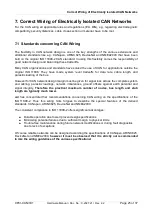
Page 25: ... for signal loss across the complete system and cabling parasitic loadings network imbalances ground offsets against earth potential and signal integrity Therefore the practical maximum number of nodes bus length and stub length are typically much lower esd has concentrated her recommendations concerning CAN wiring on the specifications of the ISO 11898 2 Thus this wiring hints forgoes to describe...

Page 26: ...al earth FE at exactly one point 4 A CAN bus line must not branch exception short cable stubs and has to be terminated with the characteristic impedance of the line generally 120 Ω 10 at both ends between the signals CAN_L and CAN_H and not to CAN_GND 5 Keep cable stubs as short as possible l 0 3 m 6 Select a working combination of bit rate and cable length 7 Keep away CAN cables from disturbing s...

Page 27: ...isted cables is unavoidable take care that the CAN_GND line is not interrupted Figure 9 Example of proper wiring with single shielded double twisted pair cables 7 2 3 Termination A termination resistor has to be connected at both ends of the CAN bus If an integrated CAN termination resistor which is equipped at the CAN interface at the end of the bus is connected this one has to be used for termin...

Page 28: ...e connected to the functional earth FE at exactly one point 4 A CAN net must not branch exception short cable stubs and has to be terminated with the characteristic impedance of the line generally 120 Ω 10 at both ends between the signals CAN_L and CAN_H and not at CAN_GND 5 Keep cable stubs as short as possible l 0 3 m 6 Select a working combination of bit rate and cable length 7 Keep away cables...

Page 29: ...e contacts gender changer are available from esd order no C 1303 01 DSUB termination connectors with male contacts order no C 1302 01 or female contacts order no C 1301 01 and additional functional earth contact are available if CAN termination and grounding of CAN_GND is required CPCI CAN 331 Hardware Manual Doc No C 2027 21 Rev 2 2 Page 29 of 37 CAN_L CAN_GND CAN_H FE CAN DP 2 CAN CBX DIO8 CAN C...

Page 30: ...cal values of reachable wire length with esd interface lmax m CiA recommendations 07 95 for reachable wire lengths lmin m 1000 800 666 6 500 333 3 250 166 125 100 83 3 66 6 50 33 3 20 12 5 10 37 59 80 130 180 270 420 570 710 850 1000 1400 2000 3600 5400 7300 25 50 100 250 500 650 1000 2500 5000 Table 6 Recommended cable lengths at typical bit rates with esd CAN interfaces Optical couplers are dela...

Page 31: ...any www concab de e g BUS PVC C 1x 2x 0 22 mm Order No 93 022 016 UL appr BUS Schleppflex PUR C 1x 2x 0 25 mm Order No 94 025 016 UL appr 7 6 2 Cable for heavy industrial Environment Applications Four Wire Manufacturer Cable Type U I LAPP GmbH Schulze Delitzsch Straße 25 70565 Stuttgart Germany www lappkabel com e g UNITRONIC BUS CAN UL CSA 2x 2x 0 22 UL CSA approved Part No 2170261 UNITRONIC BUS ...

Page 32: ...stance of the CAN data pair conductors and the attached terminating resistors To test it please 1 Turn off all power supplies of the attached CAN nodes 2 Measure the DC resistance between CAN_H and CAN_L at one end of the network see figure above The measured value should be between 50 Ω and 70 Ω If the value is below 50 Ω please make sure that there is no short circuit between CAN_H and CAN_L wir...

Page 33: ...data if there is a short circuit between CAN_GND and CAN_L but generally the error rate will increase strongly Make sure that there is no short circuit between CAN_GND and CAN_L 8 4 CAN_H CAN_L Voltage Each node contains a CAN transceiver that outputs differential signals When the network communication is idle the CAN_H and CAN_L voltages are approximately 2 5 V measured to CAN_GND Faulty transcei...

Page 34: ...rk see figure below 2 Measure the DC resistance between CAN_H and CAN_GND see figure below 3 Measure the DC resistance between CAN_L and CAN_GND see figure below The measured resistance has to be about 500 kΩ for each signal If it is much lower the CAN transceiver it is probably faulty Another indication for a faulty transceiver is a very high deviation between the two measured input resistances 2...

Page 35: ...Declaration of Conformity 9 Declaration of Conformity CPCI CAN 331 Hardware Manual Doc No C 2027 21 Rev 2 2 Page 35 of 37 ...

Page 36: ...CAN FP 6U 4HP 1 6U 4HP front panel inclusive mounting Compatible to products CPCI CAN 200 1 C 2035 02 CPCI CAN 331 1 C 2027 02 C 2027 30 CPCI CAN FP 6U 4HP 2 6U 4HP front panel inclusive mounting Compatible to products CPCI CAN 200 2 C 2035 04 CPCI CAN 331 2 C 2027 04 CPCI CAN 331 2B C 2027 05 CPCI CAN 400 2 C 2033 02 C 2027 31 Software CAN layer 2 object licences including CD ROM CAN DRV LCD RTX ...

Page 37: ...1 ME Hardware manual in English C 2027 21 CAN API ME NTCAN API manual 1 2 Application Developers Manual NTCAN API manual 2 2 Installation Guide C 2001 21 CANopen ME CANopen manuals in English C 2002 21 Table 7 Available manuals Printed Manuals If you need a printout of the manual additionally please contact our sales team sales esd eu for a quotation Printed manuals may be ordered for a fee CPCI C...

Reviews: