background image

9

Type

Do you wish to back up all recorded material or recordings made from
specific triggers such as alarm or motion detection events.

Channel

Select the channels that you wish to back up.

Start Time

Select the start date and time of the desired back up.

End Time

Select the end date and time of the desired back up.

Once you have entered the selections above click Add, data applicable to the selections
will now appear in the main screen. Further more precise selections can then be made
by clicking on the boxes to the left of the file details or selecting all files by clicking on
the box next to Channel. Once your file choices have been made the required free data
capacity and total capacity will be displayed at the bottom of the screen.

Clicking start will commence the back up operation and replace the capacity
requirement with information on the estimated time to complete the process.

ALARM INPUTS AND OUTPUTS

This section allows you to configure the alarm event capability of the DVR an also
control the actions of the DVR should an alarm event take place.

An alarm event can be created in a number of ways.

Motion

The DVR can detect movement changes in the images being captured via

detection

it’s own software. Each channel can be configured to create alarm events
via on-screen movement (Enable). The area of detection can be defined
to specific areas on screen (Region), default is full screen, and sensitivity
can be adjusted to avoid false triggering. Motion detection triggers can
then be configured to create an alarm output or start recording sessions
on an of the channels, show a message on screen or send an e-mail alert.

Video Blind

The DVR can detect failing light conditions on specific channels which
would creat a poor quality image, this could include lights being turned
off or even covering the camera by accident or on purpose by an intruder.
Sensitivity and actions following a trigger event can be configured.

Video Loss

Damaged or severed cables, failure of power supply or damage to a
camera can all cause a video loss event. Actions following a video loss
event can be configured.

Alarm Input

Additional alarm devices such as PIR detectors, magnetic contacts or
panic attack buttons can be used to trigger actions via the alarm inputs
on the rear panel of the DVR. Detector inputs can be set as normally
open or normally closed to suit. Actions following an alarm event can be
configured.

DVR4i Manual_Layout 2  01/05/2013  14:35  Page 9

Summary of Contents for 4 CHANNEL NETWORKABLE DVR WITH NTEGRAL 500GB HARD DRIVE

Page 1: ...4 CHANNEL NETWORKABLE DVR WITH INTEGRAL 500GB HARD DRIVE US ER MANUAL DVR4i Manual_Layout 2 01 05 2013 14 35 Page 1...

Page 2: ...ion if you are not sure about the power supply to be used Do not place anything on or around the power cord A damaged power cord may cause electric shock Please do not touch any control parts not ment...

Page 3: ...Trouble shooting 14 This manual is designed to be used as a quick start guide alongside the informative general user interface GUI of the DVR Additional details of the subjects covered may be found wi...

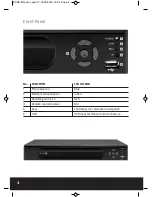
Page 4: ...2 Network connection on Green 3 Recording status on Red 4 Remote control receiver N A 5 Keys Control keys for main menu navigation 6 USB USB input for Mouse control or back up 1 2 3 4 6 5 Front Panel...

Page 5: ...ET LAN Network Interface 9 USB USB interface 10 OFF ON Power switch 11 RS485 RS485 Interface 12 DC 12V 12V Power Input from power supply NB To obtain best quality on screen display It is highly recomm...

Page 6: ...h in the real panel must be turned off The system time must be checked regularly If the time is not correct you must replace the battery we recommend replacing the battery every year and using the sam...

Page 7: ...Hard disk management password settings network settings Info Hard Drive status system usage log version details Making a recording RECORD CONFIGURATION This section allows you to configure the record...

Page 8: ...nywhere in the picture then move the mouse in any direction to create a selection window Once you are happy with the selection window release the left click and then left click again within the create...

Page 9: ...DVR can detect movement changes in the images being captured via detection it s own software Each channel can be configured to create alarm events via on screen movement Enable The area of detection...

Page 10: ...can be provided by your internet service provider or IT support Includes opportunity to enter forwarded Port number for mobile device viewing GUI Display Settings for how the on screen information is...

Page 11: ...to the DVRs IP address avoid using port 80 two are for PC viewing the third is for mobile phone viewing This port is entered in the Net Service area if your mobile phone supports this The best APP at...

Page 12: ...this is the first time you have connected to your DVR from this PC it will take 4 5 minutes to load Step 2 Login enter user s name and password the default Administrator User ID is admin and the passw...

Page 13: ...k and type in what is my IP Any of the top search results will take you to a website which will display your External IP address The first time you connect to the DVR from a new remote PC a security w...

Page 14: ...tection is set 4 The hardware of the DVR is damaged 5 No cameras connected 6 No power to connected cameras Real time image problems such as the image color or the brightness distortion Possible reason...

Page 15: ...tion is set 5 The user has no surveillance to view 6 The real time image of the hard disk recording machine itself is not clear Network connection is not stable Possible reasons are as followed 1 Netw...

Page 16: ...Elite Security Products Unit 7 Target Park Shawbank Rd Lakeside Redditch B98 8YN Telephone 01527 515150 email info espuk com DVR4i Manual_Layout 2 01 05 2013 14 35 Page 16...

Reviews: