MAGPRO16 Addressable Fire Alarm Panel – Installation and Programming Manual
45
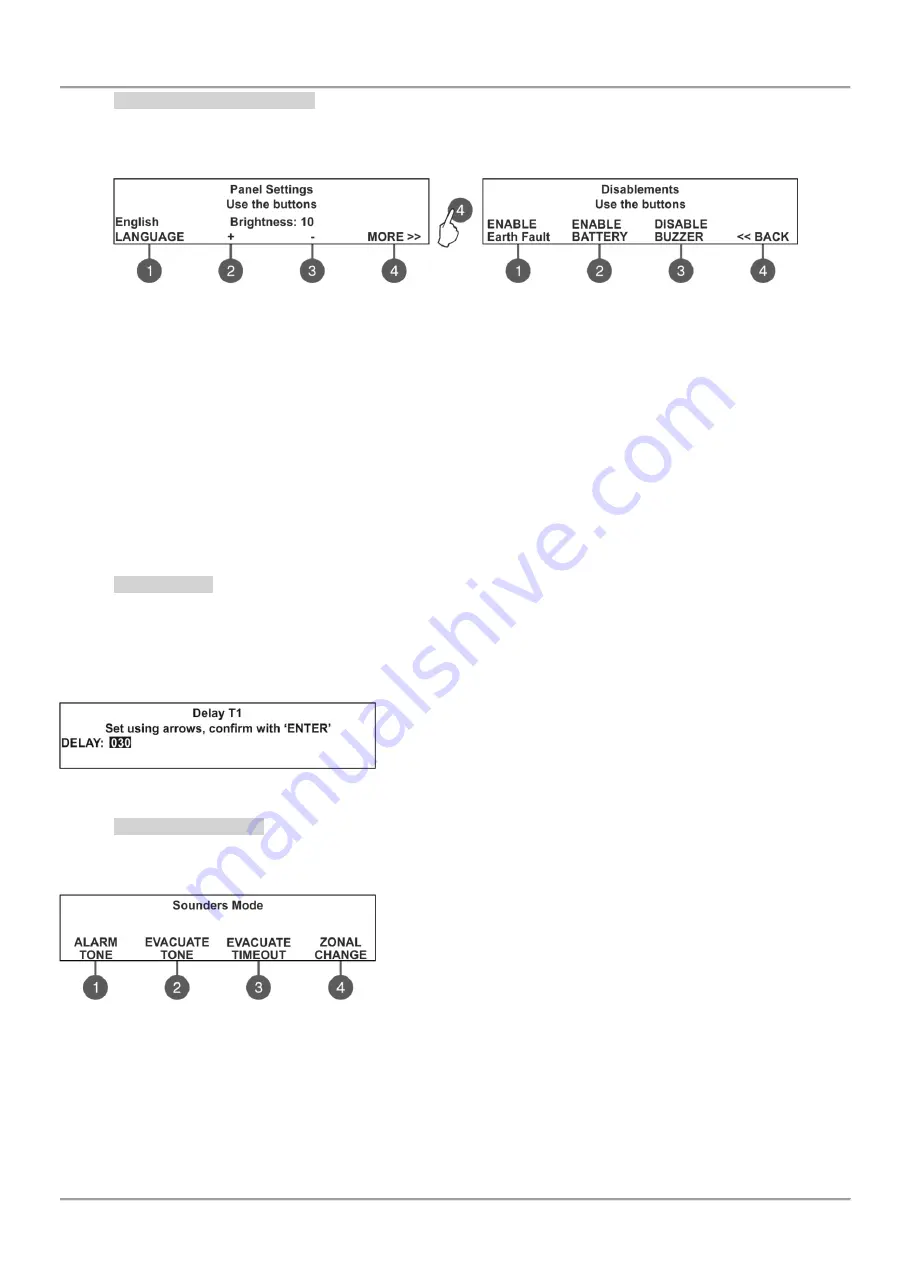
7.6.4 Panel General Settings
In this submenu the installer can make some adjustments for the panel performance.
To access the PANEL SETTINGS submenu, enter in the
installer’s menu - 6. GENERAL SETTING - 6.4) PANEL
SETTINGS. The screen displays:
7.6.5 Delay
Т1
In this submenu the installer sets the time to Delay T1. T1 is the time delay needed for reaction of the security
personnel on the protected site. T1 provides a time delay for the personnel to go to the zone in fire alarm and to check
the situation. The operation of time delays T1 and T2 are described with the algorithm below.
To access the DELAY T1 submenu, enter in the
installer’s menu - 6. GENERAL SETTING - 6.5) DELAY T1. The
screen displays:
Use the up and down arrows to set the delay T1. The time interval is
in range 0 - 60 sec.
Confirm the settings with ‘ENTER’ button.
7.6.6 Sounders Mode
In this submenu the installer sets the sounders operation mode.
To access the SOUNDERS MODE submenu, enter in the
installer’s menu - 6. GENERAL SETTING - 6.6) SOUNDERS
MODE. The screen displays:
Use the functional buttons to set:
(1)
– Set the alarm type sound. Enter the submenu and use the up/
down arrow buttons to select a number from 1 to 32 for the alarm
sound
– the reference parameters for the selected sound are listed
on the last row of the screen.
(2)
– Set the evacuation type sound. Enter the submenu and use the
up/ down arrow buttons to select a number from 1 to 32 for the
evacuation sound
– the reference parameters for the selected sound are listed on the last row of the screen.
(3)
– The button is active only in ZONAL operation mode. The EVACUATION TIMEOUT is a time delay until
evacuation of the site. Enter the submenu and use the up/ down arrow buttons to set a DELAY time from 0 to 10
minutes. In a fire situation only the sounder of the zone(s) with alarm condition will be activated. After the set
evacuation timeout delay is over the sounders in the whole site are activated also.
(4)
– Press to change the sounders operation mode.
•
Common
- All sounders will be activated with no sense of zone to which they are connected.
•
Zonal
- Only the sounder of the zones with alarm condition will be activated.
Confirm the settings with ‘ENTER’ button.
Use the functional buttons to set:
(1) LANGUAGE
- Press to set the language. Every
pressing of the button changes the currently used
language for the menus.
(2) + Brightness
- Press to increase the brightness
of the screen back light. The maximum value is 20.
(3) - Brightness
- Press to decrease the brightness
of the screen back light. The minimum value is 0.
(4) MORE>>
- Press to switch to other panel
settings.
Confirm all settings with pressing ENTER button.
Use the functional buttons to set:
(1) Earth Fault
- Press to enable/ disable the Earth Fault
indication. When the Earth Fault indication is enabled you
have to set a jumper to Earth Fault terminals on the control
panel PCB.
(2) BATTERY
- Press to enable/ disable the Accumulator
Battery Fault Indication. When the Accumulator Battery
Fault Indication is enabled the panel will monitor the
internal battery resistance Ri. In normal operation Ri<0.3Ω.
If Ri>0
.3Ω, the panel will alert for Battery fault with
message in Faults menu ‘Battery High Resistance’. The
installer has to change the accumulator battery with new.
(3) BUZZER
– Press to enable/ disable the buzzer
signalization.
(4) << BACK
- Press to switch back to previous settings.
Confirm all settings with pressing ENTER button.


