background image


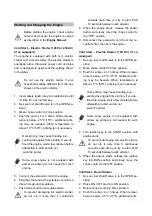
Starting and Stopping the Engine 


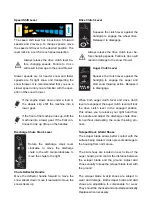
Before starting the engine, check engine 

oil level and ensure the engine is served 

as described in the 

Engine Manual


Cold Start – Electric Starter (120V or 230 AC) 

(if so equipped) 

The engine is equipped with both A.C. electric 

starter and a recoil starter. The electric starter is 

equipped with a three-wire power cord and plug 

and is designed to operate at the voltage shown 

in the label. 


Do not use the electric starter if your 

household voltage different from the one 

shown on the electric starter. 


1.  Insert safety ignition key into ignition slot until 

it clicks. Do not turn the key. 

2.  Be sure fuel shutoff valve is in the OPEN po-

sition. 

3.  Move choke control to FULL position. 

4.  Push the primer 2 or 3 times. When temper-

ature is below -25

 o

C (15

o

F), additional prim-

ing may be needed. When temperature is 

above 10

 o

C (50

o

F), priming is not necessary. 


Over priming may cause flooding, pre-

venting the engine from starting. If you do 

flood the engine, wait a few minutes before 

attempting to start and do not 

push the primer.   


Some snow engine is not equipped with 

primer as priming is not needed for such 

engine.  


5. Connect 

the 

extension cord to the engine. 

6.  Plug the other end of the extension cord into a 

three-hole ground receptacle. 

7.  Push starter button until engine starts. 

To prevent damaging the electric starter, 

do not run it more than 5 continuous 

seconds each time you try to start. Wait 

10 seconds between each attempt.   

8.  When the engine starts, release the starter 

button and slowly move the choke control to 

the “OFF” position. 

9.  Disconnect the extension cord from the re-

ceptacle first, then from the engine. 


Cold Start – Electric Starter (12V DC) (if so 

equipped) 

1.  Be sure fuel shutoff valve is in the OPEN po-

sition. 

2.  Move choke control to FULL position.   

3.  Push the primer 2 or 3 times. When temper-

ature is below -25

 o

C (15

o

F), additional prim-

ing may be needed. When temperature is 

above 10

 o

C (50

o

F), priming is not necessary. 


Over priming may cause flooding, pre-

venting the engine from starting. If you do 

flood the engine, wait a few minutes before 

attempting to start and do not 

push the primer.   


Some snow engine is not equipped with 

primer as priming is not needed for such 

engine.  


4.  Turn ignition key to the START position until 

engine starts.   

To prevent damaging the electric starter, 

do not run it more than 5 continuous 

seconds each time you try to start. Wait 

10 seconds between each attempt.   

5.  When the engine starts, release the ignition 

key into RUN position and slowly move the 

choke control to the OFF position. 


Cold Start – Recoil Starter 

1.  Be sure fuel shutoff valve is in the OPEN po-

sition. 

2.  Place ON / OFF switch in ON position. 

3.  Rotate choke control to FULL position. 

4.  Push the primer 2 or 3 times. When temper-

ature is below -25

 o

C (15

o

F), additional prim-

Summary of Contents for XTP120

Page 1: ...eiden k nn s HUOMIO Lue k ytt ohjeet huolellisesti ennen laitteen k ytt ja noudata kaikkia annettuja ohjeita S ilyt ohjeet my hemp tarvetta varten ISOJOEN KONEHALLI OY Keskustie 26 61850 Kauhajoki As...

Page 2: ...a huomautuksia Lumilingon monipuoliset toiminnot tekev t ty st si nopeamman ja helpomman Turvallisuus suori tuskyky ja luotettavuus ovat olleet etusijalla t m n koneen kehitt misess mik tekee siit hel...

Page 3: ...neesi Vain oikein koulutettu aikuinen saa k ytt ko netta ei koskaan lapset On t rke ett luet k ytt ohjeen ja ymm rr t sen sis ll n ja koneeseen kiinnitettyjen tarrojen merkityksen Opettele sen k ytt s...

Page 4: ...urkottele liian pitk lle l k yt konetta pal jain jaloin tai avosandaalit jalassa K yt jalkineita jotka suojaavat jalkojasi ja joilla on tukeva astua liukkaille pinnoille Seiso tukevasti ja s ilyt tasa...

Page 5: ...veden l mmittimen kuivausrummun tai kaasulaitteen kanssa Anna moottorin j hty ennen laitteen sulkemista varastoon Koneen k ytt ja hoito l nosta tai kanna konetta moottorin ollessa k ynniss l k yt kon...

Page 6: ...a ja jalkak yt vill Tarkasta ty stett v alue huolellisesti Poista kaikki ovimatot sanomalehdet kelkat laudat johdot ja muut vieraat esineet ty alueelta joita lumikierukka voisi singota ymp rilleen Tar...

Page 7: ...ota kunnes lumikierukka on t ysin py s htynyt ennen kuin puhdistat poistokourun tu koksia tai teet mit tahansa s t j tai tarkastuk sia K sikosketus poistokourun sis puolella olevan py rivien osien kan...

Page 8: ......

Page 9: ...t ohjauspaneelin reikien l pi Varmista ett ovat rullaohjaimessa asianmukai sesti kun ne kiinnitet n vaihdevipuihin Nopeudens t vipu Poista nuppi ja liu uta vaihdevipu ohjauspanee lissa olevan aukon l...

Page 10: ...paturmaan Katso suo siteltu rengaspaine renkaan laidasta Pid renkaiden paine aina samana Jos paine ei ole sama molemmassa ren kaassa ei kone ehk kulje suoraan ja kaavinlevy voi kulua ep tasaisesti Pid...

Page 11: ...itukseen S ilyt niit var massa paikassa Vararullatapit Siipipy r on kiinnitetty siipipy r n akseliin rulla tapeilla Kaksi 6x37 rullatappia siipipy r lle on toimitettu varaosana laitteistopussissa S il...

Page 12: ...akku telineeseen 5 Liit plus kaapeli punainen akun liittimeen ensin ja sitten negatiivinen musta akku kaapeli Tarkasta ett kaikki kaapeliliitokset ovat pit v t 6 Asenna akkukansi ja kirist ruuvi ja m...

Page 13: ......

Page 14: ...untaamiseksi yl s K ytt kytkimen vipu Purista kytkinvipu kahvaa vasten vetopy r n kytkemiseksi P st irti vapauttaaksesi Vapauta k ytt kytkin aina ennen nopeuden vaihtamista Muussa tapauksessa t m voi...

Page 15: ...u on kiinnitetty k tev sti lumi kierukan kotelon taakse kiinnityspidikkeell Jos k yt n aikana poistokouruun juuttuu lunta tai j t puhdista poistokouru ja kourun aukko seu raavasti 1 Vapauta lumikieruk...

Page 16: ...varusteena Asenna avain virtalukkoon moottorin k ynnist miseksi Pys yt moottori ottamalla virta avaimen pois virtalukosta ON OFF virtakytkin jos varusteena K ytet n moottorin pys ytt miseen Siirr kytk...

Page 17: ...r liukukeng t haluttuun asentoon 2 Varmista ett liukukeng n koko pohjapinta on maata vasten sill muutoin liukukeng t ku luvat ep tasaisesti 3 Kirist mutterit ja pultit huolellisesti Lumikierukan ja ve...

Page 18: ......

Page 19: ...l paina rikastinta Kaikki lumilinkoja ei ole varustettu rikasti mella koska kyseinen moottori ei tarvitse sit 4 Pid virta avainta START asennossa kunnes moottori k ynnistyy S hk k ynnistyksen vaurioi...

Page 20: ...id moottori puhtaana lumesta k yt n aikana Moottorin ilmavirtaus paranee ja k ytt ik pite nee T RKE On suositeltavaa k ytt moottoria linkoamisen j lkeen muutaman minuutin ajan ennen sammuttamista jott...

Page 21: ......

Page 22: ......

Page 23: ...eta kansi sivuun 3 Irrota hihna seuraavasti a Rullaa lumikierukan hihna pois moottorin hihnapy r lt b K nn hihnapy r oikealle kireyden alentamiseksi c Nosta k ytt hihna pois moottorin hihnapy r lt 4 K...

Page 24: ...kourun kampi takaisin paikoilleen Kitkapy r n vaihto Mik li lumilinko ei toimi vetopy r n kytkimen ol lessa kytkettyn p lle suorita vetopy r n kyt kimen vaijerin s t ongelman korjaamiseksi Mik li onge...

Page 25: ...kier ros ennen py r n k nt mist my t p i v n ja uuden ruuvin kirist mist Toista t t toimenpidett useita kertoja ja varmista ett levyt on kiinnitetty samanlaisella voi malla 90 130 N m 4 Liu uta kitkap...

Page 26: ...asentoon 6 Kytke ja kirist sytytystulpan johto kiinni 7 T yt puhtaalla tuoreella bensiinill 8 Puhdista s d k rkiv li tai vaihda tulppa 9 Aseta virta avain 10 Lis tai tyhjenn ljy moottorin kampikammio...

Page 27: ...lumen poistami seen 8 Liian suuri lumim r 9 Yritet n lingota eritt in raskasta tai m rk lunta 10 Lumikierukka on j tynyt paikal leen 1 Puhdista poistokouru 2 Poista roskat tai vieraat esineet lumi kie...

Page 28: ...visning OBS L s noggrant igenom bruksanvisningen innan du anv nder maskinen och f lj alla angivna instruktioner Spara instruktionerna f r senare behov ISOJOEN KONEHALLI OY Keskustie 26 61850 Kauhajoki...

Page 29: ......

Page 30: ......

Page 31: ...r och anv nd maskinen med sunt f rnuft Undvik onormala kroppsst llningar Anv nd inte maskinen n r du r barfota eller b r sandaler eller liknande l tta skor B r skyddande skor som skyddar f tterna och...

Page 32: ...ndningsk llor s som varmvattenberedare pannor kl dtorkar eller liknande L t motorn kallna innan maskinen st lls undan till f rvaring Maskinens anv ndning och sk tsel Lyft eller b r aldrig en maskin me...

Page 33: ...ller kantstenar Inspektera arbetsomr det noggrant H lla ar betsomr det rena och fria fr n leksaker d rrmat tor tidningar k lken br dor vajrar och andra fr mmande f rem len vilka skulle kunna tippas ve...

Page 34: ...bakom handtagen V nta tills sn skruven stannat helt innan du rensar en blockerad utkastare eller utf r n gra justeringar eller inspektioner H nderna i kontakt med roterande delar i utkas tare r den v...

Page 35: ......

Page 36: ...axeln 5 L t styrkablarna glida genom h let p kon trollpanelen Kontrollera att kablarna har monterats p rullf ringen ordentligt n r de ansluts till v xelspakarna Hastighetsreglage Avl gsna knappen och...

Page 37: ...ka att d ck f lj hopps ttning brister med kraft och orsa kar allvarliga skador Se fr n sidopl ten om det rekommenderade trycket p d cken S kerst ll att lufttrycket i d cken alltid r korrekt Om trycket...

Page 38: ...p s ker plats tills dem beh vs Reserv sp nnstiftar Impeller r f stad p impelleraxel med sp nnstif tar Tv 6x37 sp nnstiftar f r impeller finns med som reservdelar i tillbeh rsp sen F rvara dessa p s k...

Page 39: ...ningen 5 Anslut den positiva r d batterikabel f rst p batteriet sedan den negativa svart batteri kabeln Kontrollera att batterikopplingar r ordentligt fastdragna 6 Montera locket till batteriet och dr...

Page 40: ......

Page 41: ...tt koppla in hjulens drivning Frisl pp spaken Frisl pp alltid kopplingen f re v xelbyte Om man inte g r detta resulterat det att sn slungan skadas Kopplingsspak f r sn skruven F r sn skruvens kontroll...

Page 42: ...och ppningen s kert p f ljande s tt 1 Frikoppla kopplingen f r sn skruv och st ng av motorn 2 Ta loss reng ringsverktyget fr n h llaren p inmatningsk pan 3 Ta ett stadigt grepp p handtaget och skjuta...

Page 43: ...gsna nyckeln ON OFF brytare om utrustade med Anv nds f r att st nga av motorn St lla brytaren p OFF l ge f r att st nga av motorn St lla brytaren p ON l ge f r att starta och k ra mo torn Startl set 1...

Page 44: ...f r att undvika oj mnt sli tage om medar 3 Dra fast muttrar och skruvar ordentligt Koppling f r utkastare och drift N r kopplingsspak f r utkastaren eller drift r fri kopplade och i fril ge kan kabeln...

Page 45: ......

Page 46: ...ggspump eftersom till ggspumpning inte r beh vlig p dessa motorer 4 Vrida startnyckeln till START l ge tills motorn startar F r att f rhindra skador p elstart k r den inte mer n 5 sekunder i str ck va...

Page 47: ......

Page 48: ...rhindra kortslutningen lossa d refter den positiva r d batterikabel 3 Ta ut batteri ur h llaren 4 Avl gsna korrosion ur batteripolar och ka belskor med en st lborsta tv tta sedan med en l tt bakpulver...

Page 49: ......

Page 50: ...ller skyddet f r remmen och st lla skyddet till sidan 3 Demontera remmen enligt f ljande a Rulla ut remmen ur drivhjulen med motor avst ngd b Trycka v ndhjulen mot h ger f r att frisl ppa sp nningen c...

Page 51: ...sn skruv och ramen 8 Placera remmen ar p remskivan or p motorn Byte av friktionshjulen Om sn slungan slutar driften trots att kopplingen r tillkopplade och justeringen av styrkabeln hj lper inte f r p...

Page 52: ...medsols och fort s tta med det n sta skruven p andra si dan av hjulen Upprepa denna process flera g nger f r att garantera att plattorna blir tdragna j mnt med ett moment av 90 Nm och 130 Nm 4 F r in...

Page 53: ...glaget till FAST l ge eller ON OFF brytaren p ON l gen 6 Ansluta och f sta t ndstiftskabeln 7 Fyll tanken med ren f rsk bensin 8 Reng r justera gnistgapet eller byt mot en ny 9 S tta in startnyckeln 1...

Page 54: ...rs ket att r ja mycket tungt eller bl t sn 10 Sn skruven har frusit fast 1 Avl gsna blockeringen ur utkasta ren 2 Avl gsna skr p eller fr mmande f rem len fr n sn skruven eller impellern 3 Justera st...

Page 55: ...OTE Read the instruction manual carefully before using the machine and follow all given instructions Save the instructions for further reference ISOJOEN KONEHALLI OY Keskustie 26 61850 Kauhajoki As Fi...

Page 56: ......

Page 57: ......

Page 58: ...part of the machine may result in personal injury Stay alert watch what you are doing and use common sense when operating the machine Do not overreach Do not operate the machine while barefoot or when...

Page 59: ...spark open flame or other sources of ignition such as a water heater furnace clothes dryer and the like Allow the engine to cool before storing in any en closure Machine use and care Never pick up or...

Page 60: ...mes are dangerous Always check overhead and side clearances carefully before operation Always be aware of traffic when operating along streets or curbs Thoroughly inspect the area to be worked Keep th...

Page 61: ...control levers and stop engine be fore you leave the operating position behind the handles Wait until the auger comes to a com plete stop before unclogging the chute assembly making any adjustments o...

Page 62: ......

Page 63: ...es are at the same height and then tighten all the fasteners securely 4 Slide the wheels on the axle and insert each axle pin through the hole in each wheel hub and through the hole in the axle 5 Slid...

Page 64: ...th the flat washer and clevis pin Tires The tires are over inflated at factory for shipping purposes Check the pressure in the tires Re duce or Increase equally in both tires to the man ufacturer s re...

Page 65: ...le Be sure both skid shoes are adjusted evenly Tighten securely Chute Clean Out Tool Fasten the clean out tool to the mounting clip on the rear of the auger housing Replacement Shear Pins Pair of repl...

Page 66: ...the tray 3 Attach the tray to the auger housing with screws and nuts 4 Replace battery on the tray 5 Connect positive red battery cable to the battery terminal first and then negative black battery c...

Page 67: ...KNOW YOUR MACHINE Features and Controls NOTE Some of these parts are not standard accessories so they might be missing from the Snow thrower model you have purchased...

Page 68: ...snow stream up Drive Clutch Lever Squeeze the clutch lever against the handgrip to engage the wheel drive Release it to disengage Always release the drive clutch lever be fore changing speeds Failure...

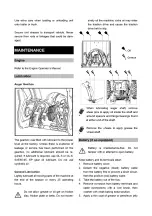
Page 69: ...ve stopped before unclogging The chute clean out tool is conveniently fastened to the rear of the auger housing with a mounting clip Should snow and ice become lodged in the discharge chute during ope...

Page 70: ...oke to start a warm engine Never use choke to stop engine Primer Press the primer to additional fuel from the car buretor to the cylinder for improved cold weather starting Recoil Starter The recoil s...

Page 71: ...snow thrower and surrounding property If you choose to operate the snow thrower on a gravel surface use extra caution and keep the skid shoes in position for maximum clearance between the ground and t...

Page 72: ......

Page 73: ...tarts To prevent damaging the electric starter do not run it more than 5 continuous seconds each time you try to start Wait 10 seconds between each attempt 8 When the engine starts release the starter...

Page 74: ...this time the snow is usually dry and has not been exposed to the direct sun and warming temperatures Slightly overlap each successive path to ensure all snow will be removed For large areas start tin...

Page 75: ......

Page 76: ......

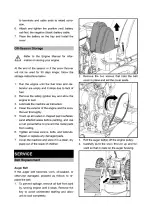
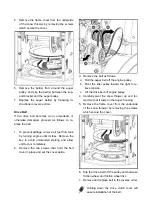
Page 77: ...unintended starting and allow unit to cool completely 2 Remove the two screws that hold the belt cover in place and set the cover aside 3 Remove the belt as follows a Roll the auger belt off the engi...

Page 78: ...olding down the auger clutch lever will ease reconnection of the auger housing and frame 8 Place belt s onto engine sheave s 9 Reinstall the chute crank lever Friction Wheel Replacement If the snow th...

Page 79: ...aft 8 Follow the previous steps in reverse order to reassemble If you only want to replace the rubber ring pro ceed as follows 1 Remove the eight screws which secure the friction wheel s side plates t...

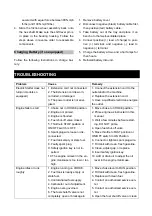
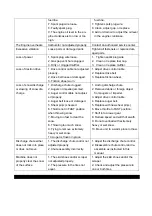
Page 80: ...et Engine fails to start 1 Choke not in CHOKE position 2 Engine not primed 3 Engine is flooded 4 Fuel shut off valve closed 5 Throttle in STOP position or ON OFF switch is OFF 6 Spark plug wire loose...

Page 81: ...ger control cable not adjust ed properly 4 Auger belt loose or damaged 5 Shear pin s sheared 6 Throttle not in FAST position when throwing snow 7 Moving too fast to clear the snow 8 Throwing too much...

Page 82: ......

Page 83: ......

Page 84: ......

Reviews: