background image

V.3.0

15

installation of wall plate

your product

V.3.0

Operating instructions

5

Operating instructions

BEFORE INSTALLING THIS PRODUCT, IT IS IMPORTANT TO READ AND UNDERSTAND THE 
INSTALLATION INSTRUCTIONS COMPLETELY IN ORDER TO AVOID PHYSICAL INJURIES AND 
MATERIAL DAMAGE. KEEP THESE INSTALLATION INSTRUCTIONS IN A PLACE WHICH IS EASILY 
ACCESSIBLE SO YOU CAN CONSULT THEM AT A LATER DATE.

The safety instructions must be followed throughout the installation of this product. User safety 
equipment and suitable tools for installation in order to avoid physical injury.

• 

This appliance is intended for domestic use only 
inside a dwelling place. Only use the appliance as 
indicated in these operating instructions. 

• 

If the product were to be sold or given to another 
person, make sure that the operating instructions 
are passed on with it and that no parts are defective.

• 

This wall mount bracket is able to support a 
maximum load of 45 kg for screens with a diagonal 
measurement of 32” (82 cm) to 75” (190 cm) 
maximum. Ensure that the wall structure can 
support such a load.

• 

The weight of the screen must not exceed the 
maximum load capacity of the bracket.

• 

It is essential that you follow a correct installation 
procedure. This must be carried out by two 
qualifi ed people. Non-compliance with the installation 
instructions may lead to severe physical injury, linked 
to falling or incorrect handling of the screen.

• 

Do not install the bracket on a structure which is 
subject to vibrations, movement or which may be 
subject to impacts. Non-compliance may lead to 
the screen being damaged or the surface of the 
bracket being damaged.

• 

Do not install the bracket in a place of passage in 
order to avoid knocks and injuries (above a bed, a 
chair, a door or in a corridor…).

• 

Do not install the bracket near heating, a fi replace, 
direct sunlight, air-conditioning or other sources of 
direct heat.

• 

Non-compliance may lead to the screen being 
damaged and may increase the risk of fi re.

• 

Do not install the bracket in a very damp environment.

• 

One month after installation, check that all the 
screws are tight and that the wall plate has been 
correctly attached to the wall. Stability may be 
reduced once the TV is attached to the bracket. 

• 

Please note: Please check that no electric cables, 
gas or water pipes are behind the wall onto which 
you wish to fi x your bracket!

• 

Stability may be reduced if the bracket is attached 
to an item of furniture. 

• 

Check the position of the electric cables when you 
install or handle the wall bracket, in order to avoid 
any pinching or deterioration of the cables.

• 

The screw fi xings supplied with this wall bracket 
are intended exclusively for fi xing to a wall made 
up of solid bricks or concrete.

• 

For installation on any other medium (wood, hollow 
bricks, plasterboard surfaces, steel…) please 
contact an approved professional installer, and use 
the appropriate equipment.

• 

Before beginning installation, please check the 
composition of your wall. Do not install the bracket 
on old or badly sealed brickwork, on a plasterboard 
surface or wood panelling.

• 

Keep children away from the installation and 
ensure that they cannot play with the appliance 
subsequently.

• 

The packaging material (packaging paper, 
polystyrene) can be dangerous for children: there 
is a risk of suffocation. Do not leave packaging 
material within reach of children!

6

V.3.0

installation of wall plate

installation of wall plate

Begin by positioning the drilling template against the wall using the 
provided spirit level to keep it straight. 
Use adhesive or drawing pins to hold the template against the wall 
while you drill six holes which will be used to attach the bracket. 

The screw fi xings supplied with this wall bracket are intended exclusively for fi xing to a 
wall made up of solid bricks or concrete. Please use all types of screws (depending on the 
type of wall) for fi xing. 
For installation on any other medium, please contact an approved professional installer, 
and use the appropriate equipment

10mm

60mm

Drill the holes with an electric drill and a 10 mm concrete bit.
Remove the template and place to one side.

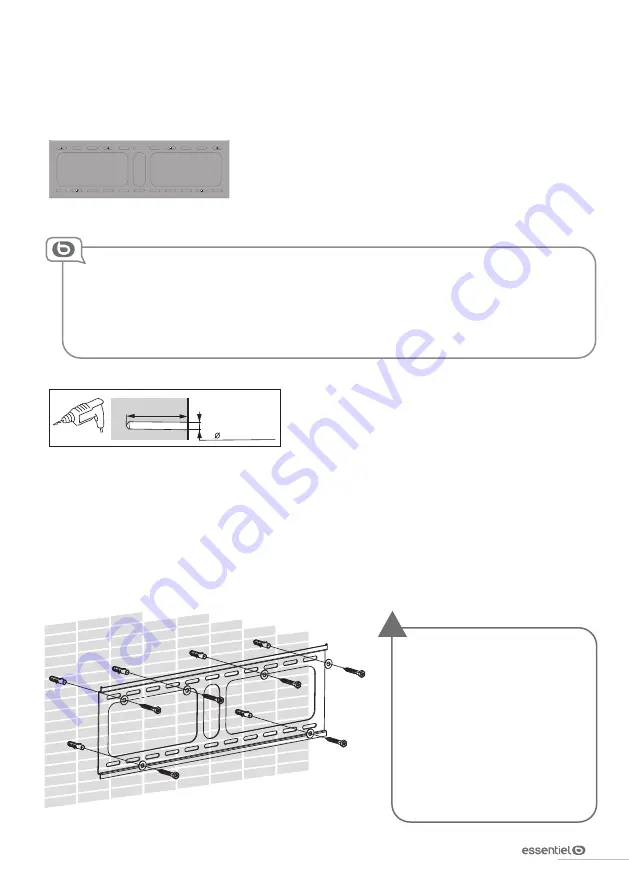
Insert a concrete rawl plug in each hole. If necessary, you can use a hammer to lightly tap each rawl 
plug, so they are at the same level as the wall. Once the rawl plugs are in place, position the wall plate. 
Attach the washers and then the lag screws into the rawl plugs which project slightly from the wall, as 
indicated in the diagram below.

• 

Do not tighten completely until all 
the screws are in place.

• 

Do not overtighten the screws. This 
can damage the wall needlessly.

• 

Do not release the wall bracket 
before it is firmly attached to 
the wall.

!

Summary of Contents for 8000790

Page 1: ...ions To help you make the most of your purchase Bedienungsanleitung Damit Sie an Ihrem Gerät lange Freude haben Notice d utilisation Pour vous aider à bien vivre votre achat Manual de instrucciones Para ayudarle a disfrutar de su compra Handleiding Om u te helpen zo veel mogelijk te genieten van uw aankoop ...

Page 2: ...4 rond 4 vis métal M5x12 4 vis métal M5x30 4 vis métal M6x12 4 vis métal M6x35 4 vis métal M8x16 4 vis métal M8x40 Sachet 1 Sachet 2 Sachet 3 Sachet 4 Sachet 5 Sachet 6 4 entretoises M8 8 4 vis métal M8x45 Quatre sachets de vis de tailles différentes de 1 à 4 sont fournis afin de sélectionner la visserie requise pour votre téléviseur En effet peu de téléviseurs sont fournis avec le matériel de mon...

Page 3: ...votre produit 3 V 3 0 Outils nécessaires non fournis Dimensions Dimensions totales du support 633 mm x 430 mm 430 mm 205 mm 633 mm 600 mm Max 400 mm ...

Page 4: ...SA 100 x 100 200 x 200 200 x 300 300 x 300 400 x 200 400 x 300 400 x 400 600 x 400 Poids maximum 45 kilos Diagonale d écran 32 75 82 cm 190 cm Écart mur écran 16 mm Nombre conseillé de personne pour l installation 2 Temps approximatif d installation 30 minutes ...

Page 5: ...port N installez pas le support dans un lieu de passage afin d éviter les chocs et les blessures au dessus d un lit d une chaise d une porte dans un couloir N installez pas le support près d un chauffage d une cheminée de la lumière directe du soleil de l air conditionné ou de toutes autres sources de chaleur directe Le non respect peut entraîner l endommagement de l écran et peut augmenter le ris...

Page 6: ... veuillez contacter un installateur professionnel agréé et utiliser du matériel approprié 10mm 60mm Percez les trous en utilisant une perceuse électrique et une mèche à béton de 10 mm Décollez le gabarit et mettez le de coté Insérez une cheville à béton dans chaque trou Si nécessaire vous pouvez utiliser un marteau pour taper légèrement sur chaque cheville afin qu elles soient au même niveau que l...

Page 7: ...la profondeur du point de montage nous vous conseillons d utiliser les combinaisons de visserie suivantes vis rondelle 1 2 ou 3 entretoises M4x30 ou M5x30 12 ou M5x12 12 ou M5x12 M6x12 ou M8x16 M6x35 ou M8x40 12 ou M5x12 Vis métal M4x12 ou Vis métal M5x12 Vis métal M4x30 ou Vis métal M5x30 Vis métal M6x12 ou Vis métal M8x16 Vis métal M6x35 ou Vis métal M8x40 ou Vis métal M8x45 30 Rondelles M4 M5 R...

Page 8: ...n dos incurvé ou un point de montage encastré une entretoise doit être utilisée Choisissez l entretoise qui est la plus proche de la profondeur de l encastrement afin de garder le support aussi près de l écran que possible Placez l entretoise entre le bras fixe et l écran Utilisez les rondelles fournies avec les vis M4 M5 pour assurer une stabilité optimale Attachez chaque bras à l écran en aligna...

Page 9: ...istinctement un clic signifiant que le téléviseur est bien en place et parfaitement maintenu Haut Bas Si elles sont toujours visibles une fois repliées sectionnez les extrémités à l aide d une paire de ciseaux avant de les replier Pensez à conserver une longueur suffisante de languette afin de garder la possibilité d ôter le téléviseur de son support ultérieurement Lorsque le téléviseur est correc...

Page 10: ...vez le pour le retirer complètement entretien et nettoyage Veuillez vérifier que les vis soient correctement fixées tous les 2 mois Au moindre doute quant à l installation contactez votre installateur professionnel Toutes les informations dessins croquis et images dans ce document relèvent de la propriété exclusive de SOURCING CREATION SOURCING CREATION se réserve tous les droits relatifs à ses ma...

Page 11: ...ses M8 8 4 vis métal M8x45 Four bags of screws of different sizes from 1 to 4 are provided so you can select the screws required for your TV In fact few TV sets are supplied with the assembly kit included if screws are supplied with the TV set they are generally found in the holes on the back of the TV set If the length and the diameter of the mounting screws required by the TV set are not known t...

Page 12: ...12 V 3 0 your product your product 3 V 3 0 Necessary tools not provided Dimensions Total dimensions of the bracket 633 mm x 430 mm 430 mm 205 mm 633 mm 600 mm Max 400 mm ...

Page 13: ...SA standards 100 x 100 200 x 200 200 x 300 300 x 300 400 x 200 400 x 300 400 x 400 600 x 400 Maximum weight 45 kilos Diagonal of screen 32 75 82 cm 190 cm Wall screen distance 16 mm Number of people advised for installation 2 Approximate installation time 30 minutes ...

Page 14: ...amaged or the surface of the bracket being damaged Do not install the bracket in a place of passage in order to avoid knocks and injuries above a bed a chair a door or in a corridor Do not install the bracket near heating a fireplace direct sunlight air conditioning or other sources of direct heat Non compliance may lead to the screen being damaged and may increase the risk of fire Do not install ...

Page 15: ...tion on any other medium please contact an approved professional installer and use the appropriate equipment 10mm 60mm Drill the holes with an electric drill and a 10 mm concrete bit Remove the template and place to one side Insert a concrete rawl plug in each hole If necessary you can use a hammer to lightly tap each rawl plug so they are at the same level as the wall Once the rawl plugs are in p...

Page 16: ... the depth of the mount point we advise you to use the following combinations of screw fixings screws washers 1 2 or 3 spacers M4x30 ou M5x30 ou M5x12 ou M5x12 M6x12 ou M8x16 M6x35 ou M8x40 ou M5x12 M4 x 12 metal screws or M5 x 12 metal screws M4 x 30 metal screws or M5 x 30 metal screws M6 x 12 metal screws or M8 x 16 metal screws M6 x 35 metal screws or M8 x 40 metal screws or M8 x 45 metal scre...

Page 17: ...r screen If your screen has a curved back or a recessed mount point a spacer must be used Choose the spacer which is the closest to the depth of the recess in order to hold the bracket as close to the screen as possible Place the spacer between the fixed arm and the screen Use the washers provided with the M4 M5 screws for optimal stability Attach each arm to the screen aligning the holes in each ...

Page 18: ... the wall plate Then tilt the TV downwards You should hear a distinct click signifying that the TV is in place and firmly held Haut Bas If they are still visible when folded up cut the ends with scissors before folding up Remember to leave a cord of sufficient length to allow you to remove the TV from the bracket later When the TV is correctly positioned you can fold up the two cords to form a loo...

Page 19: ...owards you then lift it to remove it completely maintenance and cleaning Please check that the screws are correctly fixed every 2 months If you have the slightest doubt about the installation contact your professional installer All information designs drawings and pictures in this document are the property of SOURCING CREATION SOURCING CREATION reserves all rights to its brands designs and informa...

Page 20: ...entretoises M8 12 6 chevilles 10x50 4 ron 4 vis métal M4x12 4 vis métal M4x30 4 rond 4 vis métal M5x12 4 vis métal M5x30 4 vis métal M6x12 4 vis métal M6x35 4 vis métal M8x16 4 vis métal M8x40 Sachet 1 Sachet 2 Sachet 3 Sachet 4 Sachet 5 Sachet 6 4 entretoises M8 8 4 vis métal M8x45 ...

Page 21: ...V 3 0 21 1 niveau à bulle ndelles frein M4 delles frein M5 4 rondelles frein M6 4 rondelles frein M8 430 mm 205 mm 633 mm 600 mm Max 400 mm ...

Page 22: ...22 V 3 0 ...

Page 23: ...V 3 0 23 ...

Page 24: ...24 V 3 0 10mm 60mm M4x1 M4x1 M4x1 M4x30 ou M5x3 M4x12 ou M5x12 M4x12 ou M5x12 M6x12 ou M8x16 M6x35 ou M8x40 M4x12 ou M5x12 Haut Bas ...

Page 25: ...V 3 0 25 M4x30 ou M5x30 12 ou M5x12 12 ou M5x12 M6x12 ou M8x16 M6x35 ou M8x40 12 ou M5x12 30 Haut Bas Optio Haut Bas Haut Bas Option t ...

Page 26: ...26 V 3 0 X TV TV TV Possibilité de superposer 1 à 3 entretoises ...

Page 27: ...V 3 0 27 ...

Page 28: ...28 V 3 0 ...

Page 29: ...ind vier Beutel mit Schrauben in verschiedenen Größen 1 bis 4 um das geeignete Schraubmaterial für Ihren Fernseher auszuwählen In seltenen Fällen ist das Montagematerial bei Fernsehern im Lieferumfang enthalten wenn Schrauben enthalten sind befinden sich diese im Allgemeinen in den Löchern auf der Rückseite des Fernsehers Wenn Länge und Durchmesser der für den Fernseher benötigten Montageschrauben...

Page 30: ...30 V 3 0 ihr Produkt Ihr Produkt 3 V 3 0 Erforderliches Werkzeug nicht im Lieferumfang enthalten Maße Gesamtgröße der Halterung 633 mm x 430 mm 430 mm 205 mm 633 mm 600 mm Max 400 mm ...

Page 31: ...100 x 100 200 x 200 200 x 300 300 x 300 400 x 200 400 x 300 400 x 400 600 x 400 Maximale Belastbarkeit 45 kg Bildschirmdiagonale 32 75 82 cm 190 cm Mindestabstand Wand Bildschirm 16 mm Empfohlene Personenanzahl für die Installation 2 Geschätzte Installationsdauer 30 Minuten ...

Page 32: ...ühren Bringen Sie die Wandhalterung nicht an einem Durchgangsort an um Stöße und Verletzungen zu vermeiden oberhalb eines Bettes eines Stuhls einer Tür in einem Gang Installieren Sie die Halterung nicht neben einem Heizkörper einem Kamin einer Klimaanlage an einem Ort mit direkter Sonneneinstrahlung oder in der Nähe anderer direkter Wärmequelle Eine Nichtbeachtung kann zu Schäden am Gerät führen u...

Page 33: ...inen anerkannten Fachinstallateur und verwenden Sie geeignetes Material 10mm 60mm Verwenden Sie dafür eine elektrische Bohrmaschine und einen 10mm Betonbohrer Entfernen Sie die Schablone und legen Sie sie beiseite Stecken Sie einen Betondübel in jedes Loch Klopfen Sie gegebenenfalls die Dübel mit einem Hammer leicht in die Wand so dass sie nicht mehr hervorstehen Wenn die Dübel richtig stecken leg...

Page 34: ...nd Tiefe der Befestigungsstelle empfehlen wir folgende Schraubenkombinationen Schraube Unterlegscheibe 1 2 oder 3 Abstandshalter M4x30 ou M5x30 ou M5x12 ou M5x12 M6x12 ou M8x16 M6x35 ou M8x40 ou M5x12 Metallschraube M4x12 oder Metallschraube M5x12 Metallschraube M4x30 oder Metallschraube M5x30 Metallschraube M6x12 oder Metallschraube M8x16 Metallschraube M6x35 oder Metallschraube M8x40 oder Metall...

Page 35: ...mit geschwungener Rückseite oder eingebauten Montagepunkten muss ein Abstandshalter verwendet werden Entscheiden Sie sich für den Abstandshalter der möglichst genau zur Tiefe des Kastens passt damit sich die Halterung so nah wie möglich am Bildschirm befindet Platzieren Sie den Abstandshalter zwischen dem unbeweglichen Arm und dem Bildschirm Verwenden Sie die Unterlegscheiben mit den Schrauben M4 ...

Page 36: ...nten Sie müssen ein deutliches Klicken hören dies bedeutet dass der Fernseher korrekt eingerastet und am richtigen Platz ist Haut Bas Wenn die Enden auch nach dem Einklappen noch sichtbar sind kürzen Sie diese vor dem Einklappen mit einer Schere Lassen Sie die Lasche lang genug um den Fernseher später auch wieder aus der Halterung entnehmen zu können Wenn der Fernseher richtig positioniert ist kön...

Page 37: ...htig in Ihre Richtung heben Sie ihn dann an und nehmen Sie ihn komplett heraus Wartung Reinigung und Pflege Prüfen Sie alle zwei Monate dass die Schrauben korrekt angezogen sind Bei Fragen zur Montage Sie sich bitte mit einem Fachinstallateur in Verbindung Alle Informationen Zeichnungen Skizzen und Bilder in diesem Dokument sind ausschließliches Eigentum von SOURCING CREATION SOURCING CREATION beh...

Page 38: ...entretoises M8 12 6 chevilles 10x50 4 ron 4 vis métal M4x12 4 vis métal M4x30 4 rond 4 vis métal M5x12 4 vis métal M5x30 4 vis métal M6x12 4 vis métal M6x35 4 vis métal M8x16 4 vis métal M8x40 Sachet 1 Sachet 2 Sachet 3 Sachet 4 Sachet 5 Sachet 6 4 entretoises M8 8 4 vis métal M8x45 ...

Page 39: ...V 3 0 39 1 niveau à bulle ndelles frein M4 delles frein M5 4 rondelles frein M6 4 rondelles frein M8 430 mm 205 mm 633 mm 600 mm Max 400 mm ...

Page 40: ...40 V 3 0 ...

Page 41: ...V 3 0 41 ...

Page 42: ...42 V 3 0 10mm 60mm M4x1 M4x1 M4x1 M4x30 ou M5x3 M4x12 ou M5x12 M4x12 ou M5x12 M6x12 ou M8x16 M6x35 ou M8x40 M4x12 ou M5x12 Haut Bas ...

Page 43: ...V 3 0 43 M4x30 ou M5x30 12 ou M5x12 12 ou M5x12 M6x12 ou M8x16 M6x35 ou M8x40 12 ou M5x12 30 Haut Bas Optio Haut Bas Haut Bas Option t ...

Page 44: ...44 V 3 0 X TV TV TV Possibilité de superposer 1 à 3 entretoises ...

Page 45: ...V 3 0 45 ...

Page 46: ...46 V 3 0 ...

Page 47: ......

Page 48: ...ctrónicos RAEE Por lo tanto este aparato en ningún caso puede ser tratado como un residuo doméstico y debe ser desechado y recogido tal como se establece para este tipo de residuos Las autoridades locales puntos de recogida y los distribuidores ponen a su disposición sistemas de devolución y recogida específicos para estos productos Al reciclar su aparato al final de su vida útil contribuirá a pro...

Page 49: ... Lokale overheden en distributeurs stellen inzamelsystemen bijv milieustraat beschikbaar om uw apparaat correct af te danken Door uw af te danken apparaat te recycleren draagt u bij aan de milieubescherming en voorkomt u mogelijke schadelijke gevolgen voor uw gezondheid In unseren Labors getestet Die Garantie gilt ab dem Kaufdatum Kassenbeleg Diese Garantie erstreckt sich nicht auf Mängel oder Sch...

Reviews: