background image

14

V.1.0

V.1.0

15

your product

4

V.1.0

V.1.0

5

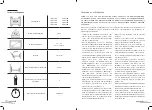
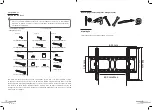
Technical features

VESA standards

100 x 100
200 x 200 
200 x 300
300 x 300

400 x 200
400 x 300
400 x 400
600 x 400

Maximum weight

50 kilos

Diagonal of screen

32" - 75"

82 cm - 190 cm

Tilt

20 ° (±10°)

Minimum wall / screen distance

43 mm

Number of people advised for 

installation

2

Approximate installation time

30 minutes

Operating instructions

BEFORE INSTALLING THIS PRODUCT, IT IS IMPORTANT TO READ AND UNDERSTAND THE 
INSTALLATION INSTRUCTIONS COMPLETELY IN ORDER TO AVOID PHYSICAL INJURIES AND 
MATERIAL DAMAGE. KEEP THESE INSTALLATION INSTRUCTIONS IN A PLACE WHICH IS EASILY 
ACCESSIBLE SO YOU CAN CONSULT THEM AT A LATER DATE.

The safety instructions must be followed throughout the installation of this product. User safety 
equipment and suitable tools for installation in order to avoid physical injury.

• 

If the product were to be sold or given to 
another person, make sure that the operating 
instructions are passed on with it and that no 
parts are defective.

• 

This wall mount bracket is able to support a 
maximum load of 50 kg for screens with a diagonal 
measurement of 32” to 75” maximum. Ensure that 
the wall structure can support such a load. 

• 

The weight of the screen must not exceed the 
maximum load capacity of the bracket.

• 

It is essential that you follow a correct installation 
procedure. This must be carried out by two 
qualified people. Non-compliance with the 
installation instructions may lead to severe 
physical injury, linked to falling or incorrect 
handling of the screen.

• 

Do not install the bracket on a structure which is 
subject to vibrations, movement or which may 
be subject to impacts. Non-compliance may 
lead to the screen being damaged or the surface 
of the bracket being damaged.

• 

Do not install the bracket in a place of passage in 
order to avoid knocks and injuries (above a bed, 
a chair, a door or in a corridor…).

• 

Do not install the bracket near heating, a 
fireplace, direct sunlight, air-conditioning 
or other sources of direct heat.    

Non-compliance may lead to the screen being 
damaged and may increase the risk of fire.

• 

Do not install the bracket in a very damp 
environment.

• 

One month after installation, check that all the 
screws are tight and that the wall plate has been 
correctly attached to the wall.

• 

Please note: Please check that there are no 
cables or pipes behind the wall to which you 
wish to attach your bracket!

• 

Check the position of the electric cables when 
you install or handle the wall bracket, in order to 
avoid any pinching or deterioration of the cables.

• 

The screw fixings supplied with this wall bracket 
are intended exclusively for fixing to a wall made 
up of solid bricks or concrete.

• 

 For installation on any other medium (wood, 
hollow bricks, plasterboard surfaces, steel…) 
please contact an approved professional 
installer, and use the appropriate equipment.

• 

Before beginning installation, please check 
the composition of your wall. Do not install the 
bracket on old or badly sealed brickwork, on a 
plasterboard surface or wood panelling.

• 

Keep children away from the installation and 
ensure that they cannot play with the appliance 
subsequently.

• 

The packaging material (packaging paper, 
polystyrene) can be dangerous for children: there 
is a risk of suffocation. Do not leave packaging 
material within reach of children!

Summary of Contents for INCLIN TV 32-75

Page 1: ...et Muurbeugel INCLIN TV 32 75 Operating instructions To help you make the most of your purchase Bedienungsanleitung Damit Sie an Ihrem Gerät lange Freude haben Notice d utilisation Pour vous aider à bien vivre votre achat Manual de instrucciones Para ayudarle a disfrutar de su compra Handleiding Om u te helpen zo veel mogelijk te genieten van uw aankoop ...

Page 2: ...vis métal M6x35 4 rondelles frein M8 4 vis métal M8x16 4 vis métal M8x40 Sachet 1 Sachet 2 Sachet 3 Sachet 4 Sachet 5 Sachet 6 4 entretoises M8 8 6 rondelles M8 4 vis métal M8x45 Quatre sachets de vis de tailles différentes de 1 à 4 sont fournis afin de sélectionner la visserie requise pour votre téléviseur En effet peu de téléviseurs sont fournis avec le matériel de montage inclus si des vis sont...

Page 3: ...i est sujette à vibrations mouvements ou pouvant subir un impact Le non respect peut entraîner l endommagement de l écran ou l endommagement de la surface du support N installez pas le support dans un lieu de passage afin d éviter les chocs et les blessures au dessus d un lit d une chaise d une porte dans un couloir N installez pas le support près d un chauffage d une cheminée de la lumière direct...

Page 4: ...ez pas exagérément les vis Cela peut endommager le mur sans aucune nécessité Ne relâchez pas le support mural avant qu il soit solidement fixé au mur installation des bras inclinables installation des bras inclinables Recouvrez une surface stable et plane d un chiffon doux Placez l écran de votre appareil sur le chiffon doux Localisez les points de montage filetés situés au dos de l écran Détermin...

Page 5: ...t les trous de chaque bras avec les inserts filetés du panneau arrière de votre écran en insérant les vis à travers les deux trous et en tournant dans le sens des aiguilles d une montre à l aide d un tournevis cruciforme jusqu à ce qu elles soient complètement enfoncées assemblage final Pour finir l installation de votre nouveau support commencez par desserrer les molettes de réglage des deux bras...

Page 6: ...nclinaison avec plus de facilité Une fois l inclinaison trouvée resserrez les deux bras en tournant les molettes de réglage dans le sens des aiguilles d une montre Replacez le téléviseur si nécessaire Toutes les informations dessins croquis et images dans ce document relèvent de la propriété exclusive de SOURCING CREATION SOURCING CREATION se réserve tous les droits relatifs à ses marques création...

Page 7: ...étal M8x45 Four bags of screws of different sizes from 1 to 4 are provided so you can select the screws required for your TV In fact few TV sets are supplied with the assembly kit included if screws are supplied with the TV set they are generally found in the holes on the back of the TV set If the length and the diameter of the mounting screws required by the TV set are not known test various size...

Page 8: ...bracket on a structure which is subject to vibrations movement or which may be subject to impacts Non compliance may lead to the screen being damaged or the surface of the bracket being damaged Do not install the bracket in a place of passage in order to avoid knocks and injuries above a bed a chair a door or in a corridor Do not install the bracket near heating a fireplace direct sunlight air con...

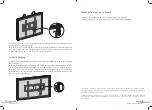
Page 9: ... This can damage the wall needlessly Do not release the wall bracket before it is firmly attached to the wall installation of tilting arms installation of tilting arms Cover a stable flat surface with a soft cloth Place the screen of your appliance on the soft cloth Locate the threaded mount points on the back of the screen Determine the correct screw length by carefully inserting a match or tooth...

Page 10: ...timal stability Attach each arm to the screen aligning the holes in each arm with the threaded inserts on the back panel of your screen inserting the screws through the two holes and turning clockwise using a crosshead screwdriver until they are completely tight final assembly To finish installing your new bracket begin by loosening the adjustment knobs on the two tilting arms Present the screen t...

Page 11: ...rse mounting bars If the space between the wall and the screen is too restricted remove the TV so you can adjust the tilt more easily Once you have found the right amount of tilt retighten the two arms by turning the adjustment knobs clockwise Replace the TV if necessary All information designs drawings and pictures in this document are the property of SOURCING CREATION SOURCING CREATION reserves ...

Page 12: ... cuatro bolsas de tornillos de tamaños diferentes de 1 a 4 para que pueda elegir los más adecuados para su televisor Efectivamente pocos televisores incluyen el material de montaje si se suministran tornillos con el televisor normalmente se encuentran en los orificios de su parte posterior Si desconoce la longitud y el diámetro de los tornillos de montaje que necesita el televisor pruebe con torni...

Page 13: ...ovimientos o que pueda sufrir un impacto Si no se siguen las instrucciones la pantalla o la superficie de soporte pueden resultar dañadas Con el fin de evitar golpes y lesiones no instale el soporte en un lugar de paso encima de una cama de una silla de una puerta en un pasillo No instale el soporte cerca de una calefacción de una chimenea de la luz directa del sol del aire acondicionado o de cual...

Page 14: ...ría dañar la pared innecesariamente No suelte el soporte de pared hasta que esté bien fijado a la pared instalación de los brazos inclinables instalación de los brazos inclinables Recubra una superficie plana y estable con un paño suave Coloque la pantalla de su aparato sobre el paño Localice los puntos de montaje roscados situados en la parte posterior de la pantalla Compruebe que el tornillo tie...

Page 15: ...uno de los brazos con los insertos roscados del panel posterior de la pantalla introduciendo los tornillos a través de ambos orificios y girándolos hasta el fondo en el sentido de las agujas del reloj con la ayuda de un destornillador de estrella montaje final Para terminar de instalar su nuevo soporte empiece aflojando las ruedas de regulación de los dos brazos inclinables Ponga la pantalla delan...

Page 16: ...aya conseguido la inclinación adecuada vuelva a apretar los brazos girando las ruedas de regulación en el sentido de las agujas del reloj Vuelva a colocar el televisor si es necesario Todas las informaciones los dibujos los bocetos y las imágenes del presente documento son propiedad única y exclusiva de SOURCING CRÉATION SOURCING CRÉATION se reserva todos los derechos relativos a sus marcas creaci...

Page 17: ...edenen Größen 1 bis 4 um das geeignete Schraubmaterial für Ihren Fernseher auszuwählen In seltenen Fällen ist das Montagematerial bei Fernsehern im Lieferumfang enthalten wenn Schrauben enthalten sind befinden sich diese im Allgemeinen in den Löchern auf der Rückseite des Fernsehers Wenn Länge und Durchmesser der für den Fernseher benötigten Montageschrauben unbekannt ist probieren Sie verschieden...

Page 18: ...uf einer Struktur bei der es zu Vibrationen Bewegungen oder Einschlägen kommen könnte Die Nichtbeachtung kann zu Schäden am Fernseher oder an der Halterung führen Bringen Sie die Wandhalterung nicht an einem Durchgangsort an um Stöße und Verletzungen zu vermeiden oberhalb eines Bettes eines Stuhls einer Tür in einem Gang Installieren Sie die Halterung nicht neben einem Heizkörper einem Kamin einer...

Page 19: ... wenn sie stabil an der Wand befestigt ist Installation der kippbaren Arme Installation der kippbaren Arme Legen Sie ein weiches Tuch auf eine stabile und ebene Fläche Legen Sie den Bildschirm des Geräts auf das weiche Tuch Suchen Sie die Gewinde an den Befestigungsstellen auf der Rückseite des Bildschirms Bestimmen Sie die richtige Schraubenlänge indem Sie vorsichtig ein Streichholz oder einen Za...

Page 20: ...en Befestigen Sie jeden Arm am Fernseher indem Sie dessen Löcher an den Gewindeeinsätzen auf der Rückseite Ihres Bildschirms ausrichten die Schrauben durch die beiden Löcher stecken und mit Hilfe eines Kreuzschlitz Schraubenziehers im Uhrzeigersinn festziehen bis sie komplett eingedreht sind Endmontage Zum Schluss der Installation Ihrer neuen Wandhalterung lockern Sie zunächst die Stellrädchen der...

Page 21: ...m die Neigung leichter anpassen zu können Wenn der passende Neigungswinkel gefunden ist ziehen Sie die beiden Arme wieder fest indem Sie die Einstellrädchen im Uhrzeigersinn drehen Richten Sie den Fernseher neu aus falls notwendig Alle Informationen Zeichnungen Skizzen und Bilder in diesem Dokument sind ausschließliches Eigentum von SOURCING CREATION SOURCING CREATION behält sich alle Rechte in Be...

Page 22: ...ootte van 1 tot 4 meegeleverd zodat u de gepaste schroeven kunt selecteren voor uw televisie Maar weinig televisies zijn immers voorzien van meegeleverd bevestigingsmateriaal als er schroeven bij de televisie worden meegeleverd zitten ze meestal in de gaten aan de achterkant van de televisie Als u de lengte en diameter niet van de montageschroeven voor uw televisie test dan de verschillende format...

Page 23: ...van het scherm Installeer de beugel niet op een structuur die onderhevig is aan trillingen bewegingen of stoten Anders kan het scherm of het oppervlak van de beugel beschadigd raken Installeer de beugel niet in een doorgang om schokken en letsels te voorkomen boven een bed een stoel een deur in een gang Installeer de beugel niet in de buurt van een verwarming open haard direct zonlicht airconditio...

Page 24: ...s totdat hij stevig aan de muur is bevestigd installatie van de kantelbare armen installatie van de kantelbare armen Bedek een stabiel vlak oppervlak met een zachte doek Plaats het scherm van uw apparaat op de zachte doek Zoek op de achterkant van het scherm de met schroefdraad voorziene bevestigingspunten Bepaal de lengte van de schroef door voorzichtig een lucifer of tandenstoker in te brengen e...

Page 25: ...ten in elke arm uit te lijnen met de bevestigingspunten met schroefdraad op het achterpaneel van uw scherm Steek de schroeven door de twee gaten en draai ze met een kruiskopschroevendraaier rechtsom tot ze volledig zijn ingeschroefd laatste installatiestap Om de installatie van de nieuwe beugel te voltooien moet u eerst de instelschroeven op beide kantelbare armen losdraaien Plaats het scherm voor...

Page 26: ... de muur om deze instelling aan te passen Nadat u de juiste hoek hebt gevonden draait u beide armen vast door de instelschroeven rechtsom te draaien Plaats de televisie indien nodig terug Alle informatie tekeningen schetsen en afbeeldingen in dit document zijn de exclusieve eigendom van SOURCING CREATION SOURCING CREATION behoudt alle rechten met betrekking tot haar merken creaties en gegevens Kop...

Page 27: ...habitual del producto Service Relation Clients Customer Relations Department Servicio de Atención al Cliente Avenue de la Motte CS 80137 59811 Lesquin cedex Art 8000788 Ref Inclin TV 32 75 FABRIQUÉ EN R P C MADE IN P R C FABRICADO EN la RPC SOURCING CREATION Avenue de la Motte 59810 Lesquin France Support mural Wall mount bracket Soporte de pared INCLIN TV 32 75 Ayude al medio ambiente Recicle est...

Reviews: