background image

Ausg

abe / Version

26.08.2010

 / 

tbe


Seite

 / Page 

5

 von / of 

10


ESSMANN GmbH 

 Im Weingarten 2 

 D-32107 Bad Salzuflen 

 T49 (0) 5222.791-0 

 T49 (0) 5222.791-236 

E-Mail: info@essmann.de 

  www.essmann.de 


A member of the 

ESSMANN GROUP


Technisch

e Änderungen vorbehalten. / 

Subject to technical alterations.


Dok.Nr.

:OFF

-017047


Art.Nr.: 

25000026


Montage in 

Aufsetzkranz/Lichtkuppel: 

Assembly: 


Sollte diese Montageanleitung nicht alle offen 
Fragen beantworten, wenden Sie sich an die 
ESSMANN Anwendungstechnik.


If these installation instructions do not answer any of  
the  questions  you  may  still  have,  please  contact 
ESSMANN’

s application engineers.


1.  Vorbereitung 

1.  Preparation  


Die entriegelte Lichtkuppel nicht vollständig öffnen 
und  auf dem Dach ablegen. (Verformungsgefahr bei 
hohen Außentemperaturen) 


Open the unlocked skylight dome (but not 
completely) and set it down on the roof. (Risk of 
deformation at high temperatures.)) 


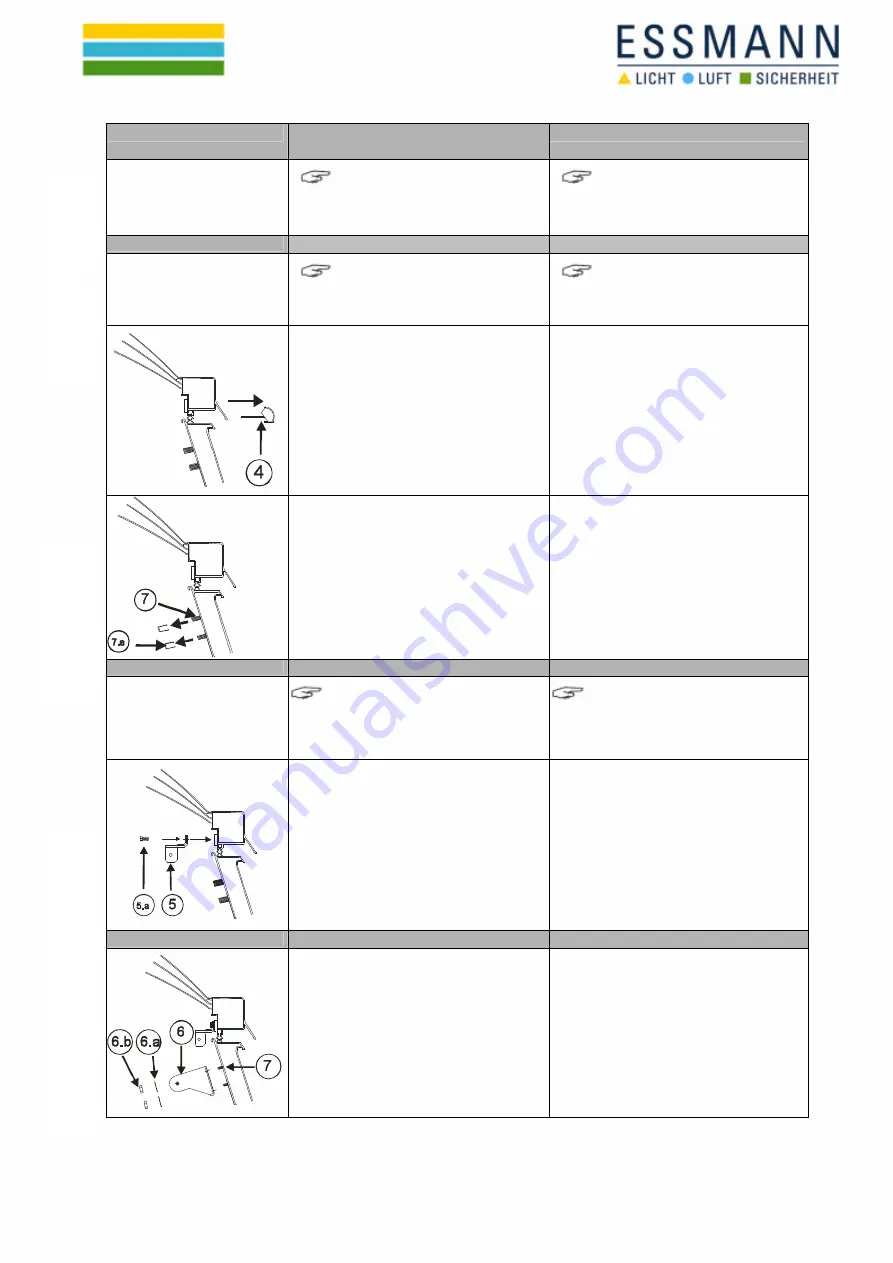
1.1 

Das Lichtkuppelschloss vom Dach aus 
entriegeln. Dazu die Lichtkuppel mit dem 
beliegenden Schlüssel entriegeln und den 
Schieber (4) herausziehen. Der Schieber wird 
nicht mehr benötigt. 


1.1  Unlock the skylight dome lock from the roof. To 

do this, unlock the skylight dome using the key 
supplied and pull out the slide (4). The slide is 
no longer needed. 


1.2 

Die beiden Abdeckhüttchen (7.a) von den zwei 
Gewindestiften (7) des Aufsetzkranzes 
herunterdrehen. Die Abdeckhüttchen werden 
nicht mehr benötigt. 


1.2  Unscrew both the cover caps (7.a) for the two 

grub screws (7) on the skylight base. The cover 
caps are no longer needed. 


2.  Spindelhalterung montieren 

2.  Installing the spindle holder 


Montage der Spindelhalterung entfällt bei der 
ESSMANN Lichtkuppel  plus und comfort plus, 
da diese bereits werkseitig montiert. 


There is no need to install the spindle holder in 
the case of the ESSMAN plus and comfort plus 
skylight domes, as this has already been done 
at the factory. 


2.1  Die Spindelhalterung (5) mittig am 

Spindelflansch der Lichtkuppel mit zwei 
Sechskant Schrauben (M6 x 10) (5.a)  
befestigen. (Max. 5,5Nm) 


2.1  Fasten the spindle holder (5) at the centre of the 

skylight dome's spindle flange using two 
hexagon-head screws (M6 x 10) (5.a). (Max. 5.5 
Nm.)


3. 

Montage Motorkonsole 

3. 

Installing the motor console  


3.1  Die Motorkonsole (6) auf die im Aufsetzkranz 

befindlichen Gewindestifte (7) setzen und mit 
den Sechskantmuttern  (M6) (6.b) und 
Unterlegscheiben (6,4) (6.a) befestigen. (Max. 6 
Nm) 


3.1  Place the motor console (6) on the grub screws 

(7) located in the skylight base and fasten it in 
place using the hexagon nuts (M6) (6.b) and 
washers (6.4) (6.a). (Max. 6 Nm.) 


Summary of Contents for EM 230V/970

Page 1: ... Kontakt für Meldung Nicht Zu Nach Rücksprache mit der ESSMANN Anwendungstechnik ist der ESSMANN Motoröffner auch für den Einsatz an Fremdfabrikaten geeignet Installation Instructions for ESSMANN servomotor opener EM 230V 970 Installation instructions For correct assembly installation and appropriate maintenance by a trained professional and safety conscious electrician and or specialist who has k...

Page 2: ...g 230 V AC Gefährliche Spannung Kann Tod schwere Körper verletzungen oder erheblichen Sachschaden verursachen Trennen Sie das Gerät allpolig von der Versorgungsspannung bevor Sie es montieren oder den Aufbau verändern VDE 0100 für 230 V Netzanschluss beachten Explanation of symbols Information that absolutely must be observed is highlighted by means of particular symbols Caution Risk to persons du...

Page 3: ...oles and secured to prevent them being switched back on unintentionally Following installation After installation and any changes to the system check all functions by means of a test run You must ensure that the ESSMANN servomotor opener does not come into contact with the substructure in either an extended or retracted state information on p 7 Application example ESSMANN skylight dome skylight ba...

Page 4: ... 25mm 2St Sechskantschraube M6 x 10mm 3St Scheibe 6 4 2St Sechskantmutter M8 3St Sechskantmutter M6 Werkzeuge Stellen Sie sicher dass Sie folgendes Werkzeug zu Ihrer Verfügung steht Steckschlüssel 10 Schraubendreher Schlitz 1 0 x 5 5 Schraubenschlüssel SW13 Kombizange Functional description This drive is operated using the integrated electronic max load cut off and does not require a limit switch ...

Page 5: ... skylight dome using the key supplied and pull out the slide 4 The slide is no longer needed 1 2 Die beiden Abdeckhüttchen 7 a von den zwei Gewindestiften 7 des Aufsetzkranzes herunterdrehen Die Abdeckhüttchen werden nicht mehr benötigt 1 2 Unscrew both the cover caps 7 a for the two grub screws 7 on the skylight base The cover caps are no longer needed 2 Spindelhalterung montieren 2 Installing th...

Page 6: ...g the hexagon nuts M8 6 d Max 6 Nm 4 3 Durch drehen an der Hubstange des Motoröffners 3 b diese in der Höhe an die Position der seitlichen Bohrung in der Spindelhalterung anpassen Durch Rechtsdrehung wird die Hubstange verkürzt durch Linksdrehung verlängert Die Hubstange und die Spindelhalterung 5 mit der Sechskantschraube M6 x 35 5 b Unterlegscheibe 6 4 5 c und Sechskantmutter M6 5 d verbinden Ma...

Page 7: ...structure on site the substructure must be checked for loads i e suction loads The screws 7 B must be selected according to the type of substructure that is present Since there is a wide range of options for applications in arcade rooflights with arcade rooflight flaps it is not possible to show every single installation scenario For this reason only examples of possible solutions are shown here F...

Page 8: ...shearing Cables must not be laid within the pivoting range The applicable regulations must be observed see page 2 M M M M M Antrieb drive Antrieb drive Antrieb 1 drive 1 max 10 Antrieb max 10 drives Abzweigdose connection box 230 V AC Lüftungstaster 230 V AC vent switch GR 1 GR 2 Netz 230 V AC power system 230 V AC NYM J 5 x 1 5 mm NYM J 5 x 1 5 mm NYM J 3 x 1 5 mm Schwarz black braun brown blau b...

Page 9: ...sole an der bauseitigen Unterkonstruktion ist die Unterkonstruktion auf den Belastungsfall zu prüfen Soglasten When installing the ESSMANN motor console on a substructure on site the substructure must be checked for loads i e suction loads 7 2 Lösungsvorschlag 2 Die ESSMANN beiliegende Motorkonsole wird durch die ESSMANN Motorkonsole Lang ausgetauscht und an der bauseitigen Unterkonstruktion befes...

Page 10: ...x Hub ca 133mm B x H X L Gehäusematerial Aluminium Rechteckprofil Farbe Standert Silber exoxiert EV 1 Sonderfarbe auf Anfrage nach RAL Farbbeschichtet Endkappen Kunststoff grau Lebensdauer 10 000Lüftungszyklen bei Nennlast Technical specifications Voltage 230 V AC 50 HZ 10 15 Current consumption Approx 0 2 A Compressive force Max 500 N Tensile force Max 250 N Stroke lengths 300 500 750 and 1000 mm...

Reviews: