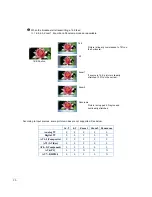
background image


40 

Set up 

‰


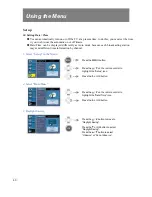
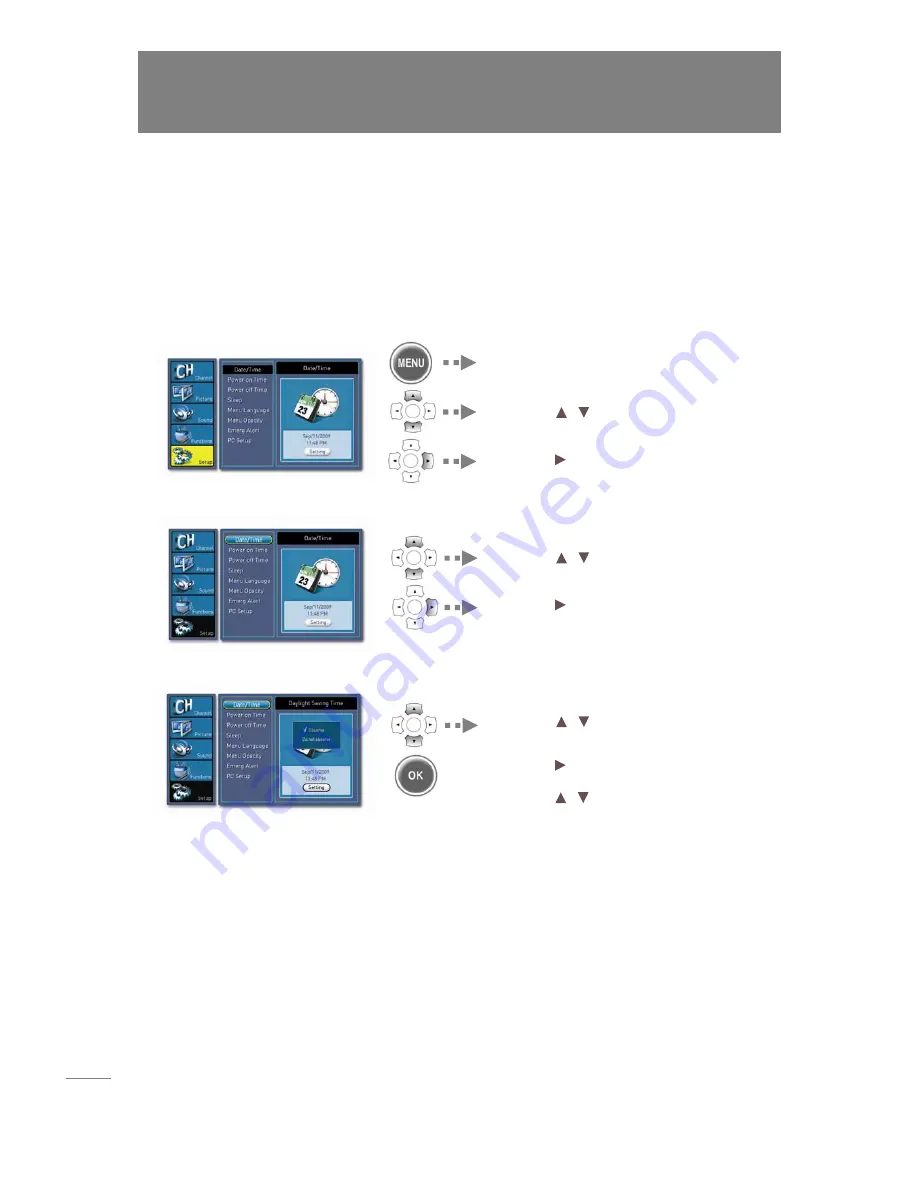
Setting Date / Time 

n

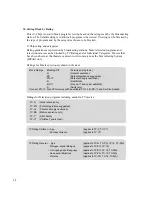
 Yes can automatically turn on or off the TV at a present time, to do this, you must set the time 

it you wish to use the automatic on or off timers. 

o

 Date/Time can be displayed differently as Auto mode because each broadcasting station 

may send different time information by channel. 


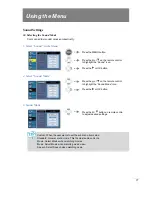
1.

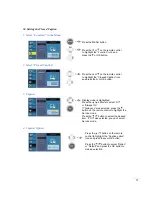
 Select “Setup” in the Menu


2.

 Select “Date/Time”


3.

 Daylight Saving


Press the

button to


move


to 

“Daylight


Saving”. 


Press


the


 or


OK


button


to


select 

“Daylight


Saving”. 

Press


the   / 


button


to


select 

“Observe”


or


“Do


not


observe”. 

Press


the   / 


on the remote control


to


highlight


the “Date/Time” icon


Press


the


or


OK button.


Press


the


MENU


button. 


Press


the   / 


on the remote control


to


highlight


the “Setup” icon

 
Press


the


or


OK button.


Using the Menu 

Summary of Contents for ES470FHD

Page 1: ...our set Retain it for future reference Record model number and serial number of the set See the label attached on the back cover and quote this information to your dealer when you require service INNOVATION IN QUALITY DESIGN 47 FULL HD LCD TV Operating Instructions ...

Page 2: ...2 ...
Page 3: ...ursuant to Part 15 of the FCC Rules These limits are designed to provide reasonable protection against harmful interference in a residential installation This equipment generates uses and can radiate radio frequency energy and if not installed and used in accordance with the instructions may cause harmful interference to radio communications However there is no guarantee that interference will not...

Page 4: ...e safety purpose of the polarized or grounding type plug A polarized plug has two blades with one wider than the other A grounding type plug has two blades and third grounding prong The wide blade or third prong are provided for your safety When the provided plug does not fit into your outlet consult an electrician for replacement of the obsolete outlet 10 Protect the power cord from being walked ...

Page 5: ...An outdoor antenna should be located away from power lines 20 Outdoor Antenna Grounding If an outside antenna is connected to the receiver be sure the antenna system is grounded so as to provide some protection against voltage surges and built up static charges Section 810 of the National Electric Code ANSI NFPA No 70 1984 provides information with respect to proper grounding of the mats and suppo...

Page 6: ...igh number of channel For Example some channel in Analog is Channel Number 6 while its HD Channel is 83 However with this feature HD Channel will be assigned virtually as 6 1 and easily recognized while analog channel is 6 PiP Picture in Picture and Dual Screen This TV provides PIP Picture in Picture and dual screen modes In PIP mode you can change PIP source PIP position and PIP size Additionally...

Page 7: ... box Connecting a DVD player Remote Control Remote Control Functions Using the Menu Channel Settings Selecting Tuner Mode Storing Channels Automatically Setting Channel Edit and Favorite Channels Displaying Signal Strength Setting the Input Mode Picture Setting Adjusting Picture Mode Setting the Desired Picture DNR Selecting the Aspect Ratio Sound Settings Selecting the Sound Mode Adjusting the De...

Page 8: ...d Caption Viewing the Closed Caption Setting the EPG View Set up Setting Date Time Setting Power on Time Setting Power off Time Setting Sleep Time Selecting Menu Language Setting Menu Opacity Setting Emergency Alert Setting PC Mode Selecting PIP Dual Screen Other Information Trouble Shooting Specifications 29 30 31 32 32 34 35 37 39 40 40 42 43 44 45 46 47 48 52 54 54 56 ...

Page 9: ... are included with your product If an accessory is missing please contact the dealer where you purchased the product User s Instruction Remote Control 2 AA Batteries Power Cable AV cable USB gender 2 Stands 2 Stand bars 2 M8 20 screws 4 M6 20 screws Getting Started ...

Page 10: ... placed 2 Assemble the stand with the stand bars as shown Make sure that the hole for bolt should be located at the back side of the stand bar 3 Install the 2 bolts securely on the bottom of the stands in the holes provided 4 Insert stand set into the holes provided at the bottom of the TV carefully ...

Page 11: ... or toggling current settings VOLUME Adjust sound level or set the value while On Screen Menu is active CHANNEL Change channel or navigate while On Screen Menu is active POWER Press to turn on and off the TV Rear Panel Digital Audio Out Composite 1 AV1 In Composite Out Component 1 AV4 In Component 2 AV5 In Composite 2 AV2 In S Video AV3 In PC RGB AV6 In ...

Page 12: ...io Video composite cables using composite cable please make sure of the colors of the jacks Video should be connected to yellow audio to white and red o Using S Video Cable If the VCR you have supports S Video Output connect S Video Input of the LCD to S Video Output of the VCR and do the same in Sound cable White and Red To Watch VCR 1 Turn on the TV and press SOURCE button on the remote control ...

Page 13: ... Sound Connection Connect the Sound Input port of the LCD TV to the Sound Output Port of the Cable Box Satellite Receiver with Composite cable The color of Sound Cable and Output Ports are in White and Red o Using S Video Cable While S Video is supported Video Connection Connect the S Video Input port of the LCD TV to the S Video Output port of the Cable Box Satellite Receiver by using S Video cab...

Page 14: ...layer Video Game Machine with Composite cable The color of Sound Cable and Output Ports are in White and Red In this case the sound ports are generally located by the component ports Component Connection is also required to connect sound L R properly If fails there will be no sound o Using HDMI Source to HDMI Cable This is only where both of devices have HDMI Port Since HDMI deliver sound signal w...

Page 15: ... Electronic Program Guide 6 OK Press to move OSD Up Down Right Left While using the on screen menus press to select or change a particular function 7 MENU Press to display the on screen menus or to exit the on screen menus 8 MUTE Press to mute for speaker output In mute status if you press volume up key or tune off and turn on power mute will be released 9 VOL VOL Volume up down 10 PICTURE Press r...

Page 16: ... CH Press to alternate between the current channel and the last channel that was displayed 14 INFO Press to display the information of current channel 15 EXIT Press to exit from any on screen display at a time 16 CH CH Channel up down 17 FAVORITE Press to switch to your favorite channels 18 SOUND Press to change the pre defined sound modes Custom Standard Movie Music and Speech ...

Page 17: ...osition of PIP Four positions are available Left top right top right bottom left bottom 22 ASPECT Press to toggle the size of PIP large and small 23 PIP Press to change PIP DW modes Possible modes Normal no PIP no DW PIP DW DW Double window or Picture and Picture 24 FREEZE Press to freeze the current picture Press again to resume motion If you change the channel the frozen picture will be released...

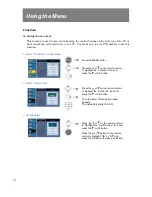
Page 18: ... in the Menu 2 Select Tuner Mode 3 Tuner Mode Press the button to move to Air Cable you want Press the button on the remote control to highlight the Tuner Mode icon Press the or OK button Press the MENU button Press the or on the remote control to highlight the Channel icon Press the or OK button Using the Menu ...

Page 19: ... If you want to stop the Auto Scan during scanning press the OK button once more As soon as Auto Scan is run all previously stored channels are removed and newly scanned channels are stored If you have changed the connection of an antenna or cable perform Auto Scan again If the scrambled channel is detected it is not added in channel list Press the OK button and Auto Scan is activated Press the ME...

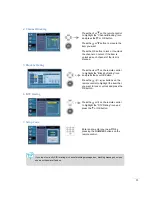
Page 20: ... Channel Edit Press the button to move to desired channel and Press the OK button to activate or deactivate the channel on your channel list or delete from your favorite list Press the or on the remote control to highlight the Channel Edit icon Press the or OK button Press the MENU button Press the or on the remote control to highlight the Channel icon Press the or OK button ...

Page 21: ...l channels will either have excellent reception or none at all It is quite unlike analog reception which can vary in reception quality from snowy to clear Press the or on the remote control to highlight the Signal Strength icon Press the MENU button Press the or on the remote control to highlight the Channel icon Press the or OK button ...

Page 22: ...the previous Menu You can set the input mode quickly using SOURCE button on the remote control Press the button on remote control to adjust desired settings Press the or on the remote control to highlight the External Input icon Press the or OK button Press the MENU button Press the or on the remote control to highlight the Channel icon Press the or OK button ...

Page 23: ... Clear and Vivid display Multimedia Good for multimedia display Press the button on remote contro to adjust desired settings Press the or on the remote control to highlight the Picture Mode icon Press the or OK button Press the MENU button Press the or on the remote control to highlight the Picture icon Press the or OK button User enjoy picture mode by factory in the favor of user In the other mod...

Page 24: ...d background Sharpness Adjust clarity of outline of objects Tint Adjust colors naturally Color Temp Whenever You Press left or right button the mode changes in following order NORMAL WARM and COOL DNR Digital Noise Reduction Reduce the Digital Noise Press the button on remote control to adjust desired settings Press the or on the remote control to highlight the Brightness icon Press the or OK butt...

Page 25: ...dcaster is transmitting a 4 3 feed 16 9 4 3 Zoom1 Zoom2 and Panorama modes are available 16 9 4 3 Zoom1 Zoom2 Panorama If source is 4 3 side bar is added to make 16 9 picture If source is 4 3 picture is cropped by 16 9 region Picture is cropped 4 3 region and nonlinearly stretched 4 3 Source ...

Page 26: ...oom1 Zoom2 Panorama Analog TV 0 0 0 0 0 Digital TV 0 0 0 0 X AV1 2 Composite 0 0 0 0 0 AV3 S Video 0 0 0 0 0 AV4 5 Component 0 0 0 0 0 AV6 PC 0 0 X X X AV7 8 HDMi 0 0 0 0 X Zoom1 Zoom2 Panorama Picture is linearly compressed to 75 on the horizontal If source is 16 9 picture is linearly stretched 133 on the vertical Picture is cropped 4 3 region and nonlinearly stretched 16 9 Source 16 9 4 3 ...

Page 27: ... This fits most audio contents Movie Select Movies when watching movies Music Select Music when watching music video Speech Select Speech when watching news Press the button on remote contro to adjust desired settings Press the or on the remote control to highlight the Sound Mode icon Press the or OK button Press the MENU button Press the or on the remote control to highlight the Sound icon Press ...

Page 28: ...on the remote control to highlight the Sound icon Press the or OK button Treble Adjusts the range size of high sound Bass Adjusts the range size of low sound Balance Adjusts the balance of left and right speakers Press the button on remote control to adjust desired settings Press the or on the remote control to highlight the Treble icon Press the or OK button ...

Page 29: ...ment such as night time listening mode 1 Select Sound in the Menu 2 Select AVL 3 AVL The default is Off Press the button button to set to the On or Off Press the or on the remote control to highlight the AVL icon Press the or OK button Press the MENU button Press the or on the remote control to highlight the Sound icon Press the or OK button ...

Page 30: ...ss button the available audio languages are shifted and heard when receiving DTV signal If selected default language is unavailable the primary audio source will be heard only If broadcaster does not transmit language identifier or broadcasts another language aside from English Spanish or French then available multiple tracks are shown as Audio1 Audio2 etc Whenever you press button the mode shifts...

Page 31: ...boratories Dolby Digital and the double D symbol are trademarks of Dolby Laboratories Dolby Digital is only available in Digital TV Whenever you press button the mode shifts in following order Dolby Digital and PCM Press the or on the remote control to highlight the Digital Audio Out icon Press the or OK button Press the MENU button Press the or on the remote control to highlight the Sound icon Pr...

Page 32: ... the or on the remote control to highlight the Set Blocking icon and press the or OK button Press the or button on the remote control to highlight ON or Off and press the OK button to make a selection Press the or on the remote control to highlight the Auto Lock icon and press the or OK button Then the Enter PIN number window appears The default is 4 digits 0 0 0 0 Press the MENU button Press the ...

Page 33: ...TV Rating icon and press the or OK button Press the or on the remote control to highlight the Block by Rating icon and press the or OK button Press the buttons on the remote control to highlight the item that you want to lock or unlock and press the OK button Press the or on the remote control to highlight the Channel Blocking icon and press the or OK button Press the or button to move to the item...

Page 34: ...gs for Television programs including made for TV movies TV G General audience TV PG Parental guidance suggested TV 14 Parents strongly cautioned TV MA Mature audience only TV Y All children TV Y7 Children 7 years older TV Rating Children Age applies to TV Y TV Y7 Fantasy Violence applies to TV Y7 TV Rating General Age applies to TV G TV PG TV 14 TV MA Dialogue sexual dialogue applies to TV PG TV 1...

Page 35: ...e a selection Display mode is highlighted Press the buttons to select Off or Always On If Always on was selected press the button on the remote control to highlight the Service mode Press the button to select the desired item If Off was selected you can t select Service mode Press the or on the remote control to highlight the Closedn Caption icon and press the or OK button Press the MENU button Pr...

Page 36: ...utton Press the button to select the Caption Size Caption Style Text Color Text Opacity Edge Style Edge Color Italic or Underline In caption option if Options is selected CC Background is highlighted To select CC Background press the button and press the or OK button Press the button to select the Color or Opacity Press the button to select the item that you want ...

Page 37: ...ransport sources Service 1 and Service2 are the primary and secondary languages respectively Service3 and service4 5 6 are additional caption sources that may be available Caption The form for the words that scroll across the bottom of the TV screen usually the audio portion of the program provided for the hearing impaired CC 1 For video related information that can be displayed Script can be in a...

Page 38: ...ed Æ Green Æ Blue Æ Yellow Æ Magenta Æ Cyan Text Opacity Specify the opacity for the text Auto Æ Solid Æ Flashing Æ Translucent Æ Transparent Edge Style Select Edge style for the text Auto Æ None Æ Raised Æ Depressed Æ Uniform Æ Drop Shadow Edge color Select Edge color for the text Auto Æ Black Æ White Æ Red Æ Green Æ Blue Æ Yellow Æ Magenta Æ Cyan Italic Convert the text in to italic Auto Æ On Æ ...

Page 39: ...rrent time and time zone are not set correctly program information is not displayed EPG displays only the programs within 12 hours from current time Press the or OK button to see the EPG Then you can get information on the broadcasting time and program Press the or on the remote control to highlight the EPG View icon Press the or OK button Press the MENU button Press the or on the remote control t...

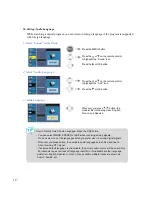
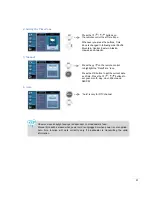
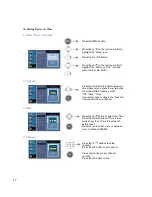
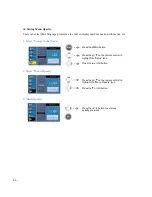
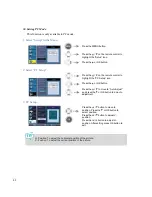
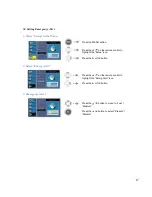
Page 40: ... may send different time information by channel 1 Select Setup in the Menu 2 Select Date Time 3 Daylight Saving Press the button to move to Daylight Saving Press the or OK button to select Daylight Saving Press the button to select Observe or Do not observe Press the on the remote control to highlight the Date Time icon Press the or OK button Press the MENU button Press the on the remote control t...

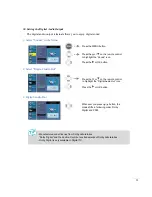
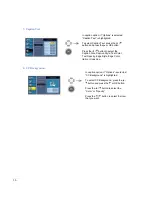
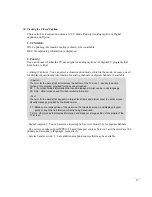
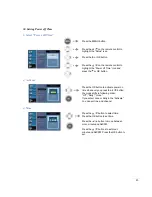
Page 41: ...ns daylight savings is dependent on broadcaster s feed Manual time will be erased when power cord is unplugged or when power is not supplied Auto time function will work correctly only if broadcaster is transmitting the valid information Auto is only for DTV channel Press the on the remote control to highlight the Date Time icon Press the OK button to set the current date and time Press the button...

Page 42: ... key to set Time Press the OK button to set Press the button to move between Hour minute and AM PM Press the OK button to activate power on time whenever you press the button the mode shifts in following order Off Daily Once If you select once or daliy in the Activate You can set time and channel Press the MENU button Press the on the remote control to highlight the Setup icon Press the or OK butt...

Page 43: ...M PM Press the OK button to set Press the OK button to activate power on time whenever you press the button the mode shifts in following order Off Daily Once If you select once or daliy in the Activate You can set time and channel Press the MENU button Press the on the remote control to highlight the Setup icon Press the or OK button Press the on the remote control to highlight the Power off Time ...

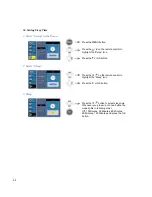
Page 44: ...ss up or down button the mode shifts in following order Off 15 Minutes 30 Minutes 60 Minutes 90 Minutes 120 Minutes and press the OK button Press the on the remote control to highlight the Sleep icon Press the or OK button Press the MENU button Press the on the remote control to highlight the Setup icon Press the or OK button ...

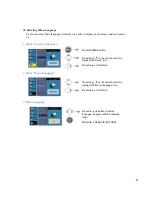
Page 45: ...he Menu 2 Select Menu Language 3 Menu Language Press the button to set the language language shifts in following order ENGLISH FRANÇAIS ESPAÑOL Press the on the remote control to highlight the Menu Language icon Press the or OK button Press the MENU button Press the on the remote control to highlight the Setup icon Press the or OK button ...

Page 46: ...us etc 1 Select Setup in the Menu 2 Select Menu Opacity 3 Menu Opacity Press the button to set menu opacity you want Press the on the remote control to highlight the Menu Opacity icon Press the or OK button Press the MENU button Press the on the remote control to highlight the Setup icon Press the or OK button ...

Page 47: ...ncy Alert Press the button to move to Low Medium Press the button to select Present Discard Press the on the remote control to highlight the Emerg Alert icon Press the or OK button Press the MENU button Press the on the remote control to highlight the Setup icon Press the or OK button ...

Page 48: ...on to move to position Press the or OK button to select position Press the button to adjust V position Press the button to adjust H position After setting press OK button to exit Press the on the remote control to highlight the PC Setup icon Press the or OK button Press the to move to Auto Adjust and press the or OK button to do auto adjustment Press the MENU button Press the on the remote control...

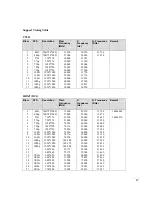
Page 49: ...Remark 1 2 3 4 5 6 7 8 9 10 11 12 13 14 15 16 17 18 19 20 21 480i 480p 576i 576p 720p 720p 720p 1080i 1080i 1080i 1080p 1080p 1080p VESA VESA VESA VESA IBM VESA 704 720 480 704 720 480 720 576 720 576 1280 720 1280 720 1280 720 1920 1080 1920 1080 1920 1080 1920 1080 1920 1080 1920 1080 640 400 640 480 640 480 640 480 640 480 640 480 720 400 720 400 13 500 27 000 13 500 27 000 74 250 74 176 74 250...

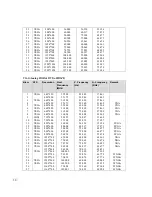
Page 50: ...ESA VESA VESA IBM VESA VESA VESA VESA VESA VESA VESA VESA VESA VESA VESA VESA VESA 640 350 640 400 640 400 640 480 640 480 640 480 640 480 640 480 720 400 720 400 800 600 800 600 800 600 800 600 800 600 1024 768 1024 768 1024 768 1024 768 1152 864 1152 864 1280 720 1280 768 1280 960 1280 960 1360 768 1360 768 31 500 25 175 31 500 25 175 25 200 31 500 31 500 36 000 28 322 35 500 36 000 40 000 50 00...

Page 51: ...920 1080 1920 1080 108 000 135 000 157 500 146 250 162 000 138 500 148 500 148 352 60 020 75 025 85 024 59 954 60 000 59 934 60 000 59 940 63 981 79 976 91 146 65 290 75 000 66 587 67 500 67 433 UXGA 1080p 1080p In Auto if position may not fit on the screen select the Position and manually adjust the position ...

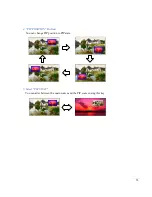
Page 52: ... not supported PIP Main NTSC RF Digital RF AV1 CVBS AV2 CVBS AV3 S video AV4 YPbPr AV5 YPbPr AV6 VGA AV7 HDMI AV8 HDMI NTSC N A No Sup Sup Sup Sup Sup Sup Sup Sup Digital No N A Sup Sup Sup Sup Sup Sup Sup Sup AV1 Sup Sup N A Sup Sup Sup Sup Sup Sup Sup AV2 Sup Sup Sup N A No Sup Sup Sup Sup Sup AV3 Sup Sup Sup No N A Sup Sup Sup Sup Sup AV4 Sup Sup Sup Sup Sup N A Sup Sup Sup Sup AV5 Sup Sup Sup ...

Page 53: ...53 4 PIP POSITION Button You can change PIP position in PIP state 5 Select PIP SWAP You can alter between the main source and the PIP source using this key ...

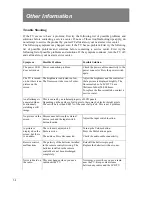
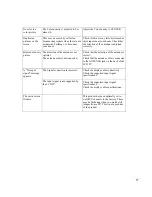
Page 54: ...florescent tube of a LCD TV has a lifetime of about 50 000 hours To replace the fluorescent tube contact a service center An afterimage is generated when continuously watching a still image This is caused by an inherent property of LCD panels Depending on the number of valid pixels there may be black or bright pixels These will be less than 0 005 of the sum of all pixels This is not a problem No p...

Page 55: ...mal The antenna cable is disconnected Check that the direction of the antenna is correct Check that the antenna cable is connected to the ANTENNA jack on the back of the LCD TV A No input signal message appears The Signal connection is incorrect Check the display cable connectivity Check the supported input signal specifications The input signal is not supported by the LCD TV Check the supported i...

Page 56: ...ideo decoding MP ML MP HL Progressive scan Yes NTSC 3D comb filter Yes Picture mode Custom STD Mild Vivid Film mode detection Yes Noise reduction Yes HDTV compatibility Yes OSD Language English French Spanish Closed caption DTV CC Analog CC V chip MPAA TV rating V chip 2 0 Channel edit Yes EPG Yes single channel EPG for DTV Favorite channel Yes Sleep timing Yes OSD transparency setting Yes EAS Yes...

Reviews: