background image


1.


Attach the threaded end of the Air Hose to the Turbine System’s air outlet. 

2.


Connect the other end of the Air Hose to the Spray Gun. 


Adjusting Flow Control Knob


The Fluid Control Knob is found at the rear of the gun. It controls the amount of solution 

that is sprayed through the nozzle. To find the optimal setting for the Fluid Control Knob, 

follow the below instructions: 
1.


Turn the knob in the clockwise direction so that only air is coming out of the gun. Then 

turn the knob counter-clockwise slightly to start the flow of spray.  


2.


In each turn, test the spray on a white sheet or towel to check the amount of solution 

coming out of the nozzle. Keep doing this until you have a very fine, even “mist” and a 

light tan colour is showing on your towel. 


3.


Turn the knob clockwise for less solution and counter-clockwise for more solution. The 

further you pull the spray gun trigger, the further the needle inside the gun is retracted 

and the more solution comes out. About a 5 millimetres trigger pull is ideal. 


Setting Spray Pattern


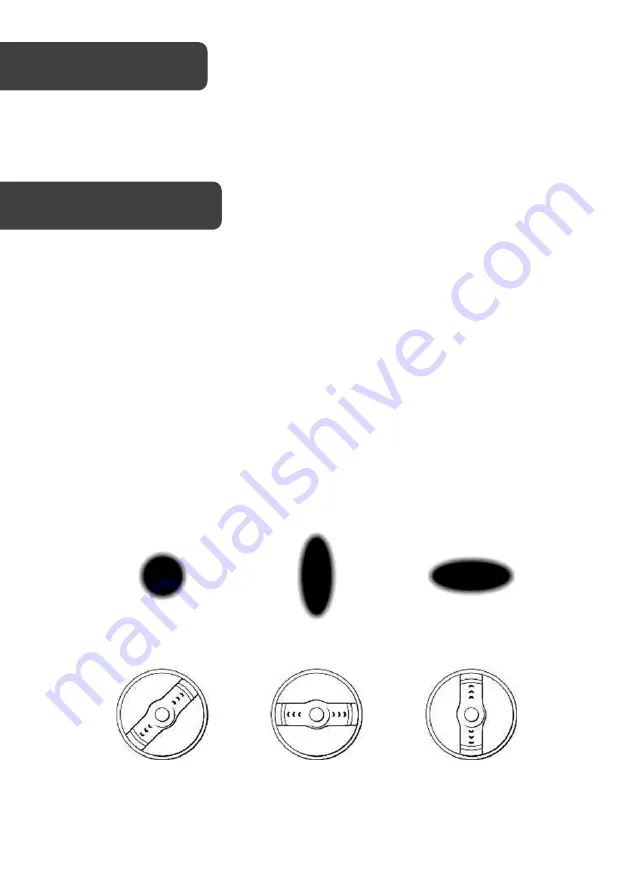
You can adjust the air cap of the Spray Gun to three positions.  


To produce a horizontal pattern for spraying across. 


To produce a vertical pattern for spraying up and down 


To produce a round pattern to spray small areas such as arms or the face.  


           ASSEMBLY


           OPERATION


Summary of Contents for ESPRTANMTA

Page 1: ...HVLP SPRAY TAN MACHINE ESSPRTANMTA BOX1...

Page 2: ......

Page 3: ...machine s motor has overheat protector when it is overheating the motor will shut down It normally takes 30 minutes to return to normal working temperature When the temperature is normal the motor wi...

Page 4: ...operate the machine with a damaged cord or plug Do not pull or carry the machine by the cord Keep away from heated surfaces Do not pull to unplug Improper installation of the grounding plug can result...

Page 5: ...1 Spray Gun 6 Handle 2 Fluid Control Knob 7 Speed Up Button 3 Air Cap 8 On Off Button 4 Cup 9 Speed Down Button 5 Turbine System 10 Air Hose 4 1 2 3 5 6 7 8 9 10 OVERVIEW...

Page 6: ...urn test the spray on a white sheet or towel to check the amount of solution coming out of the nozzle Keep doing this until you have a very fine even mist and a light tan colour is showing on your tow...

Page 7: ...rce of clean warm dry low pressure turbine air 5 Adjust the air cap on the gun Turn the Fluid Control Knob all the way in clockwise direction 6 Aim the gun towards a sink towel or another receptacle t...

Page 8: ...on for single use Ensure you have shaved desired areas before the spray Ensure you are wearing latex gloves For Spray Recipient Shower and exfoliate to eliminate dead skin cells If possible apply nail...

Page 9: ...the application to all areas of the legs Ask the recipient to turn to spray the outside and inside of arm and side of the neck 7 Ask the recipient to turn to their back Continue spraying at the back...

Page 10: ...nozzle with the cleaning solution and a small brush such as a toothbrush or nail brush Remove the fluid cup and spray until only dry air comes from the gun Wipe off the outside of the gun rinse out t...

Page 11: ...NOTES...

Page 12: ...ion We hope that this user guide has given you the assistance needed for a simple set up For the most up to date guide for your product as well as any additional assistance you may require head online...

Reviews: