background image

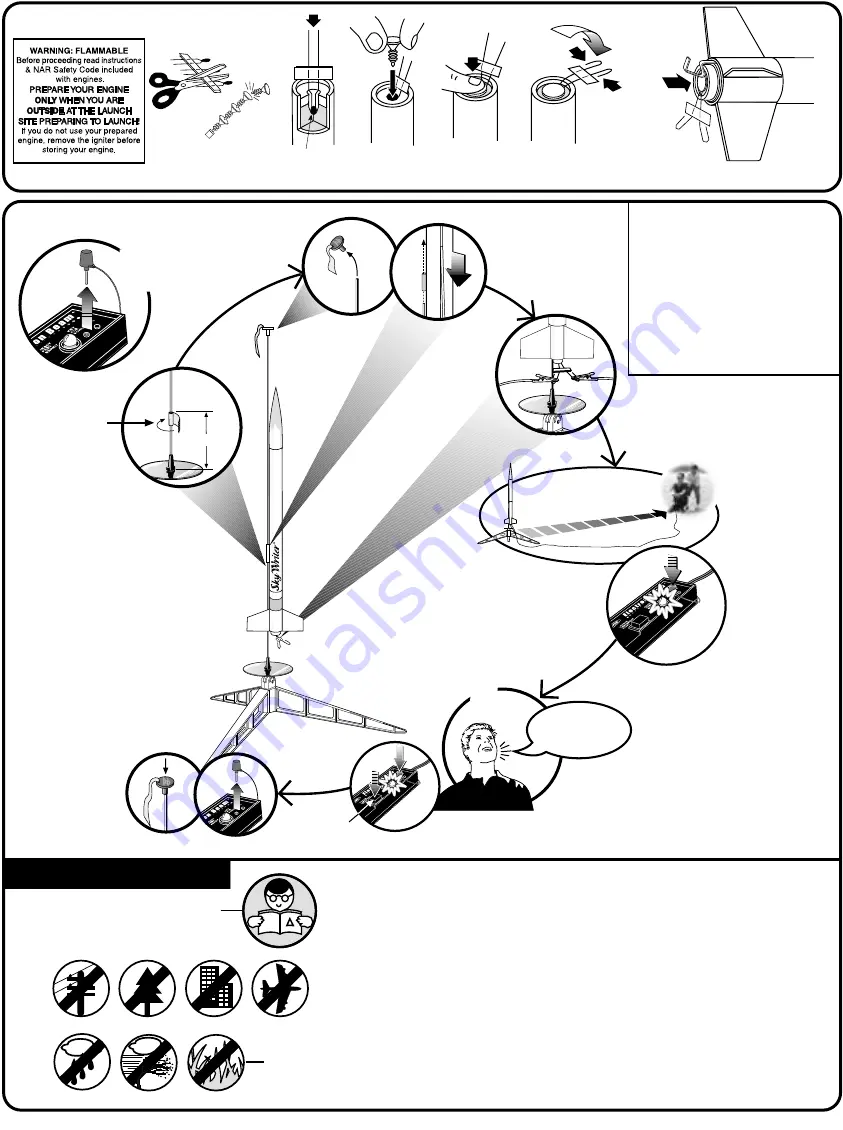
COUNTDOWN AND LAUNCH

NAR Safety Code

NO DRY GRASS
OR WEEDS

PRECAUTIONS

HOLD KEY DOWN AND PRESS LAUNCH
BUTTON UNTIL LIFT-OFF!

15 FT. (5 M)

MASKING
TAPE

INSERT KEY.
PUSH DOWN
AND HOLD.

FLYING YOUR  ROCKET

Choose a large field (500 ft. [152 m] square) free of dry weeds and
brown grass. The larger the launch area, the better your chance of
recovering your rocket. Football fields and playgrounds are great.
Launch only with little or no wind and good visibility.

Always follow the National Association of Rocketry (NAR)
SAFETY CODE.

MISFIRES

TAKE THE KEY OUT OF THE CONTROLLER. WAIT ONE MINUTE
BEFORE GOING NEAR THE ROCKET! Disconnect the igniter clips and
remove the engine. Take the plug and igniter out of the engine. If the igniter
has burned, it worked but did not ignite the engine because it was not
touching the propellant inside the engine. Put a new igniter all the way
inside the engine without bending it. Push the plug in place. Repeat the
steps under Countdown and Launch.

©2001 Centuri Corp. All rights reserved.  (12/01)  PN 60161

4...

4...

1...

1...

3...

3...

LAUNCH SUPPLIES

 Estes® Porta Pad® II Launch

Pad and Electron Beam® Controller

 Recovery Wadding

 Igniters (with Engines)

 Igniter Plugs (with Engines)

 Estes® Recommended Engines:

A8-3, B4-2, B4-4, B6-4, C6-5

(Sold Separately)

ENGINE PREP

A.

B. 

Tip must touch

propellant.

F. 

Insert Engine.

D.

C.

E.

page 4

4” (10.1 cm)

KEY ALWAYS OUT
UNTIL FINAL
COUNTDOWN!

2...

2...

4...


3...


2...


1...

5...

5...

LAUNCH
BUTTON

Summary of Contents for Sky Writer

Page 1: ...g 1 38175 Red Tube Coupler 1 30174 5 Decal Sheet 1 60160 Assembled 12 30 cm Parachute 35801 Lower Body Tube BT 50 1 60158 Upper Body Tube BT 50 1 30349 Nose Cone 1 71027 Green Engine Block 1 30162 2 PARTS Locate the parts shown below and lay them out on the table in front of you DO NOT USE THIS DRAWING TO ASSEMBLE YOUR ROCKET KEEP FOR FUTURE REFERENCE SPRAY CLEAR COAT OPTIONAL NO 2 Green Adaptor R...

Page 2: ...e set D Apply glue fillet on each side of Launch Lug Smooth with finger and let dry page 2 ENGINE MOUNT ASSEMBLY Blue Engine Mount Tube A A Locate slot in the Fin Unit Align Engine Hook of Engine Mount Assembly with slot in Fin Unit and slide in place until it stops 3 8 10 mm G L U E D Apply glue inside Lower Body Tube as shown Push Body Tube over Green Adaptor Ring in one continuous motion until ...

Page 3: ... B Spike A Insert 3 4 loosely crumpled squares of Recovery Wadding E Wrap lines loosely insert Parachute Shock Cord and Nose Cone C Fold D Roll CAUTION DO NOT CUT OFF EYELET OF NOSE CONE page 3 ATTACHING SHOCK CORD C 3 Smear Glue Smear Glue ATTACHING PARACHUTE SHOCK CORD 7 DECAL APPLICATION OPTIONAL Clear coat entire rocket after applying decal Carefully remove Decal from sheet and apply where sho...

Page 4: ...R THE ROCKET Disconnect the igniter clips and remove the engine Take the plug and igniter out of the engine If the igniter has burned it worked but did not ignite the engine because it was not touching the propellant inside the engine Put a new igniter all the way inside the engine without bending it Push the plug in place Repeat the steps under Countdown and Launch 2001 Centuri Corp All rights re...

Reviews: