background image

16

Chapter VIII Notice

1. Balance Output of ESWING

Computer balance can start immediately when you step on the pedal of ESWING. If 
you keep pressing the pedal switch, the computer balance will always on. But the 
computer keeps balance output only 5-second at a low speed, then OFF 
automatically as the pedal switch restored. Please pay attention that ESWING will 
keep balance always if the balance output function is ON, it means letting this 
scooter on a flat road without driver on it will go forward by itself.

2. ESWING Parking

If for temporary parking, you can just turn on the balance output by remote control 
and lean it against a wall or step that can stop it from moving forward; if for long time 
parking, you can switch off the power and put the supporting foot down. This parking 
supporting foot can be purchased from us independently.

3. Water Accident

Turn the power off immediately if ESWING poured into water accidentally. Do not 
drive it again if you are not sure of the default. The ESWING weighs 55kg, you can 
take it home easily without help; and please contact us for after-service guide.

4. Lock Switch

To lock ESWING is for preventing accidental run. Just power off and lock, then try to 
power on again, if red light flashes 5 times, it means ESWING is locked. 
When ESWING is ON and already initialized, if you lock at this time, it will lead to 
pedal switch short circuited. ESWING will think one driver standing on it and will start 
balance automatically. Please do not drive under this situation.

In some countries, ESWING is difficult to define vehicle type, so please don't drive 
on public roads used for motor vehicles .When driving on the sidewalk, single 
driveway or public places, please obey the local traffic rules.

Summary of Contents for city road

Page 1: ...User Manual for ESWING SHENZHEN XINLI TECHNOLOGY CO Limited...

Page 2: ...ructions Recommended for adults use Not suitable for children under 10 years Parents are advised to accompany all children Please wear helmet knee and elbow guards for safety purposes Do not abuse the...

Page 3: ...Explanation 4 Chapter III Instruction manual of remote control 6 Chapter IV Getting Started 8 Chapter V ESWING Driving 10 Chapter VI Charging 14 Chapter VII Maintenance 15 Chapter VIII Notice 16 Chapt...

Page 4: ...D ESWING is equipped with dual wheels its width is as narrow as a normal adult shoulder s width It is around 46 5KG Li ion battery operated It is not necessary to have a brake or throttle during drivi...

Page 5: ...urn left or right turn around rotate 360 degrees It also has support function and can play a subsidiary role in keeping body balance 2 The height is adjustable The driver can adjust it according to hi...

Page 6: ...ning light 2 Battery will run out soon 3 Red light warning light 3 Battery will run out completely 5 Assembly instruction of steering pipe 1 Assembly the handlebar Use the smaller hex screwdriver alon...

Page 7: ...back operate according to picture 2 Picture 1 Picture 2 If the chariot upwards don t lean it forward anymore the rider must lean backward firmly to stop immediately otherwise the rider will be fall o...

Page 8: ...n signal distance is within 15 meters once beyond this range the remote will display no connection Once the icon of displays it means battery is low and less than enough Please take the remote control...

Page 9: ...pright turn on the power after green light orange light and red light flash at the same time and the green light stay on continuous it means starting success refer to picture 3 4 5 Then hold the handl...

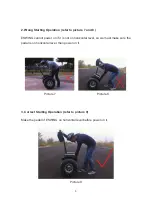
Page 10: ...refer to picture 9 Make the pedal of ESWING on horizontal level before power on it 2 Wrong Starting Operation refer to picture 7 and 8 ESWING cannot power on if it is not on horizontal level so we mus...

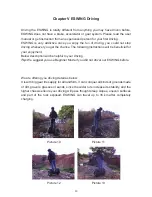
Page 11: ...ons will be beneficial for your enjoyment Below description will be helpful to your driving Tip We suggest you use Beginner Mode if you did not driver our ESWING before We are offering you driving det...

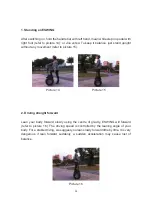
Page 12: ...refer to picture 15 Picture 14 Picture 15 2 Driving straight forward Lean your body forward slowly using the centre of gravity ESWING will forward refer to picture 16 The driving speed is controlled...

Page 13: ...nd stopping safely refer to picture 17 Tip Driving forward in a straight line you just simply push the handle forward then backward to slow down or stop 4 Turning in Original Place Turn Around and Rot...

Page 14: ...o not drive it in rainy day The water may damage the electronic mechanic ESWING does not recommend to be operated during the night Light accessories is optional ESWING can be operated on snow however...

Page 15: ...n charge mode refer to picture22 The charger has two light Red light means charging mode Green light means fully charged please pull out the charger AC inlet in soon The fully charging normally takes...

Page 16: ...be damaged worse and to check if there is necessary to replace one new tire Chapter VII Maintenance All other items that are not mentioned in this chapter in the below should be done by a professiona...

Page 17: ...oot down This parking supporting foot can be purchased from us independently 3 Water Accident Turn the power off immediately if ESWING poured into water accidentally Do not drive it again if you are n...

Page 18: ...n in 3 seconds the pedal switch is pressed down ESWING will think the driver has fallen off and will stop automatically to keep the driver safe Please remember pedal switch must be in right position t...

Page 19: ...yroscope or accelerometer In above two situations please power off ESWING and stop driving then contact the technicians 5 Function of battery display and sound alarm Green light continually On System...

Page 20: ...0m 30 4 6h 86cm 52 5cm 72 5cm 84 168 48V 11Ah ESWING W1 ES1350 19 Vacuum Aluminum Alloy Rim 83cm 47cm 60cm 55kg Brush DC Motor 80 110cm adjustable 110kg 16km h 25km 270mm 160mm 0m 30 6 8h 86cm 52 5cm...

Reviews: