background image

6

ENGLISH

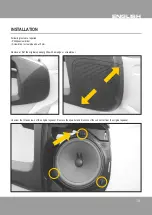
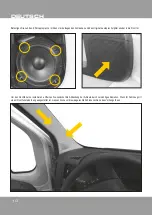
At many vehicles the tweeter can be installed behind the a-pillar cover. Replace the original tweeter with the ESX tweeter.

We recommend to secure the tweeter with hot glue.

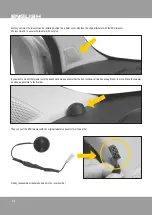
If you want to mount the tweeter onto the dashboard, please ensure that the front window curtain has enough room to move. Place the tweeter 

as close as possible to the A-pillar.

Then connect the ESX tweeter with the original tweeter connector form the a-pillar.

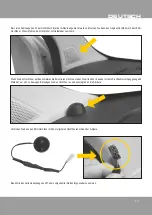
Finally, reassemble all panels and parts in the reverse order.

Summary of Contents for DCS165

Page 1: ...16 5 cm 6 5 2 WAY COMPONENT SYSTEM DCS165...

Page 2: ...been made in an incompetent manner is excluded from the warranty This warranty is limited only to defective parts and especially excludes all incidental or consequential damages and those who are asso...

Page 3: ...Screwdriver screw size about 5 mm ENGLISH INSTALLATION Remove at first the original speaker grille with a wedge or screwdriver Unscrew the three screws of the original speaker Remove the speaker and...

Page 4: ...4 ENGLISH Replace the original speaker with the enclosed adaptor ring Connect the enclosed cable adapter with the ESX speaker an the original speaker connector inside the front doors...

Page 5: ...using the four enclosed screws Put back the original speaker grille in the front door To install the tweeter remove the cover of the a pillar by pulling If your vehicle is equipped with a front windo...

Page 6: ...cure the tweeter with hot glue If you want to mount the tweeter onto the dashboard please ensure that the front window curtain has enough room to move Place the tweeter as close as possible to the A p...

Page 7: ...st die unberechtigter weil inkompetenter Weise vorgenommen wurden ist von der Garantie ausgeschlossen Diese Garantie ist auf defekte Teile beschr nkt und schlie t insbesondere alle zuf lligen bzw even...

Page 8: ...aubendreher f r eine Schraubengr e von ca 5 mm INSTALLATION Entfernen Sie zuerst das Original Lautsprechergitter mit einem Keil oder Schraubendreher L sen Sie die drei Schrauben des Originallautsprech...

Page 9: ...TSCH Ersetzen Sie den Originallautsprecher durch den beiliegenden Adapterring Verbinden Sie den beiliegenden Kabeladapter mit dem ESX Lautsprecher und den originalen Lautsprecheranschluss in den Front...

Page 10: ...Original Lautsprechergitter wieder in die Frontt r Um den Hocht ner zu installieren entfernen Sie zun chst die Abdeckung der A S ule durch vorsichtiges Abziehen Wenn Ihr Fahrzeug mit einem Frontfenst...

Page 11: ...ern Wenn Sie den Hocht ner auf das Armaturenbrett montieren m chten stellen Sie bitte sicher dass der vordere Frontfenstervorhang gen gend Platz hat um sich zu bewegen Befestigen Sie den Hocht ner so...

Page 12: ...D E S I G N Audio Design GmbH Am Breilingsweg 3 D 76709 Kronau Germany Tel 49 7253 9465 0 Fax 49 7253 946510 www audiodesign de www esxaudio de 2017 Audio Design GmbH All Rights Reserved...

Reviews: