22
ENGLISH
QM66SP
+12V
GND
REM IN
REM OUT
MODE
POWER INPUT
HIGH LEVEL INPUT
AUTO TURN-ON
POWER
VOX DC OFF
6 5 4
3 2 1
IN+
IN–
BT
ANT
RESET
USB
OPTICAL IN
REMOTE
OUT F
OUT D
OUT B
OUT E
OUT C
OUT A
IN 2
IN 1
LEVEL
INPUT
MIN
MAX
CHANNEL 1/2
IN 4
IN 3
LEVEL
INPUT
MIN
MAX
CHANNEL 3/4
IN 6
IN 5
LEVEL
INPUT
MIN
MAX
CHANNEL 5/6
EXTENSION
IN (RCA INPUTS)
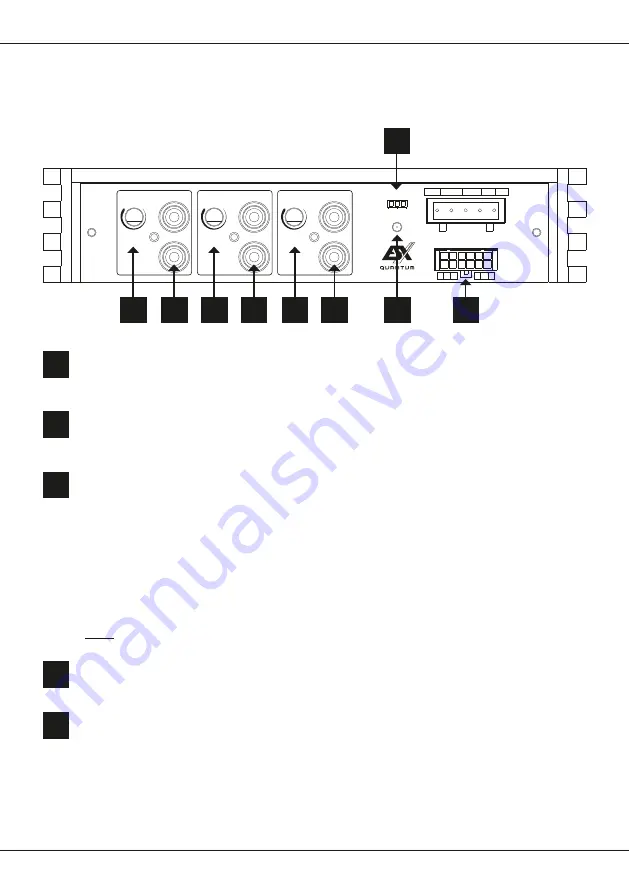
Connect the RCA inputs
IN
with the preamp outputs of head unit accordingly by using appropriate
audio signal cables.
8
HIGH LEVEL INPUT (15 ~ 45 V)
If your head unit does not have RCA preamp outputs, you can use the
HIGH LEVEL INPUT
. Connect
the loudspeaker cables of the head unit to the included wire harness accordingly.
To change the input sensitivity to 2 ~ 15 V, please see the note on page 24.
11
LEVEL INPUT
These controllers determines the input sensitivity (adaptation to the output signal of the head unit) for
each channel pair.
7
POWER
If the LED lights up in green, the device is ready for operation.
10
AUTO TURN-ON
If your head unit does not have a turn-on signal (REM), you can use the automatic turn-on function of
the device. This works in two ways, which can be set at the
AUTO TURN-ON
switch:
VOX
: Select this method when using the
IN
RCA jacks. The device then detects a voltage increase
in the incoming audio signal when switching on the head unit via the attached RCA cable and then
switches on the device.
DC
: This method only works if you use the device’s
HIGH LEVEL INPUT
. The device then detects
a voltage rise to 6 volts when the head unit is turned on by a so-called “DC offset” and then turns on
the device.
OFF
: Select position
OFF
, if you have connected a turn-on signal at the REM IN terminal.
Note:
As soon as the head unit is switched off again, the device switches itself off.
9
FUNCTIONAL DESCRIPTION
7 8
8
8
10
11
7
7
9
Summary of Contents for Quantum QM66SP
Page 30: ...30 NOTES...
Page 31: ...31 NOTES...


