background image

EI

N

BA

UA

N

LEIT

UN

G

IN

STA

LL

AT

IO

N


GU

ID

E

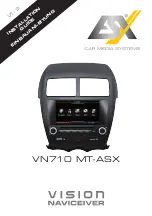
VN710 MT-ASX

V1.

2

Summary of Contents for Vision Naviceiver VN710 MT-ASX

Page 1: ...E IN B A U A N L E IT U N G IN S T A L L A T IO N G U ID E VN710 MT ASX V 1 2...

Page 2: ...en Hinweise vor der Installation 1 Behandeln Sie bitte alle Teile des Soundsystems und die Komponenten Ihres Fahrzeugs grunds tzlich mit Vorsicht 2 Beachten Sie unter allen Umst nden die Vorschriften...

Page 3: ...3 INDEX Inhaltsverzeichnis Scope of delivery 4 Lieferumfang 4 Connection Diagram 6 Anschlussdiagramm 6 Installation notes 7 Installationshinweise 7 Installation example 9 Einbaubeispiel 9...

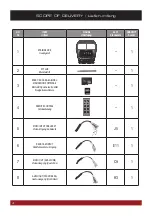
Page 4: ...INKL NAVIGATION SOFTWARE MicroSD Speicherkarte 8GB Navigationssoftware 1 4 REMOTE CONTROL Fernbedienung 1 5 VIDEO INPUT Cable Set Video Eingang Kabelsatz J5 1 6 REAR CAM INPUT R ckfahrkamera Eingang...

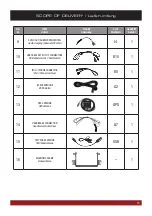
Page 5: ...Cable Set with 2 CONNECTORS USB Kabelsatz mit 2 Anschl ssen D10 1 11 iPOD IPHONE CONNECTOR iPod iPhone Anschluss B8 1 12 BT MICROPHONE BT Mikrofon G2 1 13 GPS Antenna GPS Antenne GPS 1 14 HANDBRAKE CO...

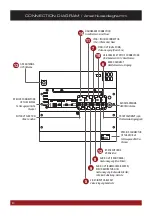
Page 6: ...INPUT Cable Set Video Eingang Kabelsatz GPS Antenna GPS Antenne REAR CAM INPUT R ckfahrkamera Eingang USB Cable Set with 2 CONNECTORS USB Kabelsatz mit 2 Anschl ssen VIDEO OUT DUAL ZONE Video Ausgang...

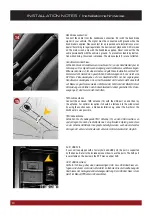
Page 7: ...passenger s side A possibly existing factory microphone is not compatible with the ESX device Please use the supplied microphone BT Mikrofon Montieren Sie das beiliegende Mikrofon 12 an einem geeignet...

Page 8: ...se angeschlossen werden W hrend der Fahrt wird der Bildschirm zur Vermeidung von Unf llen durch Unachtsamkeit dunkel geschaltet Die Video ausg nge 7 sind hiervon nicht betroffen 14 TMC cable antenna C...

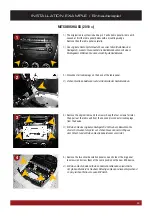
Page 9: ...om Ger t 2 3 4 Remove the two silver decoration panels on each side of the big panel 4 screws and screw them at the same position on the new ESX device 4 Entfernen Sie die beiden silbernen Dekorations...

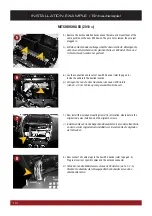
Page 10: ...io Befestigen Sie dann diese entsprechend an der gleichen Stelle am ESX Ger t Diese sind nicht verschraubt sondern nur gesteckt INSTALLATION EXAMPLE Einbaubeispiel MITSUBISHI ASX 2010 6 Lay the connec...

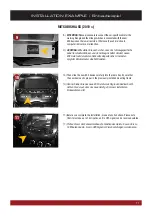
Page 11: ...hes is connected with the new ESX device on the lower rear side Otherwise the vehicle s board computer indicates a malfunction 9 ACHTUNG Bitte stellen Sie auch sicher dass das fahrzeugspezifische Kabe...

Page 12: ...D E S I G N ESX Car Media Systems Audio Design GmbH Am Breilingsweg 3 D 76709 Kronau Germany Tel 49 0 7253 9465 0 Fax 49 0 7253 946510 www esxaudio de www audiodesign de 2013 All Rights Reserved...

Reviews: