background image

28

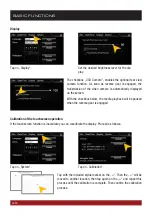
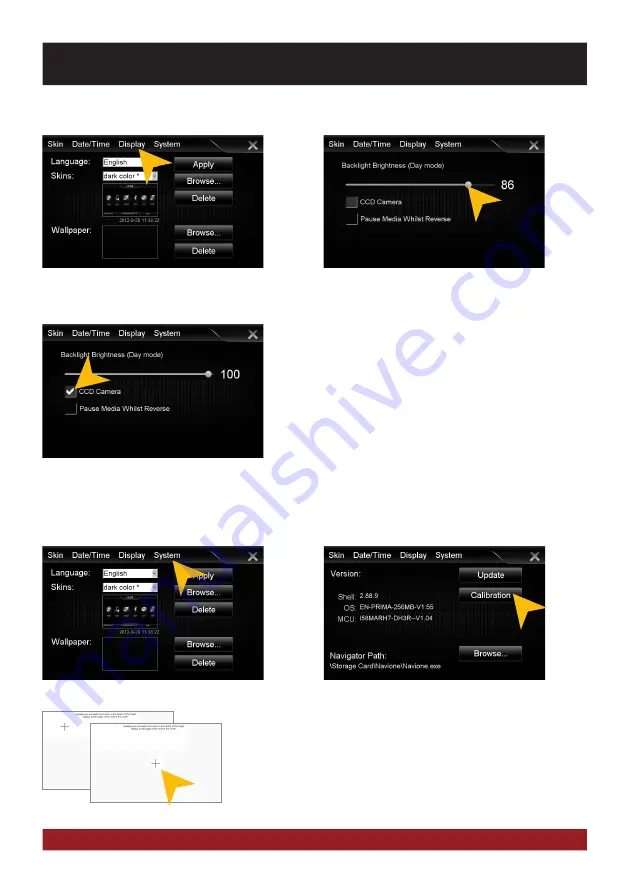
Calibration of the touchscreen operation

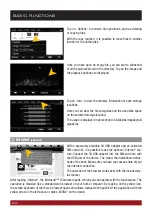
If the touchscreen function is inaccurate you can recalibrate the display. Proceed as follows:

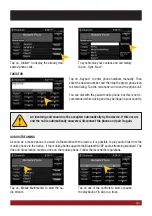
Tap with the included stylus marker on the „+“. Then the „+“ will be 
moved to another location, then tap again on the „+“ and repeat this 
process until the calibration is complete. Then confirm the calibration 
process.

Set the desired brightness level for the dis-
play.

The checkbox „CCD Camera“, enables the optional rear view 
camera  function.  As  soon  as  reverse  gear  is  engaged,  the 
transmission  of  the  video  camera  is  automatically  displayed 
on the screen.

With the checkbox below, the media playback will be paused 
when the reverse gear is engaged.

Display

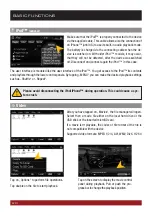
Tap on „Display“.

BASIC FUNCTIONS

Tap on „System“.

Tap on „Calibration“.

Summary of Contents for VN710 MB-A1

Page 1: ...VN710 MB A1 O W N E R S M A N U A L V 1 3...

Page 2: ...or each application File manager with an open file structure photo slideshow compatible with MS Office applications MicroSD card slot and USB port with copy function Integration of external applicatio...

Page 3: ...Player 14 Apps Applications 16 Bluetooth 17 iPod 20 Video 20 TV optional 21 Files 21 Internet optional 22 Audio Settings 23 Rear Media optional 25 Options 26 Custom settings 29 Menu assignments 29 Wa...

Page 4: ...romised The same stands for looking at the screen If necessary better park your vehicle at a safe and appropriate location The traffic rules of the EU prohibit to view moving pictures or movies while...

Page 5: ...nging of the polarity of all connections Complete the installation only while the the ignition is turned off In the event of a defect or malfunction do not attempt to repair it by yourself or open the...

Page 6: ...chapter 5 Open the radio mode 6 Skip to the previous track title station chapter 7 Open the DVD CD player menu 8 Open the main menu 9 MicroSD card slot and Reset button behind the cover 10 Power on of...

Page 7: ...lead to the regarding submenue In chapter CUSTOM SETTINGS section Menu assignments Pg 29 shows how to customize and arrange the key panels MAIN MENU After power on the device displays the main menu B...

Page 8: ...n on the device The unit receives GPS satellite signals automatically In poor weather conditions or for example while passing a tunnel these signals may be disturbed This could lead to a malfunction o...

Page 9: ...lbum cover of the current audio file 6 Playlist of the audio player The currently playing title is highlighted Tap on any title to start its playback 7 Title artist album information and elapsed time...

Page 10: ...hort playback of each song in the playlist Random for a randomized playback within all titles Repeat to replay the current title Save playlist to save the current playlist on Local Clear list to delet...

Page 11: ...the search for a station from current frequency up or down 7 Station presets 8 RDS name and RDS informations of the current station 9 RDS AF TA PTY features 10 PTY category of the current station 11...

Page 12: ...n the white input box to change the radio station name by using the screen keyboard Tap on Name as freq to set the frequency as radio station name Confirm your entry with OK or tap Cancel to exit the...

Page 13: ...lly without the user is notice anything TA Traffic Announcement The TA function enables the interruption of the media playback audio player CD DVD etc for traffic announcements After the announcement...

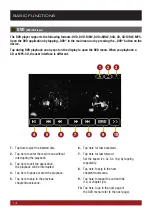
Page 14: ...repeatedly 8 Tap here to skip to the next chapter track scene 9 Tap here to repeat the current title 1x or chapter 2x 10 Tap here to go to the next page of the DVD menu refer to the next page 1 2 5 6...

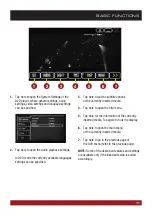
Page 15: ...here to set the subtitle options of the currently inserted media 4 Tap here to open the title menu 5 Tap here for the information of the currently inserted media Tap again to hide the display 6 Tap h...

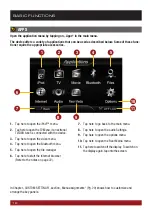
Page 16: ...Tap here to open the video menu 4 Tap here to open the Bluetooth menu 5 Tap here to open the file manager 6 Tap here to start the Internet browser Refer to the notes on page 22 7 Tap here to go back t...

Page 17: ...list of Bluetooth devices you can also manually pair the devices The range for a satisfactory connection is about 10 m To disconnect the two Bluetooth devices tap on Devices At first pair the devices...

Page 18: ...all history starts automatically CONTACTS AND CALL HISTORY Tap on Contacts Tap on the white search field to search for a contact by typing its name on the screen keyboard Tap on History Tap on Missed...

Page 19: ...lls TASTATUR Tap on Keypad to enter phone numbers manually Then enter the desired number and then tap the green phone icon to start dialing Tap the red phone icon to end the phone call You can dial wi...

Page 20: ...rough the lower control panels By tapping MENU you can make the desired playback settings such as Shuffle or Repeat After you have tapped on Movies the file manager will open Select then a movie file...

Page 21: ...is possible to manage and open com puter specific file formats The system supports the following file formats Photo BMP JPEG GIF PNG Video MPEG 1 2 4 WMV Audio MP3 WMA WAV Office PDF Word doc Excel x...

Page 22: ...into with the USB port of the device The follow the installation instruc tions of the stick Make sure you have your access data of your the internet connection The operation of the browser works best...

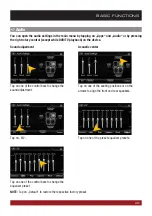
Page 23: ...ment NOTE Tap on Default to restore the respective factory preset Acoustic center Tap on one of the control bars to change the equalizer preset Tap on one of the preset equalizer presets Tap on EQ BAS...

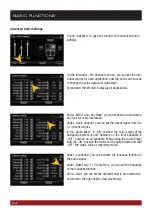
Page 24: ...of the loudness function Under Gain you can set the desired boost in db increments Scroll down the right field to view all settings Under MISC and Key Beep you can activate or deactivate a key tone fo...

Page 25: ...enter speaker This relieves the speakers and improves the sound With Gain you can set the desired level of the center speaker signal NOTE Tap on Default to restore the respective factory preset REAR M...

Page 26: ...Version number of the user interface OS Version number of the operating system MCU Version number of the CAN BUS protocol Check under www esxaudio de navi if an operating system update is available o...

Page 27: ...Tap on Date Time Date Time Select the desired time zone BASIC FUNCTIONS Set the current date Set the current time Tap on Apply Please operate complex settings as a driver generally only if you have pa...

Page 28: ...until the calibration is complete Then confirm the calibration process Set the desired brightness level for the dis play The checkbox CCD Camera enables the optional rear view camera function As soon...

Page 29: ...e You have also the possibility to link a control panel with any compatible software application EXE which must be stored on the available storage locations Tap on Browse to select the desired applica...

Page 30: ...ly you can set an already opened image as your wallpaper Tap on Options and select Set as Wallpaper Under certain circumstances the opening and loading of large images or movie files may take some tim...

Page 31: ...ogo startup logo to your liking First copy the desired file to the microSD card the USB stick or on the local hard drive Open the desired file in the file manager by double click Tap on Options and se...

Page 32: ...control which can be different depending on the currently running application NOTE If the battery button cell is discharged replace it only with a new one of the same type CR2025 Please do not throw...

Page 33: ...ame ra has been installed the display transmits automatically the camera picture Refer to page 28 This happens even when the power of the device is off After the reverse was redeployed the device rest...

Page 34: ...een is not properly calibrated Calibrate the touch screen under Apps Options System The device opens an application or is currently processing Wait until the process is com pleted Screen is black The...

Page 35: ...evice is not properly con nected or the connection cable is defective Check all connections and replace a possibly damaged cable with a new one The devices is not compatible If necessary make a softwa...

Page 36: ...ntil the GPS signal is available again The route guidance does not match with the current road or the map is is wrong The navigation software is not up to date Update the software or contact the softw...

Page 37: ...ble phone Front rear camera No transmission on the screen The camera is not properly connected to the device Check the connections for any mistakes The camera was installed improperly Check the instal...

Page 38: ...me values However before you replace a defective fuse check at first what is the cause of the short circuit Start with the power supply cable If the fuse blows again a malfunction consists inside the...

Page 39: ...nformation in this manual is incomplete or is not matching to the delivery status Please visit periodically www esxaudio de navi on the internet to check if additional information and soft ware update...

Page 40: ...D E S I G N ESX Car Media Systems Audio Design GmbH Am Breilingsweg 3 D 76709 Kronau Germany Tel 49 0 7253 9465 0 Fax 49 0 7253 946510 www esxaudio de www audiodesign de 2013 All Rights Reserved...

Reviews: