background image

1

VN715-MB-A1-DAB

V1.

0

INST

ALLA

TION

GUIDE

VISION SERIES FOR ANDROID

INFOTAINMENT

TOUCHSCREEN NAVICEIVER

Summary of Contents for VN715-MB-A1-DAB

Page 1: ...1 VN715 MB A1 DAB V 1 0 IN S T A L L A T IO N G U ID E VISION SERIES FOR ANDROID INFOTAINMENT TOUCHSCREEN NAVICEIVER...

Page 2: ...ot make any changes to the vehicle which could impair driving safety For safety reasons disconnect the vehicle battery s ground connection before installation Please always pay attention to the correc...

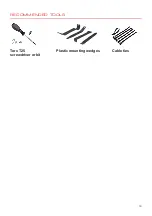
Page 3: ...3 RECOMMENDED TOOLS Torx T25 screwdriver or bit Plastic mounting wedges Cable ties...

Page 4: ...System connector QUADLOCK Standard 1 System connector QUADLOCK with CAN Bus decoder 1 CAN Bus connection cable 1 Antenna adapter Fakra on ISO 1 AV connector with all audio and video connections and ad...

Page 5: ...5 ITEM FIGURE QUANTITY GPS antenna 1 DAB antenna 1 4G LTE antennas 2 4G LTE dongle 1 WIFI antenna 1 SCOPE OF DELIVERY...

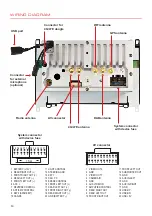
Page 6: ...ONTROL 8 ANT AMP CONTROL 9 KEY2 SPARE BIT 10 CAN RX 1 VIDEO OUT 2 11 FRONT LEFT OUT 12 SUBWOOFER OUT 13 GND 14 AUX IN LEFT 15 GND 16 AUX IN RIGHT 17 GND 18 USB DP 18 USB DN 20 USB 5V 2 GND 3 VIDEO OUT...

Page 7: ...access path in the Apps menu under Settings If the device stops responding to input the system is overloaded or crashed Then reboot the system by pressing the reset button RST on the front panel Use a...

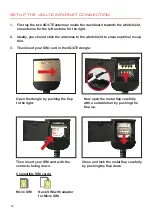
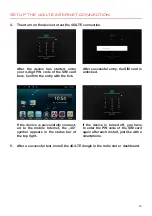
Page 8: ...the windshield to ensure optimal recep tion 3 Then insert your SIM card in the 4G LTE dongle Open the dongle by pushing the flap to the right Then insert your SIM card with the contacts facing down C...

Page 9: ...ce has started enter your 4 digit PIN code of the SIM card here Confirm the entry with the tick If the device is successfully connect ed to the mobile Internet the 4G symbol appears in the status bar...

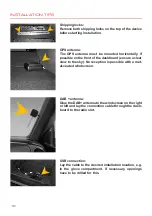
Page 10: ...d windscreen DAB antenna Glue the DAB antenna to the windscreen on the right or left and lay the connection cable through the dash board to the radio slot USB connection Lay the cable to the desired i...

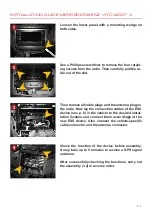
Page 11: ...of the ESX device see p 6 in the vehicle to the desired instal lation location and connect them accordingly at the new ESX device Also connect the vehicle specific cable connector and the antenna conn...

Page 12: ...rd switch from its cable 1 Now remove both upper retaining screws on each side using the Torx T25 screwdriver 2 3 Then loosen the lower radio cover with mountin gwedges 4 Carefully unlatch the fan uni...

Page 13: ...004 4 2012 Now remove both lower retaining screws on each side using the Torx T25 screwdriver 5 Then carefully pull the radio out of the slot 6 7 Then remove all cable plugs and the antenna plugs on t...

Page 14: ...the antenna con nector Then slide the ESX device into the slot of the dashboard 9 Check the function of the device before assembly It may take up to 5 minutes to receive a GPS signal outdoors After s...

Page 15: ...15...

Page 16: ...Car Media Systems Audio Design GmbH Am Breilingsweg 3 D 76709 Kronau Germany Tel 49 7253 9465 0 Fax 49 7253 946510 www esxnavi de www audiodesign de All rights reserved Technical changes errors and mi...

Reviews: