background image

47

GENERAL INFORMATION

Legal Notice

• 

ESX or Audio Design GmbH are in no way affiliated with the Volkswagen AG or any of its subsidiaries or af-
filiated companies connected to, or is acting on its behalf or with its authorization.

• 

All registered product names, trade marks and brands are the property of their respective owners.

• 

This owner‘s manual was made with the utmost care.

• 

If you need to dispose the device, be aware that no electronic devices should be deposed in the household 
waste. Dispose the device in an appropriate recycling facility according to the local waste regulations. Con-
sult if necessary your local authority or dealer.

• 

Technical changes and errors reserved.

Due to the ongoing development of this device, it is possible that the information in this manual is incomplete 
or is not matching to the delivery status.

Please visit periodically 

www.esxnavi.de

 on the internet, to check if additional information and software 

updates are available.

Customer service

In general, the assembly and installation of the device should be made by a trained and technically skilled 
specialists. 

If you have any problems with operating the device, contact your specialist dealer or the Audio Design Service 
Department under Tel. 

+49 7253 - 94 65 95

 or by E-Mail to 

navi@esxaudio.de

.


Declaration of Conformity

Distributor:

Audio Design Lautsprecher Vertriebs GmbH
Am Breilingsweg 3, DE-76709 Kronau/Germany
Hereby, Audio Design GmbH declares that the ESX VN720 VW-U1 device is in compliance with the essential, 
fundamental requirements and other relevant provisions of the following directive:

R&TTE Directive 1999/5/EG

The complete Declaration of Conformity can be found at 

www.esxnavi.de/ce

Summary of Contents for VN720 VW-U1

Page 1: ...VN720 VW U1 V 1 2 O W N E R S M A N U A L...

Page 2: ...o output 3 x Audio Video input Front and rear camera inputs Supports original factory AUX In and USB Port Supports 2D 3D navigation maps with TMCpro function Supports external TV or radio receivers DV...

Page 3: ...39 Infrared remote control 39 Multifunction steering wheel 40 Multifunction display 40 Limited media playback 41 Optional rearview camera OPS 41 Troubleshooting 42 General notes 46 IMPORTANT NOTE FOR...

Page 4: ...promised The same stands for looking at the screen If necessary better park your vehicle at a safe and appropriate location The traffic rules of the EU prohibit to view moving pictures or movies while...

Page 5: ...anging of the polarity of all connections Complete the installation only while the ignition is turned off In the event of a defect or malfunction do not attempt to repair it by yourself or open the de...

Page 6: ...ion of the voice control short push or to activate or deactivate the mute function push and hold 10 Open the navigation system 11 Open the radio mode short push or open the DAB radio push and hold 12...

Page 7: ...gs can be displayed when using the skin VW clima depending on model 3 The four function icons are depending on the skin is highlighted in white and thus activated when the corresponding function is in...

Page 8: ...ual for the navigation software The device provides the ability to use any navigation software Windows CE 6 0 compatible Patch the naviga tion software on MicroSD card with the device as follows BASIC...

Page 9: ...over of the current audio file 6 Title artist album information the elapsed time and the total time of the track 7 Progress bar of the currently playing audio file With the displacement of the knob yo...

Page 10: ...ON Symbol 1 When the last song has been played within a folder the playback will continue to the next folder After the last song playback starts again from the beginning Symbol 2 The current folder is...

Page 11: ...ngth of the current station 8 Fine adjustement of the frequency Arrow left for downward arrow right upwards 9 RDS information of the current station 10 With the arrows you can quick start the search f...

Page 12: ...REG OFF the regional function is activated Rename Station Tap on the white input box to change the radio station name by using the screen keyboard Tap on Name as freq to set the frequency as radio sta...

Page 13: ...e This is done automati cally without the user is notice anything TA Traffic Announcement The TA function enables the interruption of the media playback audio player CD DVD etc for traffic announcemen...

Page 14: ...hange language if available 12 Change subtitles if available 13 DVD menu of the DVD BASIC FUNCTIONS DVD DVD CD Player The DVD player supports the following formats DVD DVD R RW DVD R RW VCD CD CD R RW...

Page 15: ...he Bluetooth settings Turn on Bluetooth and then search for compatible devices The Bluetooth name of the device will be displayed To disconnect the two Bluetooth devices tap on Devices Choose the mobi...

Page 16: ...all history starts automatically CONTACTS AND CALL HISTORY Tap on Contacts Tap on the white search field to search for a contact by typing its name on the screen keyboard Tap on History Tap on Missed...

Page 17: ...ers manually Then enter the desired number and then tap the green phone icon to start dialing Tap the red phone icon to end the phone call You can dial with the paired mobile phone but this is not rec...

Page 18: ...h on the display again tap onto the screen or push the DISP button on the device 2 Tap here to go back to the main menu 3 Tap here to open the LinkPod menu if an iPod iPhone is connected with the devi...

Page 19: ...f and back on The user interface is modeled like the user interface of the iPod You get access to the iPod its contents and playl ists through the lower control panels By tapping MENU you can make the...

Page 20: ...A TM DAB from ESX is used The connections are as follows AV Cable AV 1 3 x RCA AV2 Cable AV2 TV 3 x RCA AV3 Cable AV3 AUX 3 x RCA AUX Factory AUX connection depending on vehicle features Front Cam Cab...

Page 21: ...and if the appropriate set tings for the audio streaming are correct Then disconnect the device and connect it again If the message A2DP is not con nected appears again the Bluetooth device does not...

Page 22: ...er settings Tap on one of the seating positions or on the arrows to align the front and rear speakers You can open the audio settings in the main menu by tapping on Apps and Audio or by pressing the r...

Page 23: ...display all applications Under MISC you can enable the Fade in for very beginning audio track ASL GALA speed dependent volume adjustment in three stages Media Volume in CCD level attenuator when rever...

Page 24: ...eakers Under Subwoofer you can turn on or off the sound output of the RCA output SUBWOOFER and you are able to set its level from 12dB to 10db Unter Center you can turn on or off the sound output of t...

Page 25: ...ding a preview will be displayed Tap on the desired storage location to display the available and compatible files Tap once to highlight a particular file Tap twice double click to open the desired fi...

Page 26: ...D will start automatically Select a disc number on which position the the CD should be ripped and stored Note If Disk Ripped is displayed in the center of the screen the CD songs are already available...

Page 27: ...You can store a total of 10 CDs in this way PLAYBACK Select to Rip Play to start in the play mode of the archive The playback of disc 1 automatically begins Select the desired disc 1 10 If there are...

Page 28: ...au tomatically The App menu contains initially the basic applications on your Android device which can be accessed via the Drive Mode app such as Drivermode voice control Music audio player Navigation...

Page 29: ...bottom left a further window opens in the lower third of the screen There you find more options such as Back Home Set tings or Forward Under Settings you can select If open TTS Selection of the intern...

Page 30: ...nction is deactivated when the USB connection is used for the quick charging The ESX device provides in Quick Charge function a charging current of 1A 2 1A depending on the connected equipment Option...

Page 31: ...12 hours AM PM Tap on Date Time Date Time Select the desired time zone Set the current date Set the current time Tap on Apply Please operate complex settings as a driver generally only if you have pa...

Page 32: ...nables the optional rear view camera function As soon as reverse gear is engaged the transmission of the video camera is automatically dis played on the screen In addition on the top right of the disp...

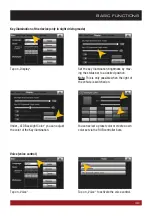
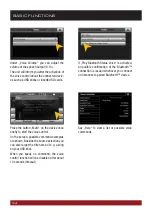
Page 33: ...to a desired position Note This is only possible when the light of the vehicle is switched on Under LED Backlight Color you can adjust the color of the Key illumination You can select a preset color o...

Page 34: ...be disabled after about 10 seconds timeout Say Help to view a list of possible voice commands Under Voice Volume you can adjust the volume of the speech output 0 10 The unit will inform you after the...

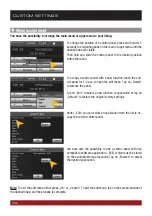
Page 35: ...he calibration process Tap on System Tap on Calibration Check under www esxnavi de if an operating system update is available or ask your retail dealer Then follow the installation instructions that c...

Page 36: ...ap on the screen outside of the dashed lines and the process is complete You have also the possibility to link a control panel with any compatible software application EXE which must be stored on the...

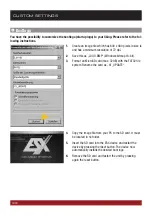
Page 37: ...tions Select a file by double click Tap at Wallpaper on Browse Tap on Apply to confirm your selection or Delete below to remove the current file Alternatively you can set an already opened image as yo...

Page 38: ...Windows bitmap 16 bit 3 Format an MicroSD card max 32GB with the FAT32 file system Rename the card as X1_UPDATE 4 Copy the image file from your PC to the SD card It must be located in no folder 5 Ins...

Page 39: ...on the cur rently running application Note If the battery button cell is discharged replace it only with a new one of the same type CR2025 Please do not throw used batteries into household waste bring...

Page 40: ...or only works if it is enabled in your car Ask if nec essary your auto repair shop for the activation The device sup ports the MFA and the MFA comfort displays ADVANCED OPERATIONS For your own and you...

Page 41: ...below can also be displayed The function always corresponds to the original vehicle and is controlled by the CANBUS If necessary deactivate the parking sensor in the vehicle manually with the dedicat...

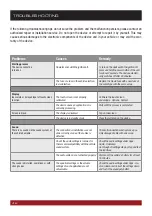
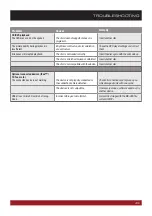
Page 42: ...ed Calibrate the touch screen under Apps Options System The device opens an application or is currently processing Wait until the process is completed Screen is black The display is disabled Tap on th...

Page 43: ...in with the print side up The disc is scratched broken or deformed Insert another disc The disc is not compatible with the device Insert another disc Optional connected devices iPod TV Tuner etc The c...

Page 44: ...avigation software considers many factors in determining a route such as the condition of the roads traffic rules one way streets major roads etc Usually the navigation software selects a route which...

Page 45: ...d The phone allows no access to the phonebook not via Bluetooth Change the settings on the phone See manual of the device Front rear camera No transmission on the screen The camera is not properly con...

Page 46: ...the power supply cable If the fuse blows again a malfunction consists inside the device In this case you should contact your authorized dealer Warranty information The warranty complies with the legal...

Page 47: ...t the information in this manual is incomplete or is not matching to the delivery status Please visit periodically www esxnavi de on the internet to check if additional information and software update...

Page 48: ...D E S I G N ESX Car Media Systems Audio Design GmbH Am Breilingsweg 3 D 76709 Kronau Germany Tel 49 7253 9465 0 Fax 49 7253 946510 www esxnavi de www audiodesign de 2017 All Rights Reserved...

Reviews: