background image


– 7 – 

ETAsys.com

Specifications are subject to change without notice.

1601 Jack McKay Blvd. • Ennis, Texas 75119  U.S.A.

Telephone: 800-321-6699 • Fax: 800-996-3821
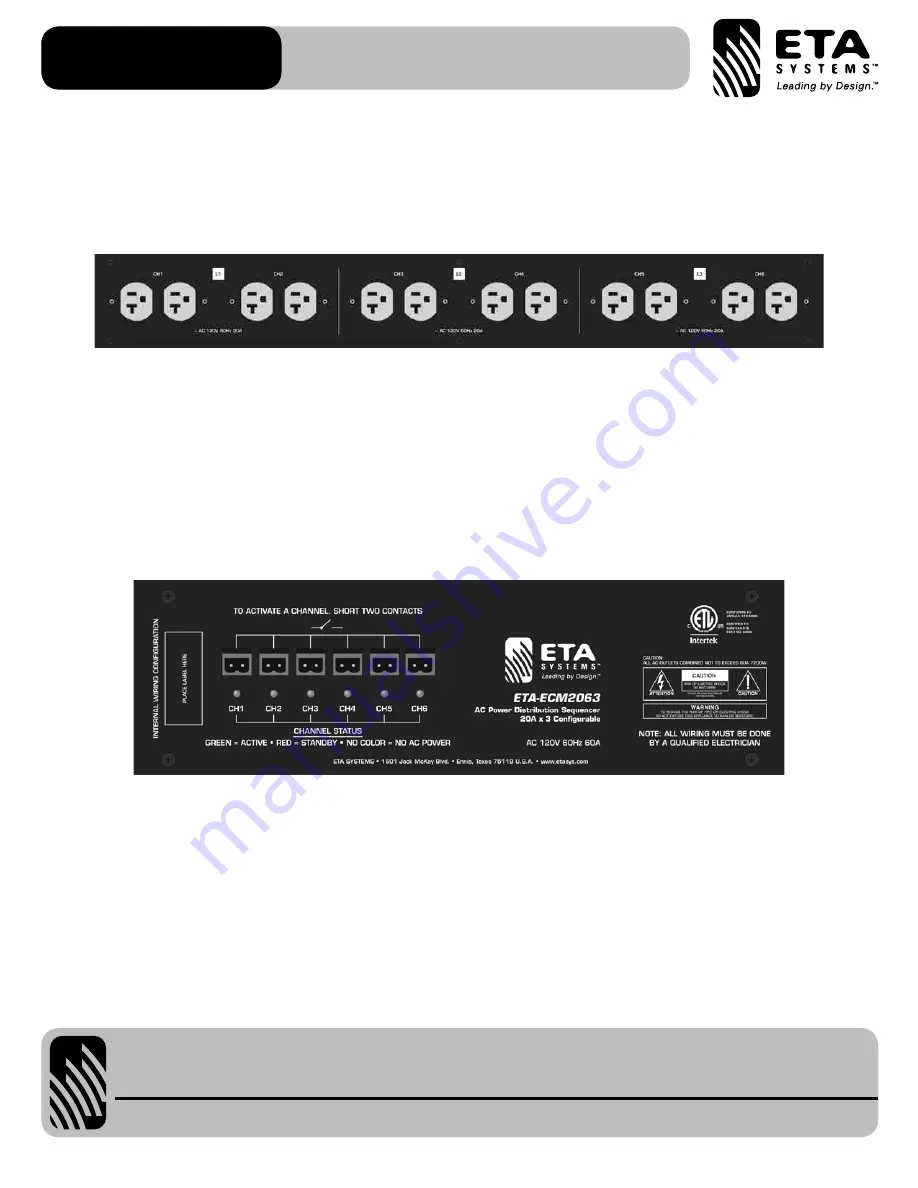
ETA-ECM2063 

AC Power Distribution Sequencer

CONFIGURING THE ETA-ECM2063

The ETA-ECM2063 is designed to be activated/triggered by a sequence controller like the ETA Systems ETA-SEQ6 or the ETA-ECS6RM. 
The ETA-ECM2063 can be configured to accept from 1 to 3 separate hard wired 20A circuits. There are three individual load sections 
in the ETA-ECM2063. Each load section has two separate sequence channels, with each channel having two 20A, 120VAC outlets. In 
summary, the ETA-ECM2063 has a total of 12 AC outlets divided into 6 sequenced channels that can be divided or combined into 3 
20A circuits. 

Note:

 All electrical wiring must be done by a certified electrician.

Channel Control Ports

There are 6 channel control ports that correspond with the 6 AC outlet channels. Activation or triggering a channel of the ETA-ECM2063 
is done by shorting two of the channel control port pins together.  An activation sequence can be triggered using an ETA-SEQ6 or  
ETA-ECS6RM sequence controller or by using another external device such as a hard contact switch to trigger a channel. If a section is 
required to be “always ON”, connect a jumper between the control port pins to the corresponding channel.

Channel Status Indicators

Each channel has a bi-color LED that designates the status of that specific channel.


•  No LED illuminated indicates there is no AC Mains power present at that channel.


•  Red illumination indicates there is AC Mains power present and that channel is ready to be activated.


•  Green illumination indicates the corresponding AC output channel is active and 120VAC is present.

Load Distribution

There are four different load distribution combinations for the ETA-ECM2063. The ETA-ECM2063 has 6 channels that are divided into 
three load circuits. This is to allow up to three separate 20A 120VAC mains lines to be applied to the ETA-ECM2063. It is not required 
to apply three circuits; you can parallel a single 20A line to all three load sections.


•  Channels 1 & 2 are connected to L1


•  Channels 3 & 4 are connected to L2


•  Channels 5 & 6 are connected to L3

Summary of Contents for ETA-ECM2063

Page 1: ...s are subject to change without notice 1601 Jack McKay Blvd Ennis Texas 75119 U S A Telephone 800 321 6699 Fax 800 996 3821 ETA ECM2063 AC Power Distribution Sequencer ETA ECM2063 AC Power Distributio...

Page 2: ...lephone 800 321 6699 Fax 800 996 3821 ETA ECM2063 AC Power Distribution Sequencer TABLE OF CONTENTS Important Safety Instructions 3 Introduction 5 Key Features 5 Applications 5 Raceway AC Inlet Knocko...

Page 3: ...d tripod bracket or table specified by the manufacturer or sold with the device When a cart is used use caution when moving the cart device combination to avoid injury from tip over 13 Unplug this dev...

Page 4: ...not place the power cord in close proximity to heaters and do not place heavy objects on the power cord including the product itself doing so may result in fire or electrical shock Ensure that the saf...

Page 5: ...ETA ECM2063 or from several feet away by using an ETA Systems sequence controller or via a switch The ETA ECM2063 was designed to be compact measuring only 37 high 3 5 wide and 2 75 deep The ETA ECM20...

Page 6: ...pporting standard USA electrical fittings of 1 2 and 3 4 The figure below is an illustration of one end of the raceway RACEWAY MOUNTING RAILS The ETA ECM2063 raceway has breakaway rail mounting tabs t...

Page 7: ...f the channel control port pins together An activation sequence can be triggered using an ETA SEQ6 or ETA ECS6RM sequence controller or by using another external device such as a hard contact switch t...

Page 8: ...AC mains Accessing the Internal Wiring 1 Locate the Control Input Panel 2 Remove the four screws See diagram below 3 Remove the Control Input Panel Note A ribbon cable is attached Carefully lay panel...

Page 9: ...ains inlet on the bottom of the raceway that allows for the easiest connection to the AC Mains line based on the layout of the installation 3 Strip the wires 3 8 4 Locate J23 L3 on the PCB Insert the...

Page 10: ...te J23 L3 on the PCB Remove the wire jumpers from P2 N and P3 H Remove wire from push on spade lug discard 2 wires 5 L1 L2 wiring Locate J24 L2 on the PCB Insert the 20A AC Mains wires into J24 L2 and...

Page 11: ...wires 3 8 4 Locate J25 L1 on the PCB Remove the wire jumpers from P2 N and P3 H Remove wire from push on spade lug discard 2 wires 5 L1 wiring Locate J25 L1 on the PCB Insert the 20A AC Mains wires i...

Page 12: ...P2 N and P3 H Remove wire from push on spade lug discard 2 wires 6 L1 wiring Locate J25 L1 on the PCB Insert the 20A AC Mains wires into J25 L1 and secure by tightening the screws firmly Ground Green...

Page 13: ...Outlets 12 NEMA 5 20 Switched Connectors Qty 6 2 Position Phoenix Euro Block Style 3 5mm Spacing Remote Trigger Hard Switch Contact Closure Indicators Incoming AC Red Active Green AC Mains Interconnec...

Page 14: ...14 ETAsys com Specifications are subject to change without notice 1601 Jack McKay Blvd Ennis Texas 75119 U S A Telephone 800 321 6699 Fax 800 996 3821 ETA ECM2063 AC Power Distribution Sequencer NOTES...

Page 15: ...15 ETAsys com Specifications are subject to change without notice 1601 Jack McKay Blvd Ennis Texas 75119 U S A Telephone 800 321 6699 Fax 800 996 3821 ETA ECM2063 AC Power Distribution Sequencer NOTES...

Page 16: ...below When products returned to ETA Systems do not qualify for repair or replacement under our warranty repairs may be performed at prevailing costs for material and labor unless there is included wi...

Reviews: