21
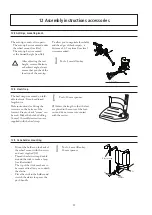
- Loosen the screw that fastens the
lock lug.
-
Slide the guard up or down to the
desired height.
-
Retighten the lug on the side-
guard.
If necessary the right armrest can be
fitted on the left side and vice-versa.
Tools: 3 mm Allen key.
Never use the armrests to lift
the wheelchair.
The detachable armrest comes in two
versions, with short or long armrest
guard. The armrest attachment can
be fitted in 2 different heights. In
position 1 the height of the armrest is
settable between 19 and 26 cm, and in
position 2 (standard) between 24 and
31 cm, with 1 cm intervals.
Tools: 10 mm spanner,
5 mm Allen key.
The lock lug is used both to set the
height of the armrest and secure the
side guard:
12 Assembly instructions accessories
1
2
12:1 Armrests, height adjustment
The belt is to be used
solely for positioning
in the wheelchair. It
must not be used as a
substitute for a safety
belt in a car.
We recommend the
front position (B).
12:2 Positioning belt
The positioning belt is in two parts,
is adjustable in length and has a snap-
lock. It can be mounted either on the
backrest joint (A) or in the hole just in
front of the backrest joint (B), above
the wheel mounts. Assembly instruc-
tions are supplied with the belt.
(!)
Ensure that the user does not
slide forwards in the seat as
this can lead to the belt im-
pairing the supply of blood
to the hip/waist area.
The anti-tip consists of two parts:
- The attachment bar is mounted
under the wheel mount (see illus).
- The extension with the stabiliser
wheel is fixed to the anti-tip bar
by means of a screw and nut at the
desired height.
To allow you to negotiate thresh-
olds and the edges of thick
carpets, a distance of 3-5 cm from
the floor to the stabiliser wheel is
recommended.
Tools: 4 mm Allen key,
8 mm U-spanner.
12:3 Anti-tip, mounting
After adjusting the seat height, centre
of balance or backrest angle, always
ensure that you check the positioning
and function of the anti-tip.
When folding the anti-tip, pull out
and swing round.
A
B

