background image

ETK-S6.0 - User’s Guide

39

ETAS

Technical Data

7.2

Environmental Conditions  

7.3

Power Supply  

7.4

Memory 

7.4.1

Data Emulation Memory 

7.4.2

Measurement Data Memory 

Item

Characteristics

Temperature range

- 40 °C to +110 °C

- 40 °F to +230 °F

Parameter

Symbol Condition

Min Typ

Max Unit

Permanent power 
supply 

(car battery)

U

Batt

Vehicle usage 

1)

4.3

12

18

V

[all values ±0%]

Standby Current

I

STBY

U

Batt

 = 12 V; 

ECU off; T = 20 °C

0.1

10

20

mA

Operating Current I

Batt

U

Batt

 = 12 V; 

ECU on; T = 20 °C

20

60

100

mA

1) The ETK-S6.0 implements reverse voltage protection in the same range and 
may be used only with central load dump protection.

Microcontroller

Characteristics

SH72546RFCC 

1)

, SH72531FCC 

2)

SH72533FCC 

2)

, SH72567BFCC 

1)

ETK-S6.0 can be used to perform mea-
surement and calibration. Internal over-
lay RAM of the micrcocontroller is used 
to emulate data in internal Flash.
max. 512 kByte (as working page)
Standby powered

SH72544 

1)

, SH72544R 

1)

,

SH72531F 

2)

ETK-S6.0 can be used to perform mea-
surement only. Calibration is not possi-
ble due to the lack of emulation 
memory in these controllers.
Standby powered

1)

: with ETK-S6.0, configuration type A

2)

: with ETK-S6.0, configuration type B

Item

Characteristics

Location

Within the emulation memory when 
using DISTAB13 hooks

Summary of Contents for ETK-S6.0

Page 1: ...ETK S6 0 Emulator Probe for Renesas AUD II and H UDI Debug Interface User s Guide ...

Page 2: ... single license Using and copying is only allowed in concurrence with the specifications stipulated in the contract Under no circumstances may any part of this document be copied reproduced transmitted stored in a retrieval system or translated into another language without the express written permission of ETAS GmbH Copyright 2019 ETAS GmbH Stuttgart The names and designations used in this docume...

Page 3: ...s for Operators 8 2 3 Intended Use 8 2 4 Identifications on the Product 11 2 5 Taking the Product Back and Recycling 12 2 6 CE marking 12 2 7 RoHS Conformity 12 2 7 1 European Union 12 2 7 2 China 12 2 8 Declarable Substances 13 2 9 Use of Open Source Software 13 3 Introduction 14 3 1 Applications 14 3 2 Features 14 4 Hardware Description 16 4 1 Architecture 16 4 2 ETK S6 0 Subtypes 16 4 3 ECU Int...

Page 4: ...tion 33 6 1 Overview 33 6 2 ETK Configuration Tool 33 6 3 ETK S6 0 Subtypes 33 6 4 Configuration Parameter 34 6 4 1 Subtype ETK S6 0A 34 6 4 2 Subtype ETK S6 0B 35 7 Technical Data 38 7 1 System Requirements 38 7 1 1 ETAS Hardware 38 7 1 2 Software 38 7 2 Environmental Conditions 39 7 3 Power Supply 39 7 4 Memory 39 7 4 1 Data Emulation Memory 39 7 4 2 Measurement Data Memory 39 7 5 Configuration ...

Page 5: ...TV 54 8 2 2 Cable with Filtercoil ETV2 54 8 2 3 Cable K70 54 8 2 4 Cable KA50 55 8 2 5 Cable CBM200 55 8 3 Adapters 56 8 3 1 ETK ECU Adapter ETAF1 56 8 3 2 Debug Adapter ETAF6 56 9 Ordering Information 58 9 1 ETK S6 0 58 9 2 Connector ECU ETK Adapter ETAF1 58 9 3 Adapters 58 9 4 Debug Adapters 58 9 5 Power Supply 58 9 6 Cables 58 9 6 1 Interface Cables 59 9 6 2 Power Supply Cables 59 10 ETAS Conta...

Page 6: ...Information All activities to be performed by the user are presented in a Use Case format That is the goal to be accomplished is briefly defined in the heading and the respective steps required for reaching this goal are then presented in a list The presentation looks as follows Goal definition any advance information Step 1 Any explanation for step 1 Step 2 Any explanation for step 2 Step 3 Any e...

Page 7: ...livered with all required components and cables see chapter Order ing Information Additional cables and adapters can be obtained separately from ETAS A list of accessories and their order designation is available in this manual and at the ETAS Home Page 1 4 Additional Information The configuration instructions for the product can be found in the corresponding software documentation Bold Labels of ...

Page 8: ... The product may be assembled operated and maintained only if you have the necessary qualification and experience for this product Incorrect operation or operation by users without sufficient qualification may lead to injuries or death or property damages General Safety at Work The existing regulations for safety at work and accident prevention must be fol lowed All applicable regulations and stat...

Page 9: ...e product by disconnecting it from the power supply or by switching off the power supply Potential Equalization Requirements for the technical State of the Product The product is designed in accordance with state of the art technology and rec ognized safety rules The product may be operated only in a technically flawless condition and according to the intended purpose and with regard to safety and...

Page 10: ...out cabling is located in the ETK User s Guides CAUTION The ETK can be damaged or destroyed Some components of the ETK board may be damaged or destroyed by electrostatic discharges Please keep the ETK in its storage package until it is installed The board should only be taken from its package configured and installed at a work place that is protected against static discharge CAUTION During install...

Page 11: ... 12 Symbol for CE conformity see chapter 2 6 on page 12 Symbol for China RoHS see chapter 2 7 2 on page 12 Symbol for China RoHS see chapter 2 7 2 on page 12 Symbol for electrostatic sensitive components XETK S14 0A Product designation example F 00K 110 722 Order number of the product example SN yyxxxxx Serial number 7 digit XXXX YY Product version ZZZZ Year of manufacture ETAS GmbH PO Box 300220 ...

Page 12: ...ched to the product or its packaging ETAS confirms that the product corresponds to the applicable product specific European Directives The CE Declaration of Conformity for the product is available upon request 2 7 RoHS Conformity 2 7 1 European Union The EU Directive 2011 65 EU limits the use of certain dangerous materials for electrical and electronic devices RoHS conformity This product does not...

Page 13: ...oad center in the customer information REACH Declaration www etas com Reach This information is continuously being updated 2 9 Use of Open Source Software The product uses Open Source Software OSS This software is installed in the product at the time of delivery and does not have to be installed or updated by the user Reference shall be made to the use of the software in order to fulfill OSS licen...

Page 14: ...sor interface Configuration type ETK S6 0A AUD II interface Configuration type ETK S6 0B H UDI interface JTAG debugger interface Serial interface to the calibration and development system 100 Mbit s AUD II interface clock speed 10 MHz or 20 MHz depending of used microcontroller H UDI interface clock speed 20 MHz Concurrent use of calibration and debugging function possible configu ration type ETK ...

Page 15: ...manent storage of configuration in EEPROM Voltage supply for EDRAM by ETK Firmware update programming of the logic device through software removal of ETK or ECU not necessary Mounting possibilities inside or on top of ECU The interface voltage level is 3 3 V The supervisor voltage level is config urable Temperature range suitable for automotive application For more technical data on the ETK S6 0 r...

Page 16: ...nes and maps through the calibration and development system Using an additional measure ment data memory area the ECU microcontroller can send data to the calibra tion and development system which receives buffers and processes this measured data DISTAB13 The 100 Mbit s serial interface provides communication with the calibration and development system The power supply for the ETK S6 0 is provided...

Page 17: ...Location of the ECU Interface left Rev A right Rev B The ECU interface can be flexibly configured for several applications For a HDC update it is not necessary to unmount or disconnect the ETK S6 0 from the ECU The ETK S6 0 is connected to the ECU via an adapter cable with 26 pins where the pin definition depends on the application and the microcontroller type For currently supported microcontroll...

Page 18: ... refer to Fig 4 3 22 Ohm series resistors on each of the 4 AUDATA signals on the AUDCK and AUDSYNC signal of the ECU part are recommended The ETK incorporates 22 Ohm series resistors for the AUDSYNC and AUDCK lines on the ECU interface The ETK incorporates a 22 kOhm pullup resistor on AUDRST 4 3 2 H UDI Interface In general the ECU interface configured for H UDI operation ETK S6 0 configu ration s...

Page 19: ...rts of the ETK are normally not on the same voltage level To use the H UDI Debug interface it is necessary to shift the voltage levels at the ECU There are two methods for shifting the voltage level usage of level shifter ICs monolithic implementation usage of diodes and resistors discrete implementation The voltage level of the DAI ports of the ECU 5 V has to be shifted to the volt age level of t...

Page 20: ... ETK S6 0 interface creates the link to the calibration and development system The interface utilizes a 100Base TX transmission to achieve a transmission performance of 100 Mbit s To ensure stable communication only 100 Mbit cables delivered by ETAS shall be used Fig 4 6 Location of the Serial ETK Interface left Rev A right Rev B 3k3 3k3 ECU ETK PVCC 5V 240 240 33k 33k PVCC 5V 33k 33k Optional PVC...

Page 21: ... By using the AUD II interface for serial ETK connection it is not available for debugging tools anymore Therefore a feedthrough for a second debugger inter face JTAG is provided This enables parallel use of tools for debugging and ETAS tools for measurement and calibration JTAG Interface for external Debugger Fig 4 8 Equivalent Circuitry of the ECU JTAG Interface ECU CON5 CON5 S ystem controller ...

Page 22: ... ETK an additional voltage converter is required All necessary voltages are created through switching power supplies which min imizes power dissipation The power supply of the ECU is not affected by the ETK S6 0 An automatic switch ensures that the power supply of the ETK S6 0 is automatically switched on and off when the ETK enters and leaves its sleep mode The ETK S6 0 can be supplied with power...

Page 23: ... and its usage by ProF is very important for the INCA user LED State Definition Red On ETK S6 0 is supplied with power and active i e the ECU is switched on or the ETAS calibration and development sys tem is connected and ready to communicate with the ETK S6 0 Green Off Working Page contains valid data and is accessible from INCA Flashing ETK S6 0 is in boot configuration mode measurement and cali...

Page 24: ...ommon to all overlay strategies is that the access to the Reference Page is only possible in active state visible by the CPU In passive state if the Working Page is active there is no access of the micro controller to this memory When using INCA this is not a real restriction but if the ECU is running from the Working Page a page switch has to be done to perform actions like upload or checksum cal...

Page 25: ... a measurement raster is ready for acquisition The ETK S6 0 periodically polls the AUDMBR to detect the triggers The AUDISR is not used in this mode 4 10 2 Phases of the Startup Protocol for H UDI Operation If the ETK S6 0 is configured in the ETK Configuration Tool as ETK S6 0 Config uration B see chapter 6 4 on page 34 the ETK is activated for H UDi operation During the startup phase the ETK and...

Page 26: ...rces by ETK The ECU configures the DAI ports as outputs and drives a logical high to signal the transition from phase 2 to phase 3 Then the ETK removes any pulldown resistors and starts initialization of the ECU resources 4 Calibration and data acquisition The ECU pulls the appropriate DAI port low to signal a trigger condition to the ETK i e a measurement raster is ready for acquisition ECU and E...

Page 27: ...ETKs use hardwired pins Currently two to four data acqui sition interrupt lines DAI1 to DAI4 are dedicated as hardware trigger signals The required circuitry for the trigger lines DAI1 to DAI4 on the ECU is shown in Fig 4 8 Equivalent Circuitry of the ECU JTAG Interface ECU The four hard ware triggers are active low signals 4 10 4 Reset The requirement for ETK reset mechanism is to ensure that pow...

Page 28: ...S591 ES592 ES595 unplugged ECU Reset Detection Delay To adapt the ETK detection scheme to different system architectures the reset detection delay of the ETK S6 0 is configurable either a short delay of 2 μs or an extended delay of 30 μs can be selected via configuration feature The result is that the ETK detection pattern is applied to the AUDATA lines for a short period of time after the reset h...

Page 29: ...onnection to the ECU CAUTION The ETK can be damaged or destroyed Some components of the ETK board may be damaged or destroyed by electrostatic discharges Please keep the ETK in its storage package until it is installed The board should only be taken from its package configured and installed at a work place that is protected against static discharge CAUTION Risk of short circuiting the internal sig...

Page 30: ...the ETK adapter ETAF6 including ETAF6 PCB and ETAF6 flatcable is required Its needs to be ordered seperately refer chapter Ordering Information on page 58 A debugger specific cable has to be used to connect the debugger with the ETAF6 PCB For connecting the ETK S6 0 to the debugger refer to Fig 5 2 on page 30 ETK ECU ETAF1 ERNI Plug CON5 CON1 Debugger ETAF6 Flatcable ETAF6 PCB ...

Page 31: ...ower Supply inside ECU available 5 3 2 Permanent Power Supply inside ECU not available Fig 5 4 Permanent Power Supply inside ECU not available ECU 12V ECU GND Permanent Supply ECU Connector ETK Pad for Power Supply ca 18 V Power Supply Connector Vehicle Battery Vehicle Wiring Cable ETV2 ECU Ignition Key 12V ECU GND Permanent S upply 12V ECU Connector Cable K70 ETK Pad for Power S upply ca 18 V Pow...

Page 32: ...isolated power supply For special applications ETAS offers the isolated power supply ETP2 Fig 5 5 Isolated Power Supply inside ECU ECU 12V Permanent Supply ECU Connector 4 8V 36V Input Output 12 V ETK Pad for Power Supply ca 18 V Power Supply Connector Vehicle Battery Vehicle Wiring Cable CBM200 Cable ETV2 Isolated Power Supply ...

Page 33: ...K to the ECU The ECU hardware developer defines the connection of the ETK to the ECU The corresponding signals usually have to be adjusted for each microcontroller All inputs are checked for plausibility to make sure that a valid configuration is generated The ETK Configuration Tool can create the following output 1 Direct ETK configuration 2 Storage of the configuration in a data file 3 The corre...

Page 34: ...No The default value is No The default value is the normal usage of the emulation regions as sep arate data regions With this feature the emulation region of the microcontroller can be used as one single emulation memory block This can be useful to have particular memory maps supported Please note that there are further restrictions when using the Fixed Memory Mode like there is only one Data regi...

Page 35: ...ue is 20 MHz The ETK can operate with two AUD interface clock speeds Please note that the performance of the measurement system and thus the num ber of variables that can be selected depends on the AUD clock speed For best performance we recommend to use the default of 20 MHz Trigger register polling rate 12 steps between 10 μs and 50 ms The default value is 50 μs This defines the rate with which ...

Page 36: ...iables defined in the A2l must be within this single emulation memory Debug Interface Voltage Level 3 3 V It is set to the fixed value of 3 3 V and can not be changed This is only provided for future extensibility Currently all supported microcontroller have a 3 3 V interface ECU Power Supply Supervision Nominal Voltage 5 0 V thresholds Low High 3 15 V High Low 3 50 V 3 3 V thresholds Low High 2 3...

Page 37: ... protection mechanism that allows access via JTAG H UDI only if the right key code is used by the ETK The key code can be specified within the ETK Configuration Tool window ETK Hardware We recommend to program the ECU with 0xFFFF FFFF FFFF FFFF as key code In this case the ECU accepts any key code ...

Page 38: ...the ETK S6 0 under INCA ASCET RP or INTE CRIO are contained in the relevant software documentation Note The ETK S6 0 can be shipped in the mechanical versions revision A and revision B Both ETK S6 0 versions have the same features functions and technical data Micro controller HSP INCA ETK Drivers and Tools ASCET RP INTECRIO SH72544 1 V5 1 0 V6 1 0 n a V5 6 0 V2 1 SH72544R 1 V7 1 0 V6 2 1 V2 1 0 V6...

Page 39: ...oltage protection in the same range and may be used only with central load dump protection Microcontroller Characteristics SH72546RFCC 1 SH72531FCC 2 SH72533FCC 2 SH72567BFCC 1 ETK S6 0 can be used to perform mea surement and calibration Internal over lay RAM of the micrcocontroller is used to emulate data in internal Flash max 512 kByte as working page Standby powered SH72544 1 SH72544R 1 SH72531...

Page 40: ... System Item Characteristics Configuration Project specific configuration for different microcontrollers or memory configurations stored in EEPROM Update Logic devices updated through soft ware Item Characteristics Transmission speed 100 Mbit s Cable length max 30 m 100 ft Serial Interface DC decoupling ...

Page 41: ...transfer FPGA 100 240 ms AUD II interface clock 3 20 10 MHz JTAG interface clock 4 20 MHz JTAG interface clock 5 20 6 MHz 1 Delay of ECU reset through ETK without transferring the FPGA UBatt present USG will be switched on 2 max delay of ECU reset through ETK UBatt and USG will be switched on 3 configurable 4 generated by ETK if ETK is operating in H UDI mode configuration B 5 for attached debugge...

Page 42: ... 2 75 V IUSG USG 2 90 V 110 μA ECU Power Supply Supervision Voltage 5 0 V selected USG USG 3 3 3 4 3 5 V USG 3 15 3 25 3 35 V IUSG USG 3 5 V 133 μA ECU Standby RAM Supervision Voltage Data Retention CPU 2 0 V selected USTBY USTBY 2 1 2 2 2 3 V USTBY 2 0 2 1 2 2 V IUSTBY USTBY 2 3 V 88 μA ECU Standby RAM Supervision Voltage Data Retention CPU 2 7 V selected USTBY USTBY 2 8 2 9 3 0 V USTBY 2 7 2 8 2...

Page 43: ...3 3 3 225 20 TMS TCK O 2 3 3 3 2400 20 TDO I 0 7 1 7 4 1 15 15 ASEMD AUDMD AUDCK O 2 3 3 3 10 10 BRKOUT ASEBRKAK I 0 7 1 7 4 1 230 10 AUDATA 3 0 3 I O 2 75 3 3 0 7 1 7 4 1 20 10 AUDATA 3 0 4 I O 2 40 3 3 0 7 1 7 4 1 100 10 AUDRST O 2 3 3 3 150 12 RES I O 5 0 7 1 7 4 1 10 40 1 Adapter cable and Samtec connector not considered PCB 1 pF cm 2 at USG 3 0 V USG configured at 3 3 V 3 at RES Low 4 at RES ...

Page 44: ...IH min V V IH max V Leakage current 2 A Additional Load by ETK typ 1 pF TMS TCK I 0 7 1 7 4 1 495 20 TDI I 0 7 1 7 4 1 225 20 TRST I 0 7 1 7 4 1 495 25 TDO O 2 3 3 3 225 10 AUDCK ASEBRKAK O 2 3 3 3 10 10 DETECT I 0 7 1 7 4 1 240 10 1 Adapter cable and Samtec connector not considered PCB 1 pF cm 2 at USG 3 0 V USG configured at 3 3 V ...

Page 45: ... permanent power supply of ECU RAMs A10 TRST Out JTAG signal A11 ASEMD Out Control signal A12 AUDMD Out AUD II signal A13 USG Sense In Comparator Input Switched power supply of ECU ignition B1 AUDATA3 Bidir Data Acquisition Interrupt Line 4 B2 AUDATA2 Bidir Data Acquisition Interrupt Line 3 B3 AUDRST Out AUD II Reset signal B4 GND B5 GND B6 GND B7 GND B8 GND B9 GND B10 RES Bidir ECU Reset signal o...

Page 46: ...CU RAMs A10 TRST Out JTAG signal A11 ASEMD Out Control signal A12 Reserved A13 USG Sense In Comparator Input Switched power supply of ECU ignition B1 AUDATA3 Bidir Data Acquisition Interrupt Line 4 optional B2 AUDATA2 Bidir Data Acquisition Interrupt Line 3 optional B3 Reserved B4 GND B5 GND B6 GND B7 GND B8 GND B9 GND B10 RES Bidir ECU Reset signal open drain for Reset asser tion and Reset detect...

Page 47: ...7 ETAS Technical Data 7 9 3 Power Supply Connector CON2 Fig 7 1 Power Supply Connector CON2 left Rev A right Rev B Pin CON2 Signal Description 1 UBatt Battery Supply Voltage for ETK 2 GND Ground CON2 CON4 CON1 CON2 CON4 CON1 ...

Page 48: ...get supply for sensing 3 TDO TDO from target 4 GND Signal Ground 5 AUDCK AUD II clock 6 GND Signal Ground 7 TDI TDI to target 8 RES Reset to target 9 TRST TRST to target 10 ASEBRKAK Break signal from target 11 TCLK TCLK to target 12 GND Signal Ground 13 NC Not connected 14 DETECT Debugger detect signal 15 NC Not connected 16 Reserved3 ...

Page 49: ...s Top View left Rev A right Rev B Fig 7 3 Mechanical Dimensions ETK S6 0 Microcontroller with Socket Adapter mounted Dimen sion Millimeters Inches Dimen sion Millimeters Inches A 60 00 2 362 E 3 00 0 118 B 56 50 2 224 F 37 00 1 457 C 33 00 1 299 G 40 00 1 575 D 3 50 0 138 H 2 60 0 102 Dimension Millimeters Inches A 2 00 0 079 B 1 70 0 067 C 6 10 0 240 ...

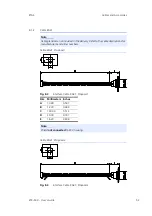
Page 50: ...DICHT compact screwing Manufacturer Lapp Description SH7 Order No 5200 0830 Nut for compact screwing Manufacturer Lapp Description SM7 Order No 5200 3490 Note Cable glands are not included in the delivery Refer to the cable descriptions for manufacturers and order numbers Dim Millimeters Inches Dim Millimeters Inches A 12 50 0 492 C 400 00 15 748 B 160 00 6 299 D 19 00 0 748 Note Shield connected ...

Page 51: ... SKINTOP compact screwing Manufacturer Lapp Description MS SC 11 Order No 5311 2320 Nut for compact screwing Manufacturer Lapp Description SM PE 11 Order No 5210 3220 Dim Millimeters Inches A 18 80 0 740 B 160 00 6 299 C 400 00 15 748 D 24 25 0 955 E 4 70 0 185 F 12 00 0 472 G 27 00 1 063 Note Shield connected to ECU housing ...

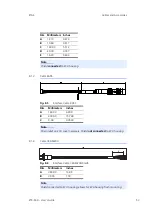
Page 52: ...oposal 1 Cable KA41 Proposal 2 Fig 8 4 Interface Cable KA41 Proposal 2 Note Cable glands are not included in the delivery Refer to the cable descriptions for manufacturers and order numbers Dim Millimeters Inches A 13 90 0 547 B 12 30 0 484 C 140 00 5 512 D 20 00 0 787 E 16 20 0 636 Note Shield not connected to ECU housing ...

Page 53: ...s A 12 10 0 476 B 10 60 0 417 C 140 00 5 512 D 20 00 0 787 E 16 20 0 636 Note Shield connected to ECU housing Dim Millimeters Inches A 160 00 6 299 B 400 00 15 748 C 9 00 0 3543 Note Strain relief on ECU cover necessary Shield not connected to ECU housing Dim Millimeters Inches A 380 00 14 96 B 30 00 1 18 Note Shield connected to ECU housing allows for ECU housing flush mounting ...

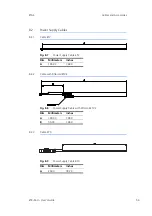
Page 54: ... ETV Fig 8 7 Power Supply Cable ETV 8 2 2 Cable with Filtercoil ETV2 Fig 8 8 Power Supply Cable with Filtercoil ETV2 8 2 3 Cable K70 Fig 8 9 Power Supply Cable K70 Dim Millimeters Inches A 190 00 7 480 Dim Millimeters Inches A 190 00 7 480 B 50 00 1 969 Dim Millimeters Inches A 2000 78 74 ...

Page 55: ...de 55 ETAS Cables and Accessories 8 2 4 Cable KA50 A B Fig 8 10 Power Supply Cable KA50 8 2 5 Cable CBM200 A Fig 8 11 Power Supply Cable CBM200 Dim Millimeters Inches A 200 7 87 B 50 1 97 Dim Millimeters Inches A 100 3 94 ...

Page 56: ...les and Accessories 8 3 Adapters 8 3 1 ETK ECU Adapter ETAF1 Fig 8 12 ETK ECU Adapter ETAF1 8 3 2 Debug Adapter ETAF6 ETAF6 Flatcable Fig 8 13 ETAF6 Flatcable Dim Millimeters Inches A 100 00 3 94 Dim Millimeters Inches A 50 80 2 00 A A ...

Page 57: ...F6 PCB Fig 8 14 ETAF6 Mechanical Dimensions and Component Placement Dim Millimeters Inches A 35 00 1 38 B 32 00 1 26 C 1 60 0 06 Connector Description C0100 to ETK Debug Connector C0101 to Debugger C0102 to ECU A1 1 1 2 2 B1 CO103 CO101 CO100 CO102 1 2 35 36 ...

Page 58: ...S6 0 F 00K 104 790 Emulator Probe for the Renesas AUD II and H UDI Debug Inter face Type Order No Note 064320 26 pin ERNI Connector Type Order No Note ETAF1 F00K 001 373 ETK Adapter with 26 pin ERNI Plug Type Order No Note ETAF6 F00K 104 773 Debug Adapter for Renesas SH72xx Debugger to ETK Order Name Short Name Order Number ETK power supply for 6 36 V DC input ETP1 F 00K 000 624 Power Supply Inter...

Page 59: ...ousing Lemo 1B HMG JST PHG 4fc 5fc 0m130 CBAM200 0m130 F 00K 104 852 ETK ECU Adapter Cable Shield on ECU housing Lemo 1B HMG JST PHG 4fc 5fc 0m085 CBAM200 0m085 F 00K 104 312 ETK ECU Adapter Cable Shield on ECU housing Lemo 1B HMG JST PHG 4fc 5fc 0m115 CBAM200 0m115 F 00K 104 311 Order Name Short Name Order Number Cable JST PHR JST PHR 2fc 3fc 0m1 CBM200 0m1 F 00K 900 052 ETK Power Supply Cable JS...

Page 60: ...or details of your local sales office as well as your local technical support team and product hotlines take a look at the ETAS website Borsigstraße 24 Phone 49 711 3423 0 70469 Stuttgart Fax 49 711 3423 2106 Germany WWW www etas com ETAS subsidiaries WWW www etas com en contact php ETAS technical support WWW www etas com en hotlines php ...

Page 61: ...onnectors CON2 and CON3 left Rev A right Rev B 22 Fig 4 10 Status LEDs left Rev A right Rev B 23 Fig 4 11 Phases of the Startup Protocol 25 Fig 4 12 Startup Procedure in Detail 26 Fig 5 1 ETK S6 0 Connection to the ECU 29 Fig 5 2 ETK S6 0 Connection to the ECU and to the Debugger 30 Fig 5 3 Permanent Power Supply inside ECU available 31 Fig 5 4 Permanent Power Supply inside ECU not available 31 Fi...

Page 62: ... 8 7 Power Supply Cable ETV 54 Fig 8 8 Power Supply Cable with Filtercoil ETV2 54 Fig 8 9 Power Supply Cable K70 54 Fig 8 10 Power Supply Cable KA50 55 Fig 8 11 Power Supply Cable CBM200 55 Fig 8 12 ETK ECU Adapter ETAF1 56 Fig 8 13 ETAF6 Flatcable 56 Fig 8 14 ETAF6 Mechanical Dimensions and Component Placement 57 ...

Page 63: ...ata Measurement 23 Debug Adapters 58 Documentation 8 E ECU Interface 17 ECU Interface Characteristics 42 ECU Voltage Supervisor 22 Electrical Characteristics 43 Environmental Conditions 39 ETAF5 Flatcable 56 ETAF5 PCB 57 ETAS Contact Addresses 60 ETK Configuration 33 ETK Configuration Tool 33 ETK interface 38 F Features 14 H Hardware Description 16 H UDI Interface 18 I Identifications on the produ...

Page 64: ...ack 12 R REACH regulation EU 13 Recycling 12 Reference Page 23 Requirements calibration software 38 ETK interface 38 PC interface 38 Reset 27 RoHS conformity China 12 European Union 12 S Safety notices Identification 6 Safety precautions 8 Scope of supply 7 Serial ETK Interface 20 40 Startup Protocol Phases of 24 25 Status LED 23 Supported Microcontrollers 17 System Requirements 38 System requirem...

Reviews: