background image

ETC Installation Guide

Access Interface

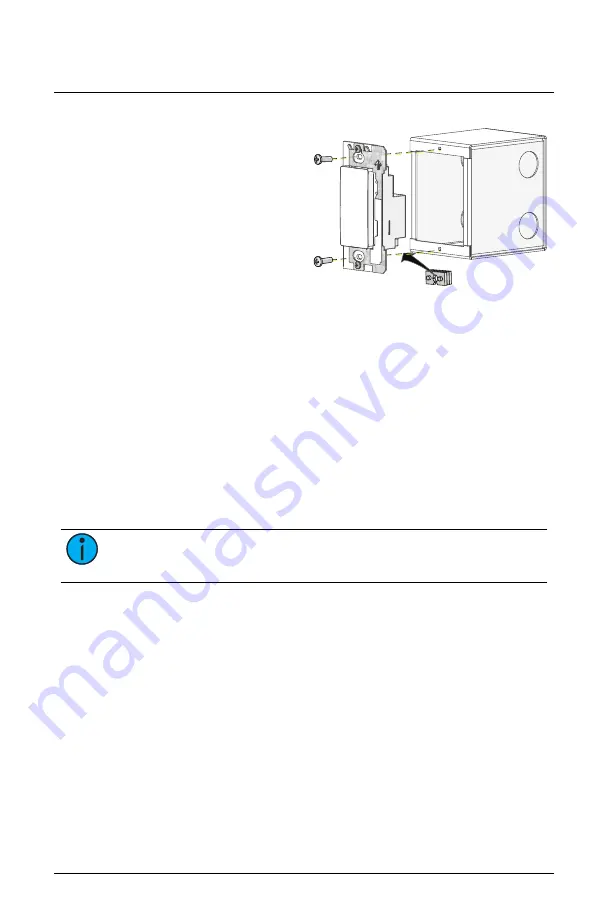
Install the Interface

Receptacle spacers are provided to
help align the Interface and cover
flush against the wall in flush
mount application. The spacers are
not required when installing the
Interface in a surface mounted box.

1.

Insert the Interface electronics and wiring into the back box. To install
multiple stations (multi-gang), insert each station electronics into the
back box from the right to the left side for the best alignment and fit.
The alignment bracket will slightly overlap the station to the right
when properly installed.

2.

Use spacers as needed to provide a flush mounted installation.

a.

Accordion fold the spacer and press the stack together to achieve
the thickness needed to fill the gap between the Interface, wall
surface, and the back box.

b.

Cut off and discard the excess.

c.

Place the stack between the electronics and the flush mounted
back box.

Note:

To ensure successful station and wall plate installation, do not

overtighten the screws.

3.

Secure the Interface in place using the mounting screws provided. If
using spacers, insert the screws through the spacers as well.

Access Interface

Page 5 of 7

ETC

Summary of Contents for EchoAccess

Page 1: ...ology to provide access to the Echo control system Use the Interface and the app together to wirelessly configure and control your Echo Presets Spaces Zones and devices Specification Installation Environment For indoor commercial controls use only ETC recommends paying special attention to the installation environment Indoor installation only 0 40 C 32 104 F 5 95 non condensing humidity A wireless...

Page 2: ...ommends using Belden 8471 or approved equal see the ETC cable cross database etcconnect com Support Cable Cross Database for equal alternatives Class 2 wire The total combined length of an EchoConnect wire run using Belden 8471 or equal may not exceed 500 m 1 640 ft with a maximum distance of 400 m 1 312 ft between any two devices Note All control wiring should be installed and terminated by a qua...

Page 3: ...cate the wire termination supplies included with the packaging Connect Wiring 1 Pull all required wiring into the back box As needed pull an additional ESD ground wire required only when the Interface is not installed in grounded metal conduit 2 Terminate the ESD ground wire pigtail a Strip 11 mm 0 4 in of insulation from the ends of the ESD ground wire pigtail provided in the termination supplies...

Page 4: ...bus please note the following Cat5 wiring must be terminated using EchoConnect Cat5 Termination Kit and must be installed using a bus topology Refer to the installation guide that is provided with the Cat5 Termination Kit 7186A1207 for information to terminate Cat5 wiring Not all topologies are supported using Cat5 careful planning is required to ensure the proper termination kits are available an...

Page 5: ... fit The alignment bracket will slightly overlap the station to the right when properly installed 2 Use spacers as needed to provide a flush mounted installation a Accordion fold the spacer and press the stack together to achieve the thickness needed to fill the gap between the Interface wall surface and the back box b Cut off and discard the excess c Place the stack between the electronics and th...

Page 6: ...ely 20 degrees 2 Hook the top of the wall plate to the tabs located on the Interface electronics assembly To ensure the wall plate is hooked properly on the top hook wiggle it slightly side to side 3 Swing the bottom of the wall plate down until the magnets engage 4 If the wall plate does not fully attach automatically wiggle the bottom of the plate until all of the magnets are seated properly to ...

Page 7: ...ce to radio communications However there is no guarantee that interference will not occur in a particular installation If this equipment does cause harmful interference to radio or television reception which can be determined by turning the equipment off and on the user is encouraged to try to correct the interference by one or more of the following measures Reorient or relocate the receiving ante...

Reviews: