INSTALLATION:
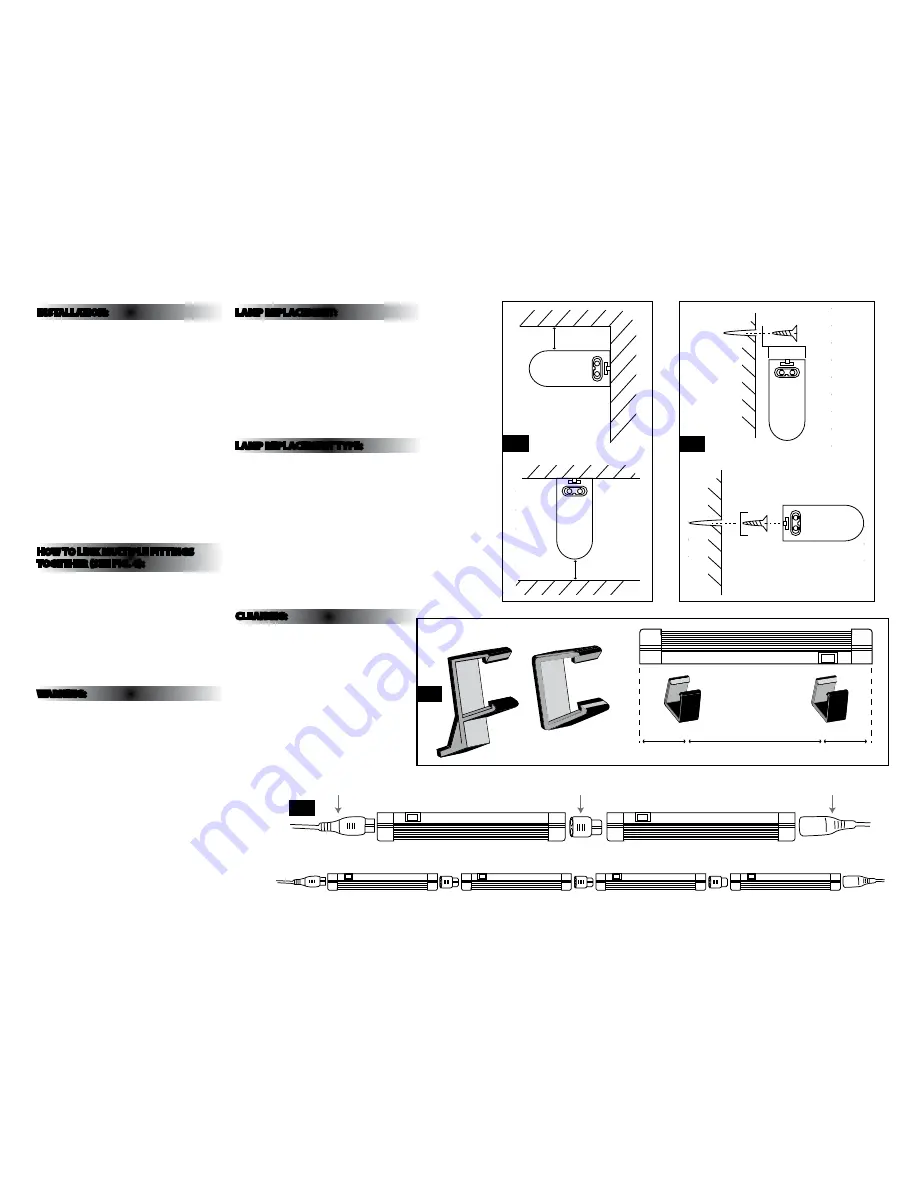
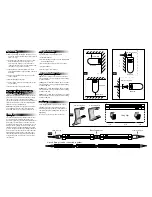
01) When positioning the fitting make sure there is a
gap of 10mm between the fitting and any adjacent
surface. see fig 1.
02) select the type of brackets you need to use and
mark off the fixing points see fig.3 opposite
for best spacing. If fixing to a shelf or under a
cupboard check the screw size required and screw
into place. see fig. 2 and 3 opposite.
03) If fixing directly to the wall, drill holes using an
appropriate drill bit to a depth of 30mm and insert
wall plugs.
04) secure the selected brackets in place using the
screws supplied.
05) Attach the fitting to the clips.
06) connect the mains lead or link lead to the socket
on your fitting.
07) Restore the power supply and switch on.
HOW TO LINk mULTIPLE FITTINgS
TOgETHER (SEE FIg. 4):
Option 1.
The light fitting can be butted together to
form a line of up to a maximum of 6 fittings. simply
remove the connector caps and push the fittings
together using the short butt connector supplied. Use
the mains lead cable to connect the first fitting and
the mains via a spur suitably fused.
Option 2.
connect link leads between each fitting
once all lights have been connected; connect the
mains lead to the mains via a spur suitably fused.
WARNINg:
The leads supplied with your fitting and the sockets
incorporated in your fitting are designed to give
protections against any possible electrical hazard. The
mains leads is terminated in a socket marked ls2s
and this lead should be used to supply mains to your
fittings or chain of fittings. Under no circumstances
should you attempt to adapt the link lead to supply
power to the opposite end of your fitting as this will
leave live pins exposed at the mains input end of the
fitting. Altering or adapting any of the leads, other
than shorting the mains supply lead, will invalidate
your guarantee and can present a severe electrical
shock hazard.
LAmP REPLACEmENT:
01) switch off the electricity at the mains.
02) lift off the diffuser.
03) Rotate the lamp through approx 90° and withdraw
from the lamp holders.
04) Insert new lamp and rotate to lock in position.
05) Replace diffuser.
06) Restore power and switch on.
LAmP REPLACEmENT TyPE:
8W
requires 1 x 8W G5 T5 300mm fluorescent tube
3500K (included) or energy saving alternative. fitting
is rated at 8W max.
13W
requires 1 x 13W G5 T5 525mm fluorescent tube
3500K (included) or energy saving alternative. fitting
is rated at 13W max.
21W
requires 1 x 21W G5 T5 850mm fluorescent tube
3500K (included) or energy saving alternative. fitting
is rated at 21W max.
28W
requires 1 x 28W G5 T5 1150mm fluorescent tube
3500K (included) or energy saving alternative. fitting
is rated at 28W max.
CLEANINg:
clean this light fitting only with a soft dry cloth.
The diffuser may be removed and washed in a
mild detergent solution. Make sure the diffuser is
completely dry before putting them back on your
light fitting.
Do not use any chemical or abrasive cleaners.
10mm Gap
End View
10mm Gap
End View
2M Mains Lead
500mm Link Lead
‘C’ Mounting Clip
‘F’ Mounting Clip
1/4
1/4
2/4
Fixing Clips
Butt Connector
Up to 6 fittings can be connected together
End View
‘F’ Mounting Clip
End View
‘C’ Mounting Clip
10mm Gap
End View
10mm Gap
End View
2M Mains Lead
500mm Link Lead
‘C’ Mounting Clip
‘F’ Mounting Clip
1/4
1/4
2/4
Fixing Clips
Butt Connector
Up to 6 fittings can be connected together
End View
‘F’ Mounting Clip
End View
‘C’ Mounting Clip
10mm Gap
End View
10mm Gap
End View
2M Mains Lead
500mm Link Lead
‘C’ Mounting Clip
‘F’ Mounting Clip
1/4
1/4
2/4
Fixing Clips
Butt Connector
Up to 6 fittings can be connected together
End View
‘F’ Mounting Clip
End View
‘C’ Mounting Clip
10mm Gap
End View
10mm Gap
End View
2M Mains Lead
500mm Link Lead
‘C’ Mounting Clip
‘F’ Mounting Clip
1/4
1/4
2/4
Fixing Clips
Butt Connector
Up to 6 fittings can be connected together
End View
‘F’ Mounting Clip
End View
‘C’ Mounting Clip
10mm Gap
End View
10mm Gap
End View
2M Mains Lead
500mm Link Lead
‘C’ Mounting Clip
‘F’ Mounting Clip
1/4
1/4
2/4
Fixing Clips
Butt Connector
Up to 6 fittings can be connected together
End View
‘F’ Mounting Clip
End View
‘C’ Mounting Clip
10mm Gap
End View
10mm Gap
End View
2M Mains Lead
500mm Link Lead
‘C’ Mounting Clip
‘F’ Mounting Clip
1/4
1/4
2/4
Fixing Clips
Butt Connector
Up to 6 fittings can be connected together
End View
‘F’ Mounting Clip
End View
‘C’ Mounting Clip
10mm Gap
End View
10mm Gap
End View
2M Mains Lead
500mm Link Lead
‘C’ Mounting Clip
‘F’ Mounting Clip
1/4
1/4
2/4
Fixing Clips
Butt Connector
Up to 6 fittings can be connected together
End View
‘F’ Mounting Clip
End View
‘C’ Mounting Clip
Fig 2
Fig 3
Fig 4
Fig 1


