INSTALLATION:
01. Choose the location for your new fitting according to
each of the conditions above.
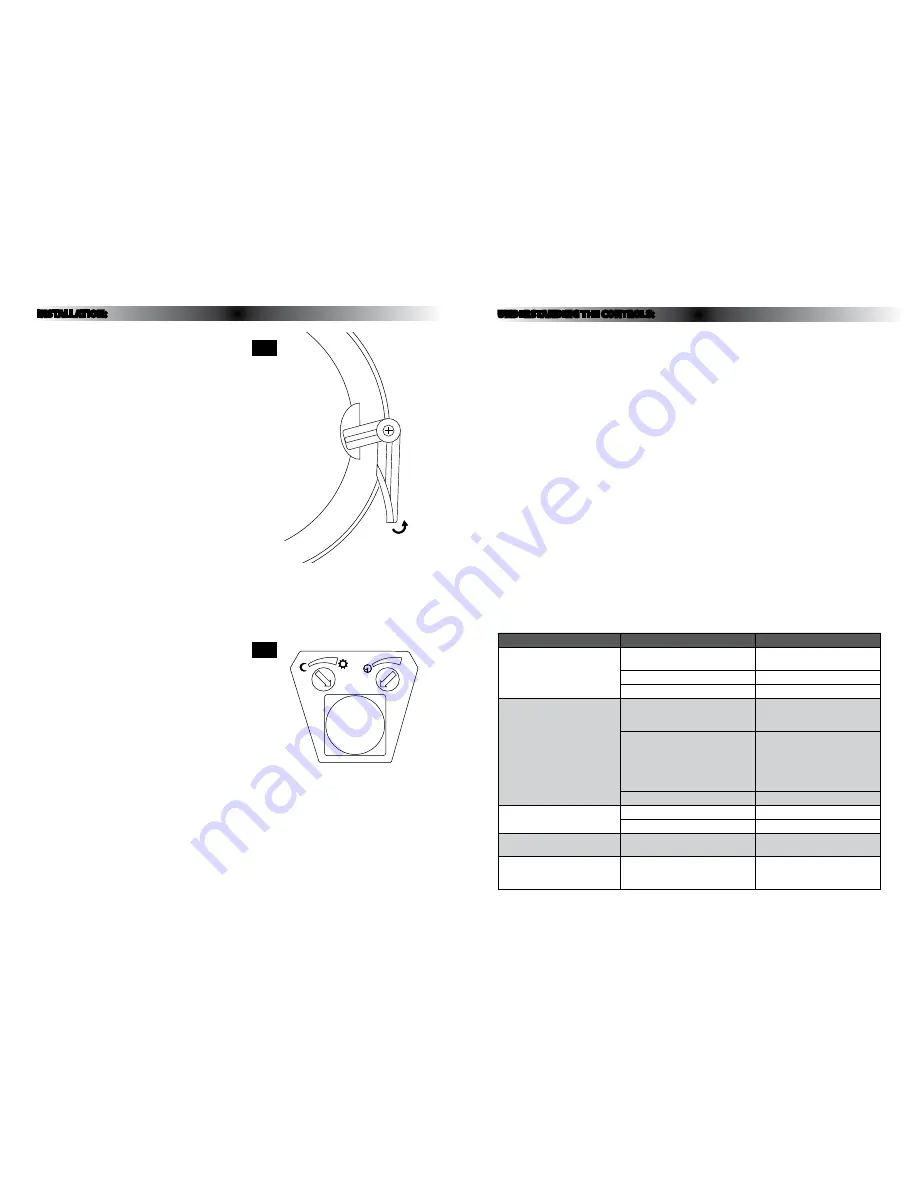
02. Turn out the three clips at the side of the diffuser and
lift off. (see FIG. 3 opposite).
03. Remove the tube from the fitting by pulling straight
up.
04. Undo the gear tray retaining screw next to the PIR
detector module on the gear tray.
05. Undo the screws at each end of the hinge and lift off
the gear tray – take care not to lose the screws and
washers.
06. Choose whether you need to use 2 or 4 screw holes
and clear through using a 4-5mm diameter drill.
07. Using the back of the fitting as a template, mark
the position of the fixing screws on your mounting
surface.
08. Prepare your fixing holes as appropriate.
09. Pierce the cable entry gland making a hole just large
enough for the cable to pass through and so that the
gland makes a tight seal around it.
10. Thread your supply cable through the gland.
11. Secure the back of your new fitting using suitable
fixings (not supplied).
12. Fix the gear tray by the hinge only, back into the
fitting using the screws and washers removed earlier.
13. Allow the gear try to hang open.
14. Make the electrical connections according to the
colour code above.
15. Close the gear tray and secure with the screw
removed earlier.
16. Re-fit the lamp pressing firmly onto the lampholder.
Take care to position the lamp correctly.
17. Replace the diffuser, take care to position the inside
rim of the diffuser over the circumference of the rear
half of the fitting and the soft seal around the hole in
the diffuser over the PIR detector lens.
18. Restore the power and switch on.
Adjusting the duration time:
The length of time that the light remains on after
activation can be adjusted from 8(±2) seconds to 7(±2)
minutes. Turning the TIME control anti-clockwise will
reduce the duration time.
Note: Once the light has been triggered by the PIR
sensor any subsequent detection will start the timed
period again from the beginning.
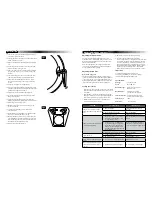
Adjusting the LUX level:
Refer to FIG. 4 opposite.
The Lux control module has a built-in sensing device
(photocell) that detects daylight and darkness. With the
control set to the (
) position, the light will operate in
both daylight and darkness. With the control set to the
(
) position, the light will only operate in darkness.
Setting the controls:
1. Turn the Lux control to the (
) position, turn the mains
power on and wait half a minute for the control circuit
to stabilize.
2. Turn the TIME control to the minimum duration time
(fully anti-clockwise) position. The bulkhead light will
now switch on and remain on for about 8 seconds.
3. Walk across the detection area to check that the
desired detection area is covered.
4. Adjust time control to the required setting.
5. To set the Lux level at which the lamp will
automatically switch “on” at night, please turn the LUX
control from daylight to night. If the lamp is required
to switch on earlier, e.g. at dusk, wait for the desired
ambient light level, then slowly turn the LUX control
knob towards the daylight setting (
) while someone
walks across the center of the area to be detected.
When the lamp switches on, release the Lux control.
Important:
To avoid dust build-up and ensure proper
functioning of the PIR detector, periodically wipe
the sensor lens lightly with a damp cloth.
Specification:
Voltage:
220-240 V 50 Hz
Load:
Max. 28W CFL
Detection range:
Approx.120
o
(horizontal),
Max. 8 metres
Duration time:
From 8(±2) seconds to
7(±2) minutes adjustable
LUX control level:
From daylight (2000 Lux) to
darkness (<3 Lux) adjustable
Splash-proof:
IP44
Protection:
Class I / Earthed
UNDERSTANDING THE CONTROLS:
PROBLEM
POSSIBLE CAUSE
TROUBLE SHOOT
Lamp does not switch on when
there is movement in the detection
area
1. No mains voltage
Check all connections, fuses &
switches
Relocate the fitting
2. Nearby lighting is too bright
Check adjustment of controls
3. Controls set incorrectly
Lamp switches on for no apparent
reason (false triggering)
1. Heat sources such as air con vents,
heater vents, other lighting or pets
are activating the sensor
Relocate the fitting away from heat
sources
2. Interference from on/off switching
of electric fans, lights or appliances
on the same circuit. (This does not
always occur but a faulty switch or
noisy fluorescent light may cause the
light to switch on)
Replace the faulty switch, replace
noisy fluorescent tubes/starters or
connect to a separate supply circuit
3. Reflection from a reflective surface
Relocate the fitting
Light remains on
1. Continuously false triggered
See above
2. Time is set too long
Adjust the TIME control
Light switches on during daylight
hours
1. Lux control is set to daylight position
Adjust the LUX control
When setting controls in daylight
the detection distance becomes
shorter
1. Interference by reflected sunlight
Re-test at night or in lower light
3.5m
120º
2.5m
360º
6m
12m
360º
12m
Fig 3
3.5m
120º
2.5m
360º
6m
12m
360º
12m
Fig 4


