Installation:
3
Choose the location for your new dryer giving consideration to each of the conditions above.
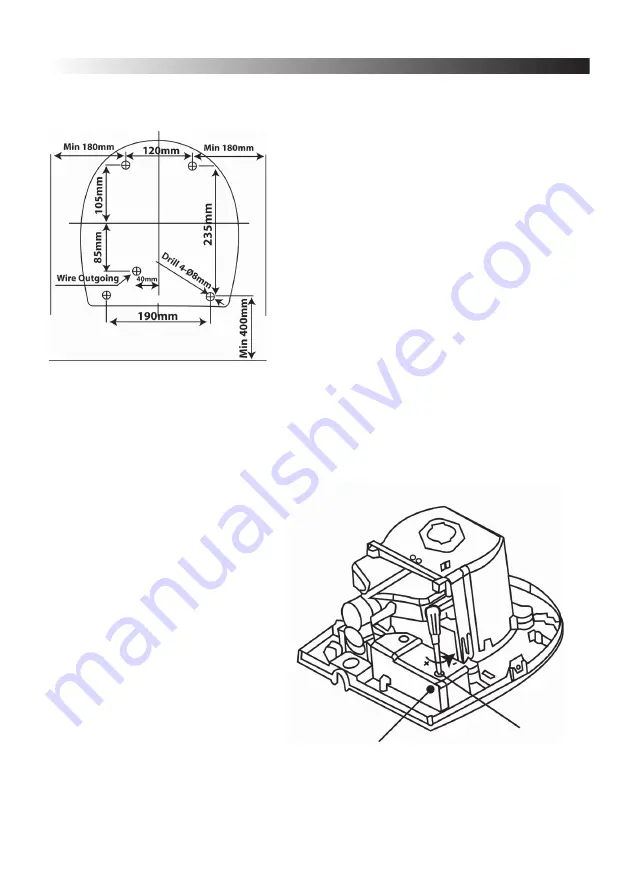
Mark the position of the fixing holes according to the diagram below.
Note:
The dryer will be activated when hands are moved beneath the outlet vent within a distance of
approximately 10cm, Sensitivity can be reduced if required.
The dryer will operate for a maximum of 1 minute continuously, after this time the dryer will stop
but can be re-started by moving hands away and back under the outlet vent to re-trigger the
detector.
Make the fixing holes as appropriate to your mounting
surface. If fitting to a solid wall, drill holes 8mm dia.
and 35mm deep. Insert the plastic plugs supplied.
Remove the screws in either side of the hand dryer
and lift off the front cover.
Remove the cable entry knock-outs as required from
the back of the dryer.
Thread your mains supply cable in through the cable
entry.
Secure the dryer on the wall using the fixings supplied.
If the fixings supplied are not appropriate to your
mounting surface, use suitable alternatives.
Make the electrical connections according to the colour code above.
Restore the power and switch on.
Test the sensitivity of the detector incorporated into your hand dryer by moving your hands
back and forth beneath the outlet vent.
Adjust the sensitivity as required using a very small screwdriver to turn the potentiometer
accessible through the hole in the end of the control circuit cover,
see opposite diagram.
Turn off the power.
The hand dryer will operate with both warm and cold
air; if use with cold air is required, turn the switch
fixed in a bracket to the side of the fan housing,
to “0”
Replace the front cover and secure in
position using the two screws
removed earlier.
Restore the power and switch on.


