D
1A
6
3A
3A
E
E2
6
4
5
3B
-If you have a extra spacer panel (E2)
use screw (3B)
Use a screw driver if needed, to push screw
through the hole.
.
Screw
Side Panels
outside
Inside
3A
4
5
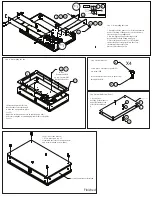
Step 3 - Assembling the sides
1. Assemble all Side panels. See (*1). Mount neutrik
device. If bowing of the panels occur it is because
the screws were over tightened.
2. You can begin wiring at this stage easily.
Use tie straps to keep wiring managed.
3. Place side panels in slots. See (*2) the tabs
on the side panels are placed into the slots.
(it should not but secure, just
place holders till next next)
G F1 F2
H P1 P2
3A
*1
*1
Notice
Countersink hole
on top. Screw will be
flush to the panel.
Step 4 - Aseembling the box
Step 5 Assemble Feet
1.Place the window’s (D) slots
into the tabs of the side panels
to keep the side panels in place
See (*2)
Make sure all side panels are in its tabs (top and btm)
before inserting the screw through window (D) to the pillar
See (*1)
X4
Step 6 Assemble Bottom Panel
Step 7 - Cover the bottom
1. Place bottom on top of
assembled enclosure. LIne up the holes
and screw it in with a screw driver.
Finished
1. If you do not
have the bottom spacer
panel (E2) still proceed
to install feet without
it.
BOTTOM COVER WITH FEET INSTALLED
*1
*2


