background image

29

EN

29

EN

Temperature

Change the floor temperature by turn-

ing the knob. Min. position on the con-

trol corresponds to 10 °C, max. position 

corresponds to 45°C. An appropriate 

setting is usually between 2 and 3. 

The temperature does not stabilise 

until the underfloor heating system has 

been on for a few days. It might then 

be necessary to adjust the thermostat’s 

setting.

Indication

The colours on the on/off switch show 

the current status for the thermostat.


Red light

 - the thermostat is on and the 

underfloor heating is activated.

Green light

- the thermostat is on and 

the underfloor heating is switched off.

Summary of Contents for ET-71

Page 1: ...HANDBUCH MANUAL MANUEL HANDMATIG DE EN FR NL ET 71...

Page 2: ......

Page 3: ...1 DE Deutsch English Fran ais 2 18 34 EN NL FR 1 DE Nederlands 50 EN NL FR...

Page 4: ...2 2...

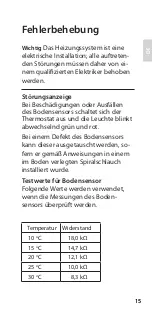
Page 5: ...t f r den Installateur des Thermostats sowie f r den Anwender Dar ber hinaus enth lt das Handbuch technische Spezifikationen und Informationen zur Fehlerbehebung Wichtig Das Fu bodenheizungssystem ist...

Page 6: ...urregelung wird mit hilfe eines auf Fuzzy Technologie basie renden Algorithmus gesteuert Diese Technologie erm glicht das Sammeln und Auswerten von Thermostatdaten anhand derer berechnet wird wann es...

Page 7: ...5 DE Paketinhalt 1 1 Front f r Elko RS Elko Plus und Gira 2 Front f r Eljo Trend Merten Jussi Busch J ger 3 Rahmen 4 Thermostat 5 Bodensensor 6 Verbindungsklemme Handbuch 2 3 4 5 6 5 DE...

Page 8: ...chtet werden sodass der Bodensensor einfach ausgetauscht werden kann Installation Montieren Sie den Thermostat in einem up dose 65 mm Standardgeh use 1 Stellen Sie sicher dass das Geh use eben an der...

Page 9: ...Geh use angeschlossen Siehe nach stehender Schaltplan 4 Setzen Sie den Thermostat in das Geh use ein und fixieren Sie es mit den vorhandenen Schrauben 5 Eine Anleitung zum Einstellen der Regelfunktion...

Page 10: ...uss separat bestellt werden Befestigen Sie den Erweiterungsrahmen mitSchraubenanderWand MontierenSie anschlie end denThermostat wie in den normalen Anweisungen beschrieben Befestigung mit R ckplatte W...

Page 11: ...in Betrieb nehmen Die genaue Wartezeit ist von der Art des Bodens und den entsprechenden Anweisungen zum Bodenbelag abh ngig Erh hen Sie die W rme anschlie end schrittweise Zur optimalen Anpassung de...

Page 12: ...ine Sekunde gedr ckt um in den Standby Modus zu wechseln Durch erneutes Halten des Schalters f r eine Sekunde kehren Sie in den Normalmodus zur ck Ein Aus Schalter ArbeitsweisedesThermostats Dieser Ab...

Page 13: ...g Raumthermostat R Der Thermostat hat eingebaute Sensoren zum Messen der Raumtemperatur und Steuern der Heizung Raum und Fu bodenthermostat Der eingebaute Sensor regelt die Raum temperatur und der Sen...

Page 14: ...stellen m ssen Regler und Front zun chst entfernt werden Drehen Sie dann mit einem kleinen Schraubenzieher den Regler in die gew nschte Position Stellen Sie hier die gew nschte Regelfunktion ein F Fu...

Page 15: ...ems ber mehrere Tage Anschlie end m ssen die Thermostateinstellungen ggf angepasst werden Anzeige Die Farben des Ein Aus Schalters zei gen den aktuellen Status des Thermo stats an Rotes Licht der Ther...

Page 16: ...pfs Wenn Sie die Temperatur gem Ihren Anforderungen eingestellt haben k n nen Sie den Einstellknopf feststellen Hierdurch wird ein unbeabsichtigtes Verstellen des Reglers vermieden Siehe nachstehende...

Page 17: ...schaltet sich der Thermostat aus und die Leuchte blinkt abwechselnd gr n und rot Bei einem Defekt des Bodensensors kann dieser ausgetauscht werden so fern er gem Anweisungen in einem im Boden verlegte...

Page 18: ...chlusskabel max 2 5 mm2 Last cos 1 Hysterese 0 3 C Schutzart IP21 Max L nge Sensorkabel 50 m 2 x 1 5 mm2 Angepasst f r Rahmensysteme von Eljo Trend Elko RS Elko Plus Str mfors Gira Merten und Jussi Bu...

Page 19: ...17 DE Artikel Ma e mm Erweiterungs rahmen 81 x 81 x 18 Sensorkabel 3 m beiliegend R ckplatte polarwei 86 x 86 x 6 Zubeh r 17 DE...

Page 20: ...18 18...

Page 21: ...l This applies both to the person installing the thermostat and the person who is going to use it You will also find troubleshooting details and technical specifications Important The underfloor heati...

Page 22: ...Temperature control is carried out by means of an algorithm that uses fuzzy technology The technology entails the termostat testing and collecting data from start up and based on this cal culating whe...

Page 23: ...21 EN 21 EN In the pack 1 1 Front for Elko RS Elko Plus and Gira 2 Front for Eljo Trend Merten Jussi Busch J ger 3 Frame 4 Thermostat 5 Floor sensor 6 Connection clip Manual 2 3 4 5 6...

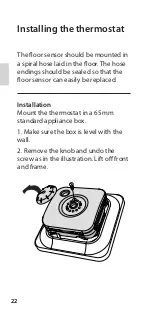
Page 24: ...in the floor The hose endings should be sealed so that the floor sensor can easily be replaced Installation Mount the thermostat in a 65mm standard appliance box 1 Make sure the box is level with the...

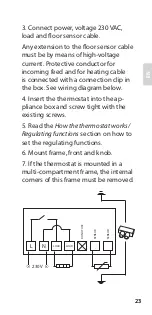
Page 25: ...a connection clip in the box See wiring diagram below 4 Insert the thermostat into the ap pliance box and screw tight with the existing screws 5 Read the How the thermostat works Regulating functions...

Page 26: ...is is not included and must be ordered separately Attach the extension frame to the wall with screws Then mount the thermostat as indicated in the normal instructions Fitting with back plate If the ex...

Page 27: ...ating Precisely how long you wait depends on the type of floor you have and the instructions for the floor putty Then increase the heat gradually In order to adapt the underfloor heating system to you...

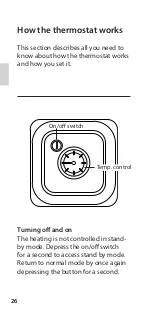
Page 28: ...need to know about how the thermostat works and how you set it Temp control Turning off and on The heating is not controlled in stand by mode Depress the on off switch for a second to access stand by...

Page 29: ...Roomthermostat R The thermostat has built in sensors for measuring the room s temperature and controlling the heating Roomandfloorthermostat R F The built in sensor regulates the room tem perature and...

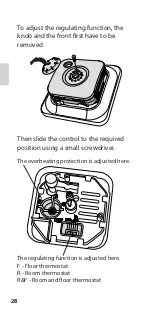
Page 30: ...the regulating function the knob and the front first have to be removed Then slide the control to the required position using a small screwdriver The regulating function is adjusted here F Floor therm...

Page 31: ...and 3 The temperature does not stabilise until the underfloor heating system has been on for a few days It might then be necessary to adjust the thermostat s setting Indication The colours on the on o...

Page 32: ...e so that the thermostat comes on and then lower it shortly afterwards then it takes 30 seconds before it goes off again Key lock button When you have found a suitable set ting for the temperature you...

Page 33: ...floor sensor the thermostat switches off and the light starts to flash alternately green and red If the floor sensor should be defective it can be replaced provided that it is installed in a spiral h...

Page 34: ...ction cable max 2 5 mm2 Load cos 1 Hysteresis 0 3 C Protection class IP21 Max length sensor cable 50 m 2x1 5 mm2 Adapted for Eljo Trend Elko RS Elko Plus Str mfors Gira Merten and Jussi Busch J ger fr...

Page 35: ...33 EN 33 EN Article Dimensions mm Extension frame 81x81x18 Sensor cable 3 m included Back plate polar white 86x86x6 Accessories...

Page 36: ...34 34...

Page 37: ...e recommandation s adresse autant aux installateurs qu aux utilisateurs du thermostat Ce manuel pr sente galement les caract ristiques techniques et des informations d aide la r solution des probl mes...

Page 38: ...effectue selon un algorithme qui utilise une tech nologie de logique floue La technologie permet au thermostat de tester et recueil lir des donn es d s la mise en service et sur cette base de calculer...

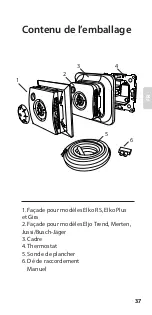
Page 39: ...R Contenu de l emballage 1 1 Fa ade pour mod les Elko RS Elko Plus et Gira 2 Fa ade pour mod les Eljo Trend Merten Jussi Busch J ger 3 Cadre 4 Thermostat 5 Sonde de plancher 6 D de raccordement Manuel...

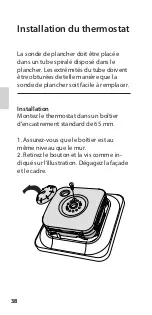
Page 40: ...du tube doivent tre obtur es de telle mani re que la sonde de plancher soit facile remplacer Installation Montez le thermostat dans un bo tier d encastrement standard de 65 mm 1 Assurez vous que le bo...

Page 41: ...accord au bo tier avec un d de raccordement Voir le sch ma de c blage ci dessous 4 Ins rez le thermostat dans le bo tier d encastrement et vissez fermement les vis existantes 5 Lisez la section Foncti...

Page 42: ...t pas fourni et doit tre command s par ment Fixez le cadre d extension au mur l aide de vis Puis montez le thermostat comme indiqu dans les instructions pour un mon tage classique Ajustement avec la p...

Page 43: ...ar le sol Le temps d attente exact d pend du type de votre plancher et des instructions relatives au mastic de plancher Ensuite augmentez progressivement le chauffage Pour adapter au mieux le syst me...

Page 44: ...vez savoir sur le fonctionnement et le r glage du thermostat Commande de temp Mise en marche et l arr t En mode veille le chauffage n est pas r gul Pour passer en mode veille appuyez une seconde sur l...

Page 45: ...d ambiance R Le thermo stat comporte deux capteurs int gr s permettant de mesurer la temp rature ambiante et de r guler le chauffage Thermostat de sol et d ambiance R F Les capteurs int gr s r gulent...

Page 46: ...ction de r gulation il faut d abord ter le bouton et la fa ade Faites glisser ensuite la commande dans la position requise l aide d un petit tournevis La fonction de r gulation se r gle ici F Thermost...

Page 47: ...es int rieurs La temp rature ne se stabilise que lorsque le syst me de chauffage par le sol fonctionne depuis quelques jours Il peut donc tre n cessaire d ajuster le r glage du thermostat Indication L...

Page 48: ...que vous l abaissez peu de temps apr s le thermostat mettra 30 secondes se r activer Bouton de verrouillage Quand vous avez trouv un r glage satisfaisant de la temp rature vous pouvez verrouiller le b...

Page 49: ...r le thermostat se d sactive et le t moin se met clignoter alternativement en vert et en rouge Si la sonde de plancher est d fectueuse elle peut tre remplac e pour autant qu elle ait t install e dans...

Page 50: ...nt max 2 5 mm2 Charge cos 1 Hyst r sis 0 3 C Classe de protection IP21 Longueur max du c ble de sonde 50 m 2 x 1 5 mm2 Adapt aux syst mes de cadre Eljo Trend Elko RS Elko Plus Str mfors Gira Merten et...

Page 51: ...49 FR 49 FR Article Dimensions mm Cadre d extension 81 x 81 x 18 C ble de sonde de 3 m fourni Plaque de fond blanc polaire 86 x 86 x 6 Accessoires...

Page 52: ...50 50...

Page 53: ...t u de handleiding leest Dit geldt zowel voor degene die de thermostaat installeert als voor de gebruiker U vindt hier ook informatie over het oplossen van problemen en technische specificaties Belang...

Page 54: ...hand van een algoritme dat ge bruikmaakt van fuzzy technologie Met deze technologie test en verzamelt de thermostaat gegevens vanaf het mo ment van inschakeling en berekent op basis daarvan wanneer d...

Page 55: ...53 NL 53 NL Inhoud verpakking 1 1 Voorkant voor Elko RS Elko Plus en Gira 2 Voorkant voor Eljo Trend Merten Jussi Busch J ger 3 Frame 4 Thermostaat 5 Vloersensor 6 Aansluitclip Handleiding 2 3 4 5 6...

Page 56: ...fgedicht zodat de vloersensor gemakkelijk kan worden vervangen Installatie Monteer de thermostaat in een inbou wdoos van 50 mm diep 1 Zorg dat het kastje vlak af ligt met de wand 2 Verwijder de draaik...

Page 57: ...staande bedradingsschema 4 Breng de thermostaat aan in het kastje en schroef stevig vast met de bestaande schroeven 5 Lees het hoofdstuk Hoe de ther mostaat werkt Regelfuncties voor informatie over he...

Page 58: ...niet inbe grepen en moet apart worden besteld Bevestig het uitbreidingsframe met schroeven aan de wand Monteer vervol gens de thermostaat volgens de gewone instructies Montage met achterplaat Als het...

Page 59: ...rming inschakelt Hoe lang u precies moet wachten hangt af van het vloertype en de gebruiksaanwijzing van de vloermortel Voer de warmte vervolgens geleidelijk op Lees de hele handleiding zodat u het vl...

Page 60: ...r de werking en het instellen van de thermostaat Temp regeling In en uitschakelen In de modus stand by wordt de ver warming niet bestuurd Druk de aan uit schakelaar een seconde lang in om naar de modu...

Page 61: ...rmostaat R de thermostaat heeft ingebouwde sensors voor het me ten van de temperatuur in de ruimte en het regelen van de verwarming Ruimte en vloerthermostaat R F de ingebouwde sensor regelt de temper...

Page 62: ...s aan te passen moet u eerst de knop en de voorkant verwijderen Schuif de regelaar vervolgens naar de gewenste positie met behulp van een kleine schroevendraaier Hier wordt de regelfunctie aangepast F...

Page 63: ...ussen 2 en 3 gebruiken De temperatuur wordt pas stabiel als het vloerverwarmingssysteem enkele dagen aan heeft gestaan Mogelijk zult u de instelling van de thermostaat dan willen aanpassen Aanduiding...

Page 64: ...gaat en de instelling kort daarna weer verlaagt duurt het 30 seconden voordat hij weer uitgaat Draaiknopvergrendeling Als u een geschikte temperatuurin stelling hebt gevonden kunt u de draaiknop vergr...

Page 65: ...t de thermostaat uitgeschakeld en gaat het lampje afwisselend groen en rood knipperen Als de vloersensor defect is kan hij worden vervangen mits hij volgens de instructies is ge nstalleerd in een in d...

Page 66: ...x 2 5 mm2 Belasting cos 1 Hysteresis 0 3 C Beschermingsgraad IP21 Max lengte sensor kabel 50 m 2 x 1 5 mm2 Aangepast voor de framesystemen Eljo Trend Elko RS Elko Plus Str mfors Gira Merten en Jussi B...

Page 67: ...65 NL 65 NL Artikel Afmeting en mm Uitbreidingsframe 81x81x18 Sensorkabel 3 m inbegrepen Achterplaat poolwit 86x86x6 Accessoires...

Page 68: ...ETHERMA ET 71 vers 1 1 Print 121213 ETHERMA Elektrow rme GmbH sterreich Landesstra e 16 A 5302 Henndorf Telefon 43 0 6214 76 77 Fax 43 0 6214 76 66 Mail office etherma com...

Reviews: