background image

20

21

MAINTENANCE

MAINTENANCE

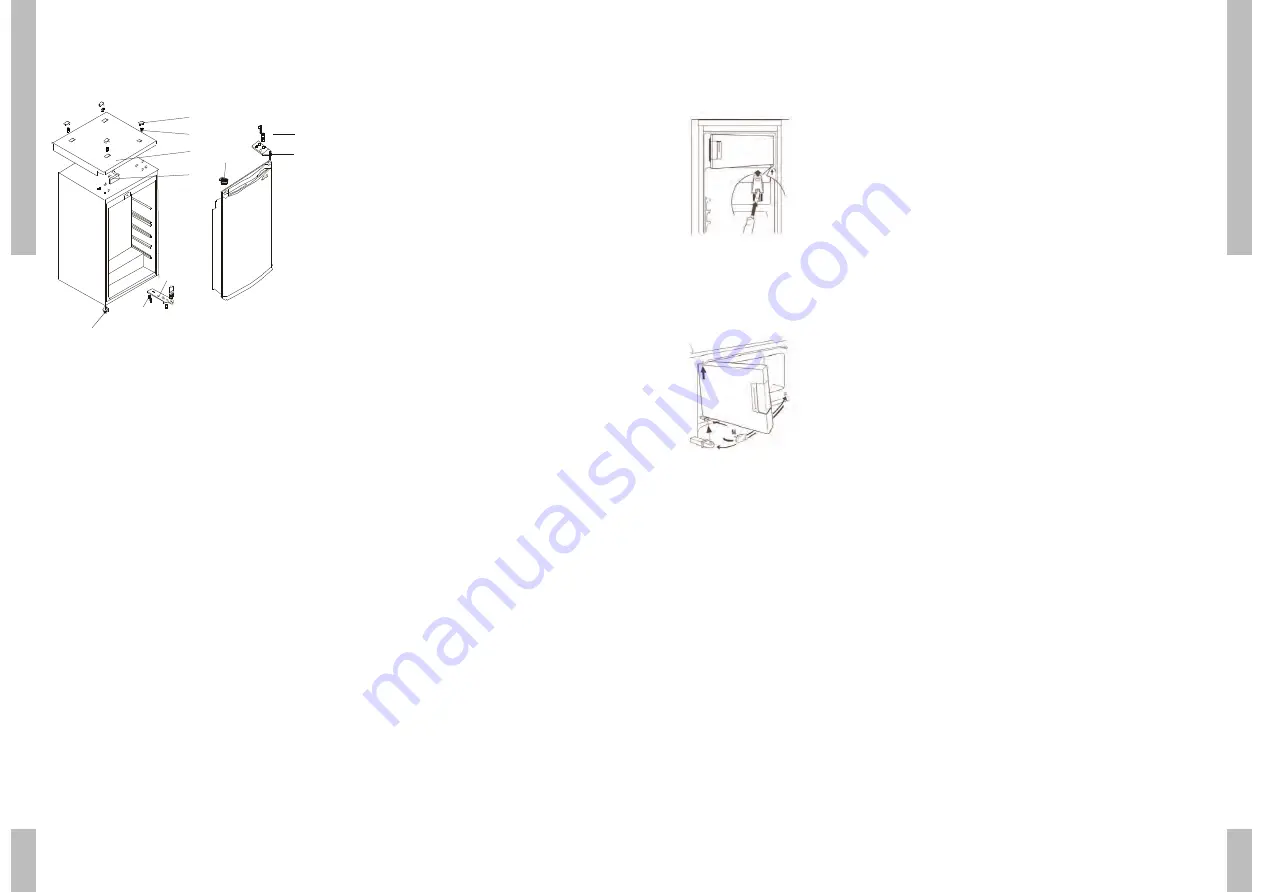
Changing the direction in which

the door opens

1.  Remove the cover plates (1) and the 

screws (2).

2. Remove the top cover (3) and the

decorative block (4).

3. Remove the screws (5) and the upper 

hinge (6).

4. Carefully lift the door from the lower hinge

and place it on a padded surface to prevent
scratching.

5.  Remove the plug (7) from the top of the

door and place it on the opposite side. 

6. Remove the screws (8) and the lower 

hinge (9).

7. Unscrew the adjustable foot (10) and place

it on the opposite side.

8. Fit the lower hinge (9) on the opposite side

with the screws (8). 

9. Slide the door back on to the lower hinge,

making sure that the lower hinge pin fits
into the lower hole of the door. 

10.Fit the upper hinge (6) on the opposite side

with the screws (5).

11.Place the decorative block (4) on the

opposite sidein the top cover (3).

12.Fit the top cover (3) with the screws (2).

Place the cover plates (1).

13.Check that door is aligned horizontally and

vertically and that the seals are closed on
all sides before finally tightening the
bottom hinge. Level the appliance with the
adjustable feet.

1

2

3

4

5

6

7

8

10

9

Changing the direction in which

the freezer compartment door

opens (if applicable)

1.  Open the freezer compartment door a little.

Using a small screwdriver, press the spring
in the opening of the lower door bearing
and remove the door.

2. Position the covering cap M on the

opposite side.

3. Turn the freezer compartment door 180

degrees and fit the lower door bearing into
the lower bearing cavity of the freezer
compartment door.

4. Fit the door in the upper door bearing and

at the same time insert the lower door
bearing into the square hole.

Summary of Contents for EKK0850WIT

Page 1: ...Itemnummer ITEMNR bereit wenn Sie mit der Kundendienstabteilung Kontakt aufnehmen When contacting the service department have the production code PCODE and complete item number ITEMNR to hand Adressen en telefoonnummers van de serviceorganisatie vindt u op de garantiekaart Les adresses et les numéros de téléphone du service après vente se trouvent sur la carte de garantie Adressen und Telefonnumme...

Page 2: ...t bent u snel op de hoogte van alle mogelijkheden van het toestel Bewaar dit boekje Een eventueel volgende gebruiker van dit toestel kan daar zijn voordeel mee doen Inhoud Inleiding 1 Veiligheid 2 Voor uw veiligheid 2 Ingebruikname 3 Voor u het toestel kunt gebruiken 3 Tips 4 Bewaartips 4 Energietips 4 Storingen 5 Storingen zelf verhelpen 5 Onderhoud 6 7 Ontdooien 6 Reinigen 7 Lamp vervangen 7 Wij...

Page 3: ...sinstallatie waarop u het toestel aansluit moet voldoen aan de nationale en lokale voorschriften Sluit het toestel aan op een volgens de geldende voorschriften geïnstalleerde wandcontactdoos Let op de afstand tussen de koelkast en een hittebron De mantel mag niet warmer dan 75 C worden Koelleidingen nooit verbuigen Om beschadigingen aan het koelsysteem te voorkomen het toestel nooit reinigen met s...

Page 4: ...ensmiddelen in een onbeschadigde verpakking Leg diepvrieslevensmiddelen zo snel mogelijk na de aankoop in het vriesvak Zorg ervoor dat ze tijdens het transport niet ontdooien Energietips Opstelling Hoge omgevingstemperaturen beïnvloeden het energieverbruik nadelig Ook direct zonlicht of andere warmtebronnen in de buurt van de koelkast hebben een ongunstige invloed op het energieverbruik Ventilatie...

Page 5: ...laats het afdekkapje terug Steek de stekker weer in het stopcontact ONDERHOUD 6 Ontdooien Koelruimte Zorg ervoor dat de dooiwaterafvoer vrij blijft Met bijvoorbeeld een satéprikker kunt u een verstopte afvoer weer vrij maken De koelruimte ontdooit van tijd tot tijd automatisch Het dooiwater loopt via het afvoergootje naar een opvangbakje waar het verdampt Vriesvak indien van toepassing Ontdooi het...

Page 6: ...deur voorzichtig uit het onderste scharnier en plaats hem op een zachte ondergrond om krassen te voorkomen 5 Verwijder de stop 7 uit de bovenkant van de deur en plaats deze aan de andere kant 6 Verwijder de schroeven 8 en het onderste scharnier 9 7 Draai de stelvoet 10 los en plaats deze aan de andere kant 8 Bevestig het onderste scharnier 9 aan de andere kant met de schroeven 8 9 Plaats de deur i...

Page 7: ...n gevoegd maar naar een speciaal centrum voor gescheiden afvalinzameling van de gemeente moet worden gebracht of naar een verkooppunt dat deze service verschaft Het apart verwerken van een huishoudelijk apparaat voorkomt mogelijk negatieve gevolgen voor het milieu en de gezondheid die door een ongeschikte verwerking ontstaat en zorgt ervoor dat de materialen waaruit het apparaat bestaat teruggewon...

Page 8: ...atures Please keep this book safely for future use Table of contents Introduction 13 Safety 14 For your safety 14 Preparing for use 15 Before you can use the appliance 15 Tips 16 Tips on keeping food 16 Energy tips 16 Faults 17 Trouble shooting 17 Maintenance 18 19 Thawing 18 Cleaning 19 Replacing the bulb 19 Changing the direction in which the door opens 20 Changing the direction in which the fre...

Page 9: ...uld connect the appliance should comply with national and local regulations Connect the appliance to a wall socket which has been fitted in accordance with the current regulations Pay attention to the distance between the refrigerator and any heat source The temperature of the mantle must not exceed 75 C Never bend refrigerant pipes To avoid damaging the cooling system never clean the appliance wi...

Page 10: ...FAULTS Tips on keeping food Only buy food in undamaged packaging Place deep frozen food in the freezer compartment as soon as possible after purchase Make sure that it doesn t defrost during transport Energy tips Position and arrangement High ambient temperatures have a negative effect on energy use Keep the refrigerator in a position away from direct sunlight or other sources of heat Keep ventila...

Page 11: ...Put the plug into the socket MAINTENANCE Thawing Refrigerator Make sure that the melt water drain remains unblocked You can clear a blocked drain with a kebab stick for example The refrigerator defrosts automatically from time to time The melt water runs away via the drain to a receptacle where it evaporates Freezer compartment if applicable Defrost the freezer compartment when the layer of ice re...

Page 12: ...n the opposite side with the screws 5 11 Place the decorative block 4 on the opposite sidein the top cover 3 12 Fit the top cover 3 with the screws 2 Place the cover plates 1 13 Check that door is aligned horizontally and vertically and that the seals are closed on all sides before finally tightening the bottom hinge Level the appliance with the adjustable feet 1 2 3 4 5 6 7 8 10 9 Changing the di...

Page 13: ...heeled dustbin This means that at the end of its working life the product must not be disposed of as urban waste It must be taken to a special local authority differentiated waste collection centre or to a dealer providing this service Disposing of a household appliance separately avoids possible negative consequences for the environment and health deriving from inappropriate disposal and enables ...

Reviews: