5
Montage
Mechanical installation
Bei der Verwendung von Gittern oder Verklei-
dungen vor dem Lautsprecher versichern Sie
sich, dass genügend Raum für den Weg des
Lautsprecher-Konus vorhanden ist. Sollte der
Abstand nicht ausreichen, kann der Konus
gegen die Verkleidung vibrieren und der Laut-
sprecher dadurch beschädigt werden.
If you plan to use grilles or panels in front of
the loudspeaker, ensure that sufficient space
is available for the path of the loudspeaker
cone. Should the distance not be sufficient,
the cone could vibrate against the grille or pa-
nel thus damaging the loudspeaker.
Einbau der Hochtöner
Die Hochtöner können eingebaut oder aufge-
baut werden. Bedenken Sie, dass sich bei der
Montage in der Türe die Halterungen der Hoch-
töner durch häufiges Türenschlagen lösen kön-
nen.
Einbau:
Schneiden Sie ggf. unter Zuhilfenah-
me der Bohrschablone (nicht beiliegend) ein
entsprechendes Loch. Verlegen Sie das zu-
führende Anschlusskabel und montieren Sie die
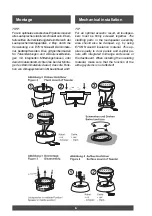
Teile wie in
Abbildung 2
gezeigt.
Die Besonderheit des ETON Einbaugehäuse
ist, dass Sie den Hochtönereinsatz
schwen-
ken und drehen
können, um die optimale
Abstrahlrichtung zu Ihrer Sitzposition zu er-
zielen. Siehe
Abbildung 3
.
Demontage:
Um den Hochtönereinsatz aus
dem Einbaugehäuse zu entfernen, drehen
Sie den Einsatz in mittlere Position, nehmen
Sie zwei metallene Rundstäbchen mit
Ø
1,0
mm und stecken Sie diese bis zum Anschlag
in die beiden Öffnungen rechts und links des
Einsatzes. Durch Schwenken des Hochtöners
können Sie Ihn nun nach oben entnehmen.
Aufbau:
Bohren Sie unter Zuhilfenahme des
Aufbaugehäuses zwei Löcher für die Befesti-
gungsschrauben und ein Loch für das zufüh-
rende Anschlusskabel. Beachten Sie dabei
die von Ihnen gewünschte Neigung des Auf-
baugehäuses. Montieren Sie die Teile wie in
Abbildung 4
gezeigt.
Surface mounting:
Drill two holes for the
fastening screws and one hole for the leading
connector cable using the mounting cabinet
as a guide. Consider the preferred incline
of the mounting cabinet. Mount the parts as
shown in
figure 4
.
Disassambly:
To remove the tweeter element
from the mounting cabinet, turn the element to
its middle position and place two round metal
rods with
Ø
1,0 mm to the limit in both openings
right and left of the tweeter element. By swi-
veling of the tweeter you can now move it
upwards and remove it.
The speciality of the ETON mounting cabinet
is that the tweeter element can be
turned and
swiveled
to achieve the optimum hearing
path to your sitting position. See
figure 3
.
Installing the tweeters
The tweeters can be flush- and surface moun-
ted. Consider that repeated opening and clo-
sing of the car door can result in loosening
of the tweeter fastening devices, when the
loudspeaker is mounted in the door panel.
Flush mounting:
Use, if necesarry, a drilling
template (not included) to cut a suitabel hole.
Lay the leading connector cable and mount
the parts as shown in
figure 2
.
Vorsicht beim Entfernen von Innen-
verkleidungen. Die Fahrzeughersteller
verwenden verschiedenste Befesti-
gungsteile die bei der Demontage be-
schädigt werden können.
Caution: Use care when removing in-
terior trim panels. Car manufacturers
use a variety of fastening devices that
can be damaged in the disassembly
process.


