background image

Four models are available for different input voltages: 
 
Model BD-10A, 115 V, 50/60 Hz, with 12101 Electrode Tip. 
 
Model BD-10AV, 230 V, 50/60 Hz, with 12101 Electrode Tip. 
 
Model BD-10AS, 115 V, 50/60 Hz, with Switch and 12101 Electrode Tip. 
 
Model BD-10ASV, 230 V, 50/60 Hz, with Switch and 12101 Electrode Tip. 


INSTALLATION.  

A standard tip electrode, Part No, 12101, illustrated above, but 

not below is included with each model.  To install it, press it into the tip of the 
generator handle.  To remove, grasp its base firmly, and with a gentle rocking 
motion, pull out from the generator tip.  Never insert or remove the electrode 
while power is on.    


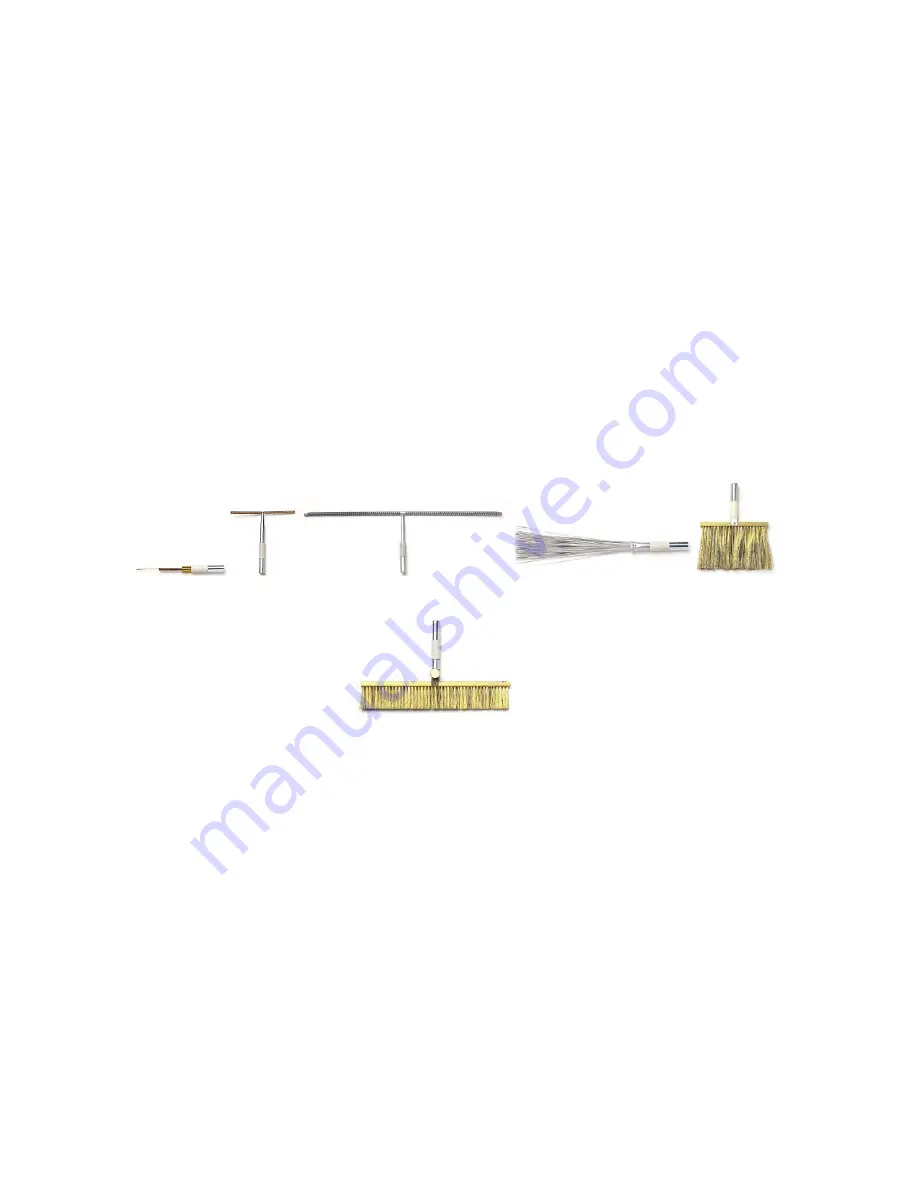
Accessory Electrodes for the Model BD-10A/BD-10AS 


12111 Spring Tip       12121 T-Tip                   12131 T-Tip, 12 in. Wide                                   12141 Fan Tip                       12401 Brush Tip  
                                   4-1/4 in. Wide

                                                                                                                           4 in. Wide 


                                                                            12421 Brush Electrode, 8 in. Wide 

 
These electrodes, plus the 12101 Standard Tip, are the only factory approved 
electrodes for the Model BD-10A/BD-10AS.  No other electrodes should be used. 
 
After the electrode is inserted, plug the power line cord into its matching 
receptacle, providing the proper voltage for the unit, either 115 V or 230 V. 


OPERATION.  


1) 

Turn the Output Adjustment Knob fully counterclockwise. 


2) 

Turn the Output Adjustment Knob clockwise to adjust the voltage for 
the desired spark length.  Hold the tip close to a metal object, to 
observe and adjust the length of the spark. 


-  2  - 

Summary of Contents for BD-10A

Page 1: ...re Both models are a variation of the tesla coil They have a primary coil which produces an output voltage of about 1200 V at the input line frequency 50 or 60 Hz This output voltage is interrupted by a vibrating contact energized by this coil at twice the line frequency The output voltage of this primary coil is connected to capacitors which are then discharged into a high voltage coil The capaci...

Page 2: ...or remove the electrode while power is on Accessory Electrodes for the Model BD 10A BD 10AS 12111 Spring Tip 12121 T Tip 12131 T Tip 12 in Wide 12141 Fan Tip 12401 Brush Tip 4 1 4 in Wide 4 in Wide 12421 Brush Electrode 8 in Wide These electrodes plus the 12101 Standard Tip are the only factory approved electrodes for the Model BD 10A BD 10AS No other electrodes should be used After the electrode ...

Page 3: ...lining or coating Do not use the Voltage Adjustment Knob as an ON OFF switch for the high voltage as this will prematurely wear this part Never leave either model connected to the power line unattended Remove from the power line when not in use Use of a power strip with ON OFF Switch is recommended If the output level of the Model BD 10A BD 10AS is required to be verified when this instrument is i...

Page 4: ...rease breaking the connection between contacts If the unit is then held vertically upward the gap distance decreases making the connection again between the contacts For example if the Model BD 10A AS was set for an output voltage near the low range of operation at the horizontal position it might have an output of 23 kV but be intermittent cutting out on occasion if held with the switch pointing ...

Page 5: ...na of approximately 500 kHz However by the very nature of its design it will produce electromagnetic interference EMI as a result of its operation Electric arc welders for example are another product that by its very nature and mode of operation produces EMI As a result the Model BD 10AV BD 10ASV cannot meet the European Union Electromagnetic Compatibility EMC Directive 89 336 EEC and cannot be CE...

Page 6: ...6 1 and turning the knob counterclockwise Save the plastic and fiber washers The number of washers may vary from one unit to another On each side of the adjusting screw are two metal screws covered by wax Remove and save the wax and remove the screws Slide the rear plastic housing back and expose the internal parts of the unit During this operation for the Model BD 10AS pull the black plastic butt...

Page 7: ...f leads are Okay test the switch for continuity with a multimeter Replace if bad If the unit is working but the output is reduced check the resonator coil the capacitor and the contacts Assembly Instructions For the Model BD 10AS make sure the microswitch aligns with the pushbutton Install the plastic housing 10 32 nut and screws to the proper position To avoid a potential shock hazard cover the s...

Page 8: ... Top Spring Rivet Contact Assembly 035 0007 1 Armature Assembly 035 0011 1 Adjusting Screw Assembly 040 0030 1 Bridge Yoke Bushing 044 0003 1 Top Housing Cone Models BD 10A BD 10AS 044 0004 1 Bottom Housing Model BD 10A 044 0005 1 Adjusting Knob 044 0017 1 Cord Clamp 044 0018 1 Bottom Housing Model BD 10AS 044 0027 1 Molded Switch Base BD 10AS Models 044 0028 1 Molded Button BD 10AS Models 044 300...

Reviews: