background image


18 

Column 

Description 

User Name 

Set a user name that will be used for camera access. The user name allows up to 16 alphanumeric characters. 

Password 

Set the password that will be used for remote login. The password allows up to 16 alphanumeric characters. 

Confirm Password 

Enter the password again to confirm. 

User Level 

Set the security level of an account to give the permission to control different functions. There are four user levels: 
SUPERVISOR, POWER USER, NORMAL USER and GUEST.   

Life Time 

Select how long this account is allowed to stay online (1 MIN / 5 MIN / 10 MIN / 1 HOUR / 1 DAY / INFINITE) 

Step2: Then, click “Save” to save your setting and create a new account. 

How to modify or delete an existing account 

Step1: Select the account you want to modify or delete. 

Step2: To modify the account, click “Edit” to change the settings, and click “Save”. 

To remove the account, click “Delete”. 

Note: 

It’s not allowed to remove an account when there’s only one account in the account list. 

3.7.6 Maintenance 

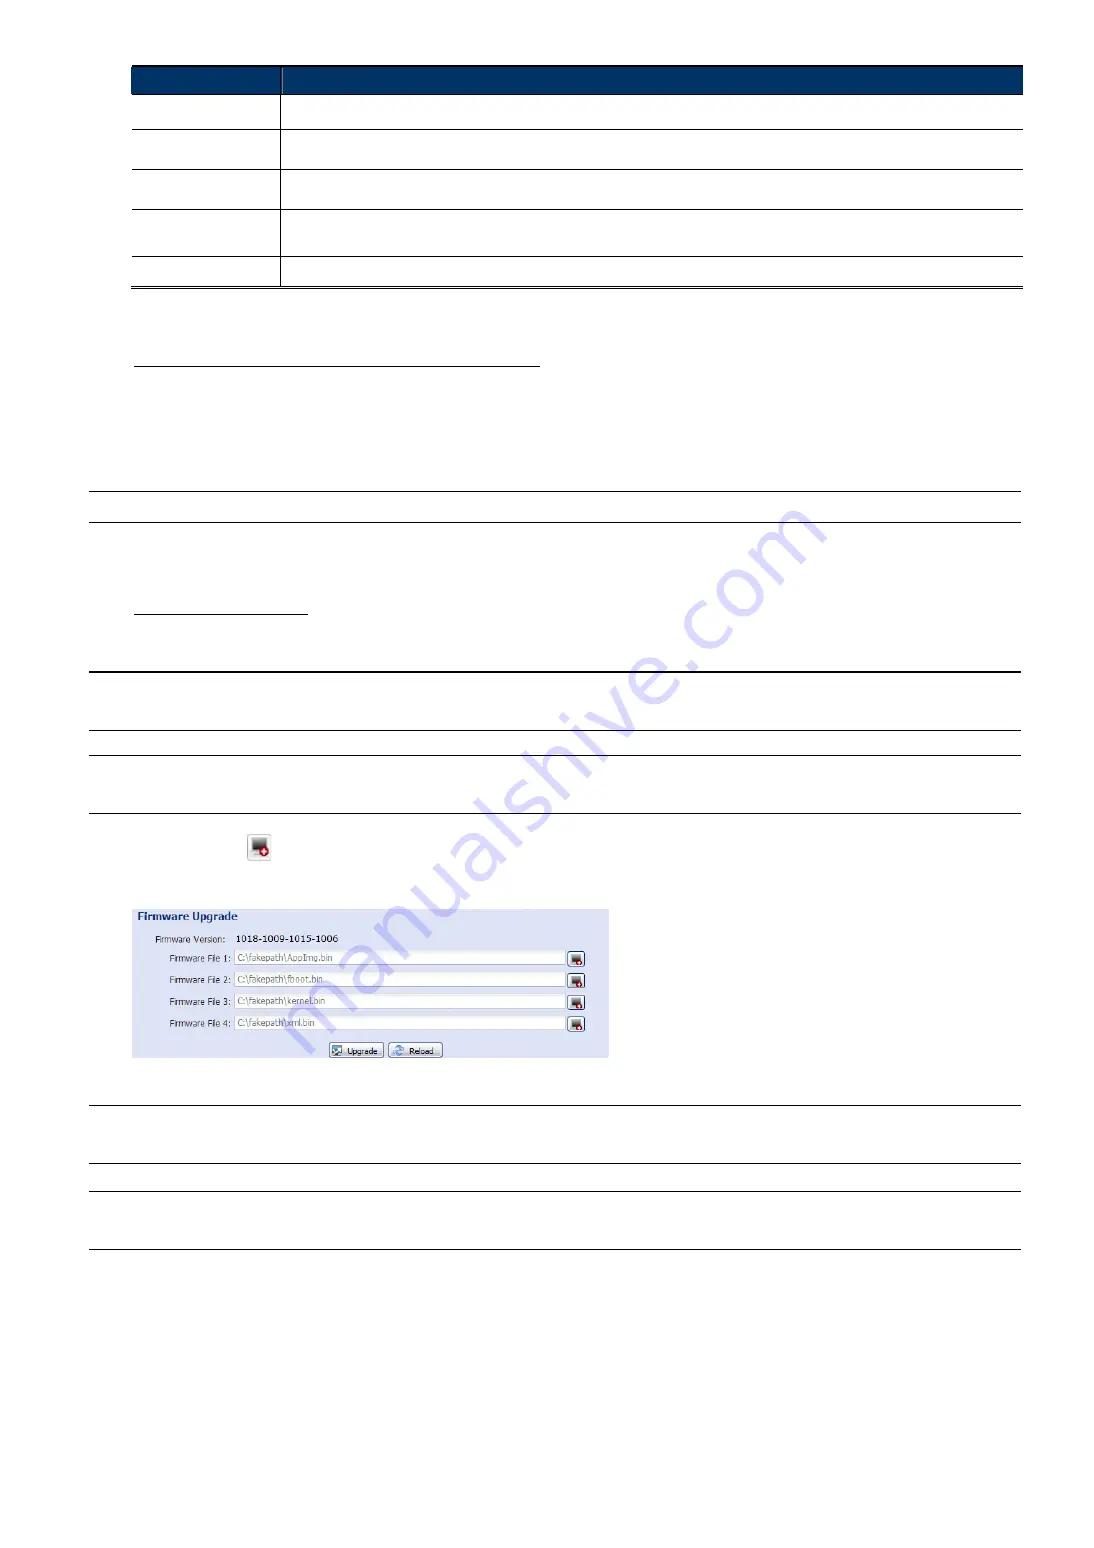
Firmware Upgrade 

This function is used when users need to upgrade the camera for function scalability.   

Note: 

Before using this function, make sure you have the correct upgrade files provided by your 
installer or distributor. 


Note: 

The event videos saved in the camera will be removed after firmware upgrade. Make sure you’ve 
copied important events to your PC before firmware upgrade.   

Step1: Select  “

” to browse to where you save the upgrade files, and select them one by one until all files are 

selected (up to four files). 


Step2: Select “Upgrade” to start system upgrading. 

Note: 

You’ll be prompted to keep current configurations. It’s recommended to keep them, or all 
configurations will be restored to default values after upgrade. 


Note: 

It takes a few minutes to finish the upgrade process. Do not disconnect the power during 
firmware upgrade, or the upgrade may be failed. The camera will reboot after the upgrade.   


Summary of Contents for AVN806

Page 1: ...n806_operation_V0 9 AVN806 IR NETWORK CAMERA SERIES OPERATION GUIDE Please read instructions thoroughly before operation and retain it for future reference...

Page 2: ...interference to radio or television reception which can be determined by turning the equipment off and on the user is encouraged to try to correct the interference by one or more of the following meas...

Page 3: ...ES AND LICENSING MAY BE OBTAINED FROM MPEG LA LLC SEE HTTP WWW MPEGLA COM GPL Licensing This product contains codes which are developed by Third Party Companies and which are subject to the GNU Genera...

Page 4: ...2 1 Network 8 3 2 2 QoS 8 3 2 3 DDNS 8 3 2 4 SNTP 8 3 2 5 FTP 9 3 2 6 MAIL 9 3 2 7 Filter 9 3 2 8 UPnP Bonjour 10 3 3 Camera 11 3 3 1 Camera 11 3 3 2 Video 11 3 3 3 Color 12 3 3 4 Audio 12 3 3 5 Advan...

Page 5: ...ick Setup with iPhone iPad Adapter 1 3 Product Overview 1 4 Rear Panel Ethernet Connect a RJ45 network cable Power Connect the supplied regulated power supply RESET With the power connected press to r...

Page 6: ...s Internet connection status System Status During powering on Always on Always on Blinking on 250 ms off 250 ms Always off Reset default Blinking on 250 ms off 250 ms Blinking on 250 ms off 250 ms Upg...

Page 7: ...wireless 2 1 Camera Login Step1 Open your web browser and key in http ipaddress portnum in the URL address box For example for the IP address 60 121 46 236 and port No 888 please key in http 60 121 4...

Page 8: ...GA 320 x 240 Live View Size Supervisor Power User Normal User Full Screen Click to display the image in full screen To exit the full screen mode press Esc on your keyboard This icon appears only when...

Page 9: ...n Only VGA and QVGA are available Take snapshots Click to take a snapshot of the current view on a new window Right click on the picture and re save it to the location you want Audio On Off Click to s...

Page 10: ...8X 16X speed forward eventually Fast Rewind Increase the speed for fast rewind Click to get 2X 4X 8X 16X speed rewind eventually Play Click to play the current video clip Pause Click to pause the vid...

Page 11: ...e same network area for easy and quick usage Bonjour Suitable for Apple Mac based operating system Allow this camera to be detected among devices within the same network area for easy and quick usage...

Page 12: ...ected network type in Network is PPPOE or DHCP For details please refer to Advanced Network Setup from www surveillance download com user n806 swf 3 2 4 SNTP SNTP Simple Network Time Protocol is used...

Page 13: ...vided from your e mail system supplier If this column is left blank the e mail server will use port 25 to send e mails Mail From Enter the name of the sender SSL Encryption Select Yes if your e mail s...

Page 14: ...of computer components and is only suitable for Microsoft Windows based operating system Bonjour functions the same as UPnP but it s only suitable for Apple Mac based operating system UPnP Bonjour Che...

Page 15: ...e the camera name is shown on the screen UP LEFT UP RIGHT DOWN LEFT DOWN RIGHT 3 3 2 Video Adjust video related settings in different video format Quality is related to image clearness FPS is related...

Page 16: ...ally based on your installation situation when necessary Flip Select ON to rotate the image 180 when necessary De noise Click and drag the slider to adjust the level from 0 10 to decrease the noise sh...

Page 17: ...rding will be but the faster the memory storage is consumed and become full 3 4 2 Record Timer To schedule alarm recording enable it and select the day and time for recording Note The timer must be en...

Page 18: ...is Motion JPEG When Enable is selected click Detection to enter the motion detection area setting page as follows Sensitivity Set the detection sensitivity from the drop down list High Normal or Low...

Page 19: ...recording when it occurs Audio Alert Select the event type you want to enable audio alert when it occurs 3 6 2 Push Video Push Video is an active notification system different from traditional FTP an...

Page 20: ...sed after the specified time select 5 MIN 15 MIN or 30 MIN from the drop down list of Auto Lock Time or select NEVER to disable this function Note When the camera access is locked after the specified...

Page 21: ...can check the current online user s with respective online information To refresh the list click Reload To allow anonymous login select Enable in Anonymous Viewer Login To disable image code verifica...

Page 22: ...ove the account click Delete Note It s not allowed to remove an account when there s only one account in the account list 3 7 6 Maintenance Firmware Upgrade This function is used when users need to up...

Page 23: ...hen the camera is reset to default values Select System bin in Firmware Upgrade and select Upgrade to import the system configuration System Reboot Select Reboot to restart your camera if needed Playe...

Page 24: ...QVGA Min Illumination 0 1 Lux F1 5 0 Lux IR LED ON S N Ratio More than 48dB AGC off Lens f3 8mm F1 5 Viewing Angle 53 7 Horizontal 34 1 Vertical 62 7 Diagonal IR LED 12 units IR Effective Range Up to...

Page 25: ...264 Camera type Megapixel camera Static No one coming in and out Dynamic One or two people coming in and out Resolution Quality Frame Rate Dynamic kbps Static kbps SXGA Best FULL 3253 3216 High 2375...

Page 26: ...uality Frame Rate Dynamic kbps Static kbps SXGA Best 1 15 581 374 High 405 342 Normal 487 248 Basic 337 141 VGA Best 358 79 High 201 63 Normal 180 28 Basic 92 15 QVGA Best 111 84 High 99 68 Normal 97...

Page 27: ...ard for a person who doesn t have network knowledge to set network configurations My live images are not fluent Why Image fluency could be affected by the local network upload bandwidth router efficie...

Page 28: ...the resolution image quality frame rate you choose the complexity of your monitoring area and how often the moving objects show in your monitoring area Testing Environment Place Office Monitoring are...

Reviews: