1646912
ETT Distribution GmbH Schmalbachstraße 16 38112 Braunschweig
Nachdruck oder Vervielfältigung nur mit ausdrücklicher Genehmigung Stand 12/2016
Operation:
Attention: For checking cables with this device these must be de-energized. Prior to any measurement make
sure the cable is de-energized which means that the load must be switched off in case of installed cables (Life
danger!).
Insert the battery into the cable tester which will make it ready for operation.
The Testing of RJ-11- and RJ-45-cables:
•
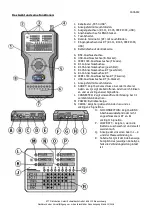
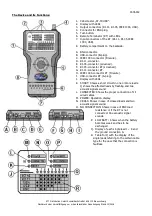
Connect one side of the cable with the RJ-11- [D] and the RJ-45-connector [E] respectively of the tester
and the other one to RT [G] and [F] respectively. If the cable is firmly installed detach RT and use it as
a remote device.
•
Press the test-button [5]. Now POWER [M] shows and the scanning is starting.
•
Now the device checks all leads one after another. This is shown by illumination of the LEDs of [Q] and
an acoustic signal. Leads which are not busy will not create a signal.
•
If the cable is screened additionally the LED G will show too.
•
After a successful test on a 1:1 cable without crossed leads CONNECTED [L] shows and all busy LEDs of
[Q] are illuminated permanently for 5 s.
•
If the cable has crossed leads CROSS [N] shows and all busy LEDs of [Q] are illuminated permanently
for 5 s.
•
In case that one or more leads have a short circuit SHORT [K] shows and the LEDs of the affected leads
at [Q] will not showing. This display will also go off after 5 s.
The Testing of USB- and IEEE 1394-cables:
•
Connect one side of the cable with the USB- [B] and the IEEE 1394-connector [E] respectively of the
tester and the other one to RT [I] and [H] respectively. If the cable is firmly installed detach RT and use
it as a remote device.
•
Press the test-button [5]. Now POWER [M] shows and the scanning is starting.
•
Press the test-button [5]. Now POWER [M] shows and the scanning is starting.
•
If the cable is screened additionally the LED G will show too.
•
After a successful test on a 1:1 cable without crossed leads CONNECTED [L] shows and all busy LEDs of
[Q] are illuminated permanently for 5 s.
•
If the cable has crossed leads CROSS [N] shows and all busy LEDs of [Q] are illuminated permanently
for 5 s.
•
In case that one or more leads have a short circuit SHORT [K] shows and the LEDs of the affected leads
at [Q] will not showing. This display will also go off after 5 s.
The Testing of BNC-cables:
•
Connect one side of the cable with the BNC-connector [A] of the tester and stick the included BNC-
dummy load into the plug on the other side.
•
Press the test-button [5]. Now POWER [M] shows and the scanning is starting.
•
Press the test-button [5]. Now POWER [M] shows and the scanning is starting.
•
After a successful test CONNECTED [L] shows and all busy LEDs of [Q] are illuminated permanently for
5 s.
•
Defective cables will not create a signal.


