background image

Operating Instructions Safety Systems
MGB-L0…-AR.-… and MGB-L0…-AP.-…

26

(translation of the original operating instructions) 112657-12-01/15

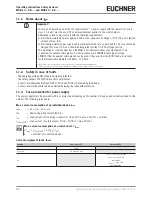
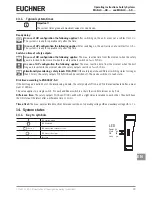
11.8.  Terminal assignment and contact description

Power

LEDs

State

DIA

GN

GN

RD

Figure 15:  Connections and indicator LED

Terminal

Designation

Description

X3.1 to X3.3

-

See the enclosed data sheet

X3.4

UA

Power supply for monitoring outputs and cover assembly, DC 24 V, must be permanently present.

X3.5 

0V

Ground, DC 0 V (connected internally to X5.5).

X3.6 

-

Not used

X3.7

-

Not used

X3.8

-

Not used

X4.1

FI1A

In case of AR configuration:

 Enable input for channel A, connect to DC 24 V in separate operation. In case of switch chains, con-

nect output signal FO1A from previous device. 

In case of AP configuration:

 Input is not evaluated.

X4.2

FI1B

In case of AR configuration:

 Enable input for channel B, connect to DC 24 V in separate operation. In case of switch chains, con-

nect output signal FO1B from previous device. 

In case of AP configuration:

 Input is not evaluated.

X4.3

-

See the enclosed data sheet

X4.4

FO1A

Safety output channel A, ON when door is closed and bolt tongue is retracted.

X4.5

FO1B

Safety output channel B, ON when door is closed and bolt tongue is retracted.

X4.6

RST

Reset input, device is reset if DC 24 V is applied to RST for at least 3 s.

X5.1

OD

Door monitoring output, 

ON when the door is closed.

X5.2

OT

Bolt tongue monitoring output,

ON when the door is closed and the bolt tongue is inserted in the interlocking module.

X5.3

-

Not used

X5.4

OI

Diagnostics monitoring output,

ON when the device is in the fault state.

X5.5

0V

Ground, DC 0 V 

(connected internally to X3.5).

X5.6

UB

Power supply, DC 24 V

X2.1 to X2.8

-

See the enclosed data sheet

X1

-

Reserved for connection of the cover circuit board (only for populated covers)

Table 2:  Terminal assignment and contact description

Summary of Contents for MGB-L0xx-AP Series

Page 1: ...EN Operating Instructions Safety Systems MGB L0 AR MGB L0 AP from V3 0 0 ...

Page 2: ...le MGB H 11 7 3 Escape release MGB E optional 11 7 4 Dimension drawing 12 7 5 Lockout mechanism 13 7 6 Escape release optional 14 7 6 1 Preparing escape release 14 8 Mounting 16 8 1 Mounting color cover 17 9 Changing actuating direction here from right to left 19 10 Protection against environmental effects 20 11 Electrical connection 21 11 1 Notes about 22 11 2 Safety in case of faults 22 11 3 Fus...

Page 3: ...n switch chains 29 12 Setup 30 12 1 Teach in operation only for MGB unicode 30 12 2 Mechanical function test 30 12 3 Electrical function test 31 13 Technical data 32 13 1 Typical system times 33 14 System states 33 14 1 Key to symbols 33 14 2 MGB AR system status table 34 14 3 MGB AP system status table 35 15 Troubleshooting and assistance 36 15 1 Fault reset 36 15 2 Help on troubleshooting in the...

Page 4: ...erating instructions Please contact our support team in this case 1 2 Target group Design engineers and installation planners for safety devices on machines as well as setup and servicing staff possessing special expertise in handling safety components 1 3 Key to symbols Symbol depiction Significance AP This section applies on operation as MGB AP AR This section applies on operation as MGB AR DIP ...

Page 5: ...3 0 0 123151 Basic information about safe setup and maintenance Operating instructions 112657 this document Possibly enclosed data sheet Item specific information about deviations or additions Brief instructions for teach in operation MGB AP MGB AR from V2 0 0 114903 Brief instructions for teach in operation I n t e r n e t www Important Always read all documents to gain a complete overview of saf...

Page 6: ...with the following standards Ì Ì EN ISO 13849 1 Safety of machinery Safety related parts of control systems Part 1 General principles for design Ì Ì EN ISO 12100 Safety of machinery General principles for design Risk assessment and risk reduction Ì Ì IEC 62061 Safety of machinery Functional safety of safety related electrical electronic and programmable electronic control systems Correct use inclu...

Page 7: ...0 Key to symbols Combination possible 2 1 Main differences between MGB AP and MGB AR System family Symbol Use MGB AP AP Optimized for operation in safe control systems If series connection is not necessary the number of terminals can be reduced using this system family MGB AR AR Linking of several safety guards on one shutdown path As a consequence several safety doors can be very simply polled us...

Page 8: ...vice according to EN ISO 14119 Ì Ì Safety function The safety outputs are switched off when the safety guard is open see chapter 6 Function on page 10 Ì Ì Safety characteristics category Performance Level PFHd see chapter 13 Technical data on page 32 The following applies to devices with emergency stop Emergency stop emergency stop device according to EN ISO 13850 Ì Ì Safety function emergency sto...

Page 9: ...Ì Safety components must not be bypassed turned away removed or otherwise rendered ineffec tive On this topic pay attention in particular to the measures for reducing the possibility of bypass ing according to EN ISO 14119 2013 section 7 Ì Ì The switching operation is only allowed to be triggered by the intended handle module MGB H that is positively fastened to the safety guard Ì Ì Prevent bypass...

Page 10: ...ble on page 34 and 14 3 MGB AP system status table on page 35 Configuration System family MGB AR MGB AP Condition No fault in the device TRUE TRUE Safety guard closed TRUE TRUE Bolt tongue inserted in interlocking module TRUE TRUE In case of series connection Signal available from the upstream switch on the safety inputs FI1A and FI1B In case of separate operation DC 24 V present at the safety inp...

Page 11: ... and a mounting plate can be included See enclosed data sheet Figure 1 Interlocking module MGB L 7 2 Handle module MGB H 1 2 5 4 2 3 4 Key 1 Door handle 2 Fold out lockout mechanism optional second automatically extending lockout mechanism 3 Locking pin for handle adjustment 4 Locking screws T10 for housing cover 5 Bolt tongue Notice Depending on the version a mounting plate can be included See en...

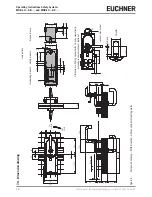
Page 12: ...1 5 4x 19 2 289 3 AUF OPEN CLOSED ZU 40 130 15 111 40 4 155 3 104 40 11 5 58 5 110 8 x 8 min 10 7 5 6 6 86 5 15 4 15 73 5 6 3 6 2 8 9 4 24 5 10 4 6 10 8 9 4 7 7 5 9 2 5 16 5 14 5 Hole pattern Interlocking module Handle module Escape release Detail A Dimensions with plug connector RC18 and automatically extending lockout mechanism optional Padlock Lockout mechanism Figure 4 Dimension drawing MGB mo...

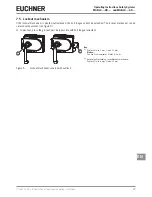
Page 13: ...t extended the bolt tongue cannot be extended The lockout mechanism can be secured with padlocks see Figure 5 To pivot out press the grooved part only possible with bolt tongue retracted 1 2 Key 1 Padlock min 2 mm max 10 mm Notice You can fit a maximum of 3 locks Ø 8 mm 2 Automatically extending second lockout mechanism Padlock min 6 mm max 10 mm Figure 5 Lockout mechanism secured with padlock ...

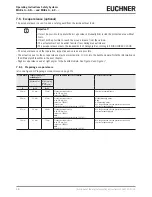
Page 14: ...ase axis at right angles to the handle module See Figure 4 and Figure 7 7 6 1 Preparing escape release also see Figure 6 Preparing escape release on page 15 Profile width Length required for actuation axis Which EUCHNER parts are required Necessary work steps Without plates With mounting plates 4 mm each D D 13 D 21 30 mm 43 mm 51 mm Standard escape release with 110 mm axis order no 100465 Shorten...

Page 15: ...andle 2 Insert actuation axis The locking ring A must be in contact with the escape release B 3 Tighten setscrew to 2 Nm 4 Fit protective sleeve Protective sleeve Actuation axis Example with mounting plates 58 5 4 2 D 4 2 10 55 5 4 2 mm per plate 250 182 Mounting plates D 13 3 5 4 2 mm per plate D 3 5 1 3 2 4 A B Figure 6 Preparing escape release ...

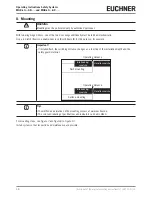
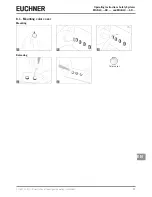
Page 16: ...his purpose for example Important Ì Ì If installed flush the switching distance changes as a function of the installation depth and the safety guard material Interlocking module Handle module Handle module Interlocking module Surface mounting Flush mounting Operating distance Operating distance Tip Ì Ì You will find an animation on the mounting process at www euchner de Ì Ì The color and labeling ...

Page 17: ...112657 12 01 15 translation of the original operating instructions Operating Instructions Safety Systems MGB L0 AR and MGB L0 AP EN 8 1 Mounting color cover 1 2 2 3 90 Click 1 Mounting Removing Color cover ...

Page 18: ...l operating instructions 112657 12 01 15 2x M6 4x M6 1 Nm 6x 0 5 Nm Cutout for escape release Tightening torque 6 Nm Recommended fixing material For mounting on the mounting plate DIN 912 M6X25 8 8 ZN CYLINDER HEAD SCREW Figure 7 Installation example for door hinged on the right general view ...

Page 19: ...er words the safety door opens by pressing up the door handle see Figure 8 For this reason the actuating direction of the door handle must be changed see Figure 8 to Figure 13 similarly on handle modules for doors hinged on the left CLOSED OPEN 1 3 2 1 Press door handle up 2 Unscrew locking screws 3 Push cover aside Figure 8 Changing actuating direction step 1 Figure 9 Changing actuating direction...

Page 20: ...socket head screw to 3 Nm State after repositioning Figure 12 Changing actuating direction steps 9 and Figure 13 Changing actuating direction final state 10 Protection against environmental effects Lasting and correct safety function requires that the system must be protected against foreign bodies such as swarf sand blasting shot etc which can become lodged in the interlocking and handle modules ...

Page 21: ... inductive loads The outputs must be protected with a free wheeling diode for this purpose RC interference suppression units must not be used Ì Ì Power devices which are a powerful source of interference must be installed in a separate location away from the input and output circuits for signal processing The cable routing for safety circuits should be as far away as possible from the cables of th...

Page 22: ...approval Only for applications as per NFPA 79 Industrial Machinery The devices have been tested as per the requirements of UL508 protection against electric shock and fire 11 2 Safety in case of faults Ì Ì The operating voltage UB is reverse polarity protected Ì Ì The safety outputs FO1A FO1B are short circuit proof Ì Ì A short circuit between FI1A and FI1B or FO1A and FO1B is detected by the devi...

Page 23: ...ents in the following table apply EU CHNER provides no warranty for safe function in case of failure to comply with these requirements Observe the following requirements with respect to the connection cables Parameter Value Unit Conductor cross section min 0 13 mm R max 60 Ω km C max 120 nF km L max 0 65 mH km 11 5 Notes on cable laying Lay all MGB connection cables in a common cable harness PLC 2...

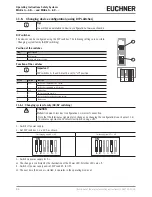
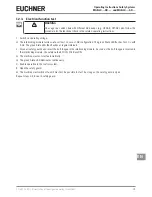
Page 24: ...ystem off Device is operated as AR system B 3 4 No function C 5 on Configuration possible off Configuration inhibited factory setting D 6 No function 11 6 1 Changing system family AR AP switching CAUTION Malfunction due to incorrect configuration or incorrect connection Ì Ì Note that the terminal assignment also changes on changing the configuration see chapter 11 8 Terminal assignment and contact...

Page 25: ...the chapter 13 Technical data on page 32 Ì Ì The inputs on an evaluation unit connected must be positive switching as the two outputs on the safety switch deliver a level of 24 V in the switched on state AR Ì Ì Always connect inputs FI1A and FI1B directly to a power supply unit or to outputs FO1A and FO1B of another EUCHNER AR device series connection Pulsed signals must not be present at inputs F...

Page 26: ...ut for channel B connect to DC 24 V in separate operation In case of switch chains con nect output signal FO1B from previous device In case of AP configuration Input is not evaluated X4 3 See the enclosed data sheet X4 4 FO1A Safety output channel A ON when door is closed and bolt tongue is retracted X4 5 FO1B Safety output channel B ON when door is closed and bolt tongue is retracted X4 6 RST Res...

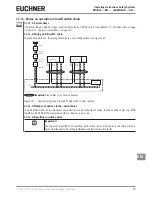
Page 27: ...I1B X4 2 RST X4 6 FO1A X4 4 FO1B X4 5 OD X5 1 OT X5 2 OI X5 4 0V X5 5 0V X3 5 UA X3 4 UB X5 6 X3 3 X2 3 X2 4 X2 2 X2 7 X3 2 X3 1 MGB 24 V DC Connected load F1 F2 S1 Figure 16 Connection example for separate operation The switches can be reset via the RST input To do this a voltage of 24 V is applied to the RST input for at least 3 seconds The supply voltage to the switches is interrupted during th...

Page 28: ...X2 2 X2 7 X3 2 X3 1 MGB F1 F2 F3 F4 Safety Outputs Safety Inputs Monitoring Outputs X2 1 X2 6 H2 H3 S2 S3 0V UA S1 FI1A X4 1 FI1B X4 2 RST X4 6 FO1A X4 4 FO1B X4 5 OD X5 1 OT X5 2 OI X5 4 0V X5 5 0V X3 5 UA X3 4 UB X5 6 X3 3 X2 3 X2 4 X2 2 X2 7 X3 2 X3 1 MGB S1 Figure 17 Connection examples for operation in a CES AR switch chain For detailed information on operation in an AR switch chain see the r...

Page 29: ...PLC MGB L AR 24 V DC cabinet 0 V FI1A FI1B FI1A FI1B FO1A FO1B FI1A FI1B FO1A FO1B UB 0V UA 0V 1 2 3 4 MGB L AR 5 FI1A FI1B FO1A FO1B FI1A FI1B FO1A FO1B UB 0V UA 0V FO1A FO1B Important lay cables in a common harness Figure 18 Central wiring of an AR switch chain in the control cabinet 11 11 3 Number of devices in the switch chains In a pure MGB switch chain a maximum of ten devices can be connect...

Page 30: ... on reconnection After teach in the adapter is removed again and the MGB is connected normally It is not necessary to fit a jumper e g in the control cabinet Teaching in handle module 1 Fit handle module 2 Close safety guard Check for correct alignment and distance using the marking on the interlocking module and re adjust if necessary 3 Insert bolt tongue in the interlocking module 4 Apply operat...

Page 31: ... test In case of AR configuration The green State LED flashes for 10 s with 5 Hz The green State LED then flashes at regular intervals 2 Close all safety guards and insert the bolt tongue in the interlocking module As soon as the bolt tongue is inserted in the interlocking module the safety outputs FO1A FO1B are ON The machine must not start automatically The green State LED illuminates continuous...

Page 32: ...utputs 80 mA Current consumption IUA Push button S unloaded per LED 5 mA External fuse See chapter 11 3 Fuse protection for power supply on page 22 Safety outputs FO1A FO1B Semiconductor outputs p switching short circuit proof Test pulses AR 1 000 AP 300 µs Test pulse interval Min 100 ms Output voltage UFO1A UFO1B 1 HIGH UFO1A UFO1B UB 2V UB LOW UFO1A UFO1B 0 1 V DC Switching current per safety ou...

Page 33: ...moment when the bolt tongue is inserted to the moment when the safety outputs switch on Ton is 570 ms AR Simultaneity monitoring safety inputs FI1A FI1B If the safety inputs have different switching states for longer than 150 ms the safety outputs FO1A FO1B will be switched off The device switches to fault state Risk time according to EN 60947 5 3 If the bolt tongue is pulled out of the interlocki...

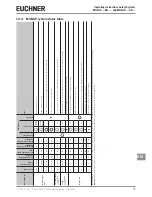
Page 34: ...ration door closed and locked Safety outputs on the previous device ON Teach in standby only for MGB unicode X open not inserted OFF OFF OFF OFF 3 x Door open device is ready for teach in of another handle module only 3 min after Power UP Setup only for MGB unicode X closed inserted OFF OFF OFF OFF 1 Hz Teach in operation tip To prevent the interruption of teach in operations close door and insert...

Page 35: ...odule only 3 min after Power UP Setup only for MGB unicode closed inserted OFF OFF OFF OFF 1 Hz Teach in operation tip To prevent the interruption of teach in operations close door and insert bolt tongue X X OFF OFF OFF OFF Positive acknowledgment after completion of teach in operation Diagnostics X X OFF OFF OFF ON 1 x Error during teach in configuration or invalid DIP switch setting X X OFF X X ...

Page 36: ...f test is performed during this time approx 10 s in case of AR configuration The LED then cyclically flashes three times 2 Close the safety guard The system is in normal mode again 15 2 Help on troubleshooting in the Internet You will find a help file on troubleshooting under Support in the service area at www euchner de 15 3 Help on mounting in the Internet You will find an animation on the mount...

Page 37: ...or spare parts that can be ordered from EUCHNER may be replaced Regular inspection of the following is necessary to ensure trouble free long term operation Ì Ì Check the switching function see section 12 3 Electrical function test on page 31 Ì Ì Check the secure fastening of the devices and the connections Ì Ì Check for soiling No servicing is required repairs to the device are only allowed to be ...

Page 38: ...Operating Instructions Safety Systems MGB L0 AR and MGB L0 AP 38 translation of the original operating instructions 112657 12 01 15 18 Declaration of conformity ...

Page 39: ...39 112657 12 01 15 translation of the original operating instructions Operating Instructions Safety Systems MGB L0 AR and MGB L0 AP EN ...

Page 40: ...r de Edition 112657 12 01 15 Title Operating Instructions Safety Systems MGB L0 AR and MGB L0 AP from V3 0 0 translation of the original operating instructions Copyright EUCHNER GmbH Co KG 01 2015 Subject to technical modifications no responsibility is ac cepted for the accuracy of this information ...

Reviews:

Related manuals for MGB-L0xx-AP Series