background image

6

Caution:

 You may need a second person to assist you in loading the bicycle rack bracket.

Mounting the bicycle to the bicycle rack bracket

Open the frame holder of the holding bracket by turning the knob nut anti-clockwise. Fold the holding bracket down and rest on the wheel rail. 

Position the bicycle on the wheel rail, with the front wheel on the side of the base plate of the holding bracket. Slide the bicycle backwards into 

the wheel rail until it is possible to stand the holding bracket up in front of the bicycle frame. Set the inclination of the holding bracket so that it 

forms a right angle with the bicycle frame. Now slide the bicycle forwards until the frame is in the frame holder of the holding bracket. Close the 

frame holder by rotating the knob nut clockwise. Make sure that the tube of the bicycle frame is securely encompassed by the holding bracket of 

the frame holder. Fold the pivoting threaded rod with the lockable knob nut into the fork opening of the holding bracket. Tighten the knob nuts.

You can only lock the lockable knob nut when it is firmly tightened. Turn the key to the red marking on the lock symbol and remove the key. Your 

bicycle is now secured to prevent theft.

The wheels are secured by placing the tensioning straps through the eye of the strap guide, around the wheel rail and the rim of your bicycle 

and tightening the straps.

When travelling with the bicycle rack bracket empty, secure the holding bracket to the wheel rail using a tensioning strap.

•  After use, store the bicycle rack in a clean and dry place. Wash off any dirt with water.

•  Check the bicycle rack bracket regularly for damages. Damaged or worn parts must be replaced immediately. Only original replacement 

parts may be used.

•  Check the bolts and nuts of the bicycle rack regularly and tighten when necessary.

•  Immediately treat any damage to paintwork with paint.

Maintenance and care

Notes regarding environmental protection

Please dispose of this device via the recycling bin or the public/municipal collection points.

The materials can be recycled. You make an important contribution to protecting our environment by recycling, material utilisation or other 

forms of reusing waste equipment!

Caution: 

The front wheel must be secured using two small tensioning straps to prevent it from turning. 

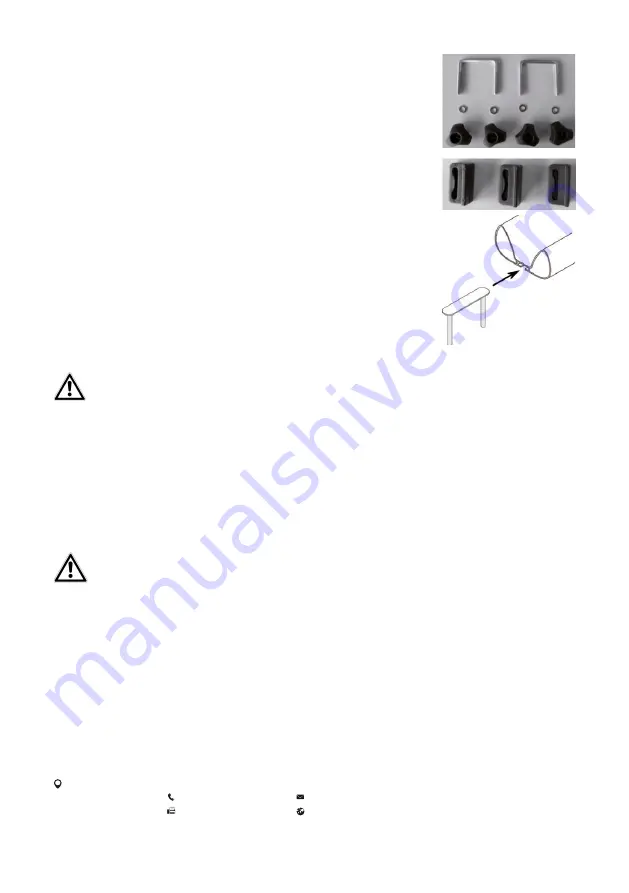
Now feed one U-shaped bracket, from below, through the drilled holes of the base plate. Fit the washers 

and knob nuts to the threads of the U-shaped bracket. Tighten the nuts gently. Do the same on the other 

side.

Align the bicycle rack bracket parallel to the vehicle axis. Pay attention to ensure that no parts of the 

bicycle will protrude beyond the vehicle body when the bicycle is subsequently mounted. Now tighten 

up all screws and nuts.
Insert the strap guide into the T-groove at the end (the longer part, seen from the base plate) of the 

wheel rail where the bicycles rear wheel will later be attached. At the other end (the shorter part, seen 

from the base plate), position the two other strap guides for securing the front wheel.

Fit the end caps onto the ends of the wheel rail.

Fit the clamp arch to the threaded bolts of the U-shaped bracket. Make sure that the lateral metal  

edges of the clamp arch are facing downwards. Now fit the washers and knob nuts to the threads of the  

U-shaped bracket. Tighten the nuts gently.

Contact information

        EAL GmbH

       Otto-Hausmann-Ring 107

       42115 Wuppertal

        Germany

+49 (0)202 42 92 83 0

+49 (0) 202 42 92 83 – 160

info@eal-vertrieb.com

www.eal-vertrieb.com

Summary of Contents for 12015

Page 1: ...e Haftung für Schäden die durch nicht bestimmungsgemäßen Gebrauch entstehen WARNUNG Lesen Sie die Bedienungsanleitung vor Inbetriebnahme sorgfältig durch und beachten Sie alle Sicherheitshinweise Nichtbeachtung kann zu Personenschäden Schäden am Gerät oder Ihrem Eigentum führen Bewahren Sie die Originalverpackung den Kaufbeleg sowie diese Anleitung zum späteren Nachschlagen auf Bei der Weitergabe ...

Page 2: ...er eigenen Sicherheit ausschließlich Zubehör oder Ersatzteile die in der Anleitung angegeben sind oder deren Verwendung durch den Hersteller empfohlen wird Überschreiten Sie niemals die zulässige Dachlast Ihres Fahrzeugs Schlagen Sie dafür im Handbuch Ihres Fahrzeugs nach oder fragen Sie den Fahrzeughersteller Beachten Sie dass sich das Fahrverhalten Ihres Fahrzeugs beim Fahren mit einer Dachlast ...

Page 3: ...hrzeugaußenseite weisen Richten Sie die Radschiene so aus dass sie mit beiden Enden gleichweit über die Querträger des Dachgepäckträgers hinausragt Verschieben Sie nun die Grundplatte auf der Radschiene bis sie sich der Querträger zwischen den Bohrungen der Grundplatte befindet Den U Bügel verschiebenSieso dasssichderandereQuerträgerzwischendenGewindebolzendesU Bügelsbefindet Verändern Sie die Pos...

Page 4: ...e of the product Proper use of the product Scope of delivery Specifications Safety precautions Operating instructions Maintenance and care Contact information The Alu Star bicycle rack bracket is designed to facilitate upright transportation of a bicycle on the roof rack of a car This device is not designed to be used by children and people with limited mental capacities or those without experienc...

Page 5: ...hescopeofdelivery Every stage is described and clearly shows which components are required for the assembly of the bicycle rack bracket 1 x Wheel rail with holding brackets 1 x Lock screw M8 x 120 1 x Coil spring 10 x 80 1 x Knob nut M8 1 x Knob nut M8 lockable 3 x Washer 15 8 x 8 5 x 1 1 Insert the lock screw from the outside through the bar of the holding bracket which has a pivoting threaded ro...

Page 6: ...acement parts may be used Check the bolts and nuts of the bicycle rack regularly and tighten when necessary Immediately treat any damage to paintwork with paint Maintenance and care Notes regarding environmental protection Please dispose of this device via the recycling bin or the public municipal collection points The materials can be recycled You make an important contribution to protecting our ...

Page 7: ... société EAL GmbH décline toute responsabilité en cas de dommages découlant d une utilisation non conforme à l emploi prévu Tenez les enfants à distance et ne les laissez pas utiliser ou jouer avec cet appareil N utilisez cet appareil qu aux fins pour lesquelles il a été prévu Ne pas manipuler ni démonter l appareil Pour votre propre sécurité utilisez exclusivement les accessoires ou pièces de rec...

Page 8: ...ixer sur votre galerie porte bagages Veillez à ce que les poignées écrous de l étrier de maintien soient accessibles depuis l extérieur du véhicule Orientez le rail porte roues de sorte que ses deux extrémités dépassent la traverse de la galerieporte bagagesdefaçonsimilaire Faitesmaintenantglisserlaplaquedebasesurlerailporte rou es jusqu à ce que la traverse se trouve entre les trous de la plaque ...

Page 9: ...o sur le porte vélo Insérez un guide de sangle à l extrémité de la rainure enT la partie la plus longue de la plaque de base du rail porte roues sur laquelle la roue arrière du vélo sera fixée par la suite Insérez les deux autres guides de sangle servant à fixer la roue avant au niveau de l autre extrémité la partie la plus courte de la plaque de base Enfoncez les embouts dans les extrémités du ra...

Page 10: ...te di bambini e persone con capacità mentali limitate o senza esperienza e o con conoscenze insufficienti Tenere il dispositivo lontano dalla portata dei bambini Questo dispositivo non è destinato all impiego industriale Dell uso appropriato fa parte anche il rispetto di tutte le informazioni fornite in queste istruzioni soprattutto delle avvertenze sulla sicurezza Ogni altro utilizzo viene consid...

Page 11: ...di zigrinati M6 6 x rondelle 11 8 x 6 5 x 1 3 3 x guide della cinghia Innanzitutto rimuovere i cappucci terminali dal binario Allentare i dadi sul lato inferiore della piastra di base fino a che non possono essere spostati sul binario Inserire la staffa a U con la traversa piatta nella scanalatura aT dalla parte inferiore del binario Disporre il binario sul portapacchi senza fissarlo Accertarsi ch...

Page 12: ...saggio attraverso l asola della guida della cinghia intorno al binario e al cerchione della propria bicicletta e stringere le cinghie Se si viaggia con il portabici vuoto fissare la staffa di sostegno al binario con una cinghia Pulire il portabici dopo l uso e conservarlo asciutto Eventualmente lavare lo sporco con acqua Controllate regolarmente il portabici per accertare eventuali danni Sostituir...

Reviews: