7
5. Explanation of symbols
6. Operating instructions
Labelled electrical products may
not be disposed of in the household
waste
Complies with EC directives
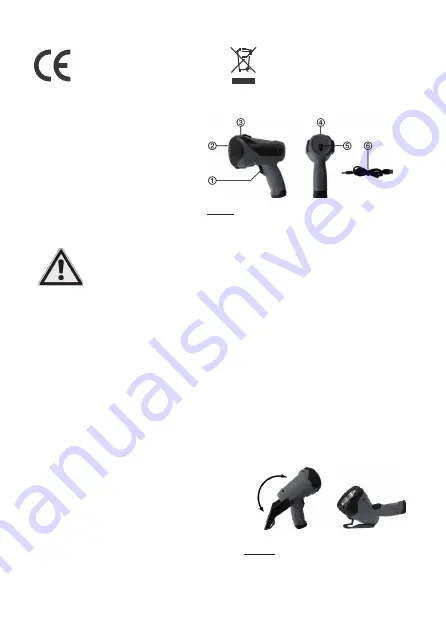
Figure 1:
Overview
6.1 Overview
1 Switch
2 Spotlight
3 Stand
4
Charge control lamp
5
Charging connection
6
Charging cable
Connect the charging connection (Position 5 in the overview) to the coaxial connector of
the charging cable (Position 6 in the overview). Connect the USB type A connector of the
charging cable to a USB charger. You can use a computer or the USB connection in your
vehicle for charging purposes.
During the charging process, the charge control lamp (Position 4 in the overview) is red.
When the battery is fully charged, the charge control lamp will change to green.
Separate the charging cable from the charger and pull the coaxial connector from the
charging connection. Close the charging connection using the protective cap.
6.2 Charging the battery
Use only chargers with a maximum 1 A of charging current!
Pressing the switch multiple times (Position 1 in the overview) enables you to activate the
following functions of the LED hand-held spotlight:
•
Spotlight on (Position 2 in the overview)
•
Spotlight, dimmed
•
Spotlight, flashing
•
Off
Unfolding the stand (Position 3 in the overview) enables you to set up the LED hand-held
spotlight on an even surface,
Figure 2.
6.3 Functions
Figure 2:
Stand


