background image

8

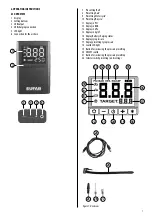
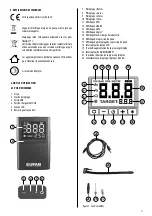
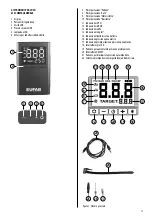
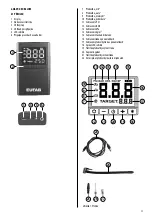
Connect the USB charging cable (Position 23 in the overview) with 

the USB charging connection of the compressor (Position 4 in the 

overview). Connect the other end of the USB charging cable to a USB 

charger. The display for the battery charging status (Position 15 in the 

overview) is activated in the display.  During the charging process, the 

segments of the charging status display shine one after another. Once 

all four segments shine permanently, the compressor’s battery is fully 

charged.
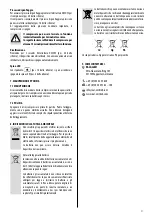
After charging, fi rst disconnect the charger from the power socket 

and then disconnect the compressor from the charging cable. Always 

maintain this sequence.

6.2 CHARGING THE BATTERY

Setting the TARGET pressure 

Press the ON/OFF switch (Position 20 in the overview) for approx. 3 
seconds. The display light is activated. Pressing the selector switch 
several times for a longer period 

(Position  22  in  the 

overview), you can set the unit for the pressure:
PSI 

BAR 

 KPA 

 KGF/CM²

6.3 USING THE COMPRESSOR

Checking the charge status

Press the ON/OFF switch. (Position 20 in the overview) for 

approx. 3 seconds. The display is activated. The battery symbol 


shows the charging status (empty, 25 %, 50 %, 75 %, 

100 %).

You can set the target pressure with the buttons  

and 

(Position 21 and 19 in the overview), these can be read in the display 

‘TARGET’ (Position 17 in the overview).

Automatic/controlled lowering of the air pressure is not 

possible with this device.  

Connecting the air hose

Screw the end with the outer thread of the air hose (Position 24 in 

the overview) into the connection of the compressor (Position 6 in the 

overview).

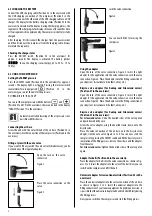
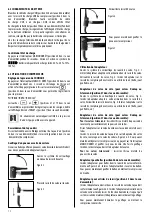
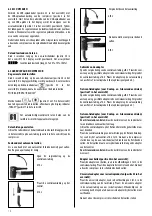
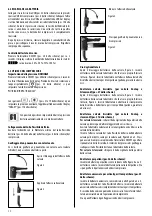
Open the lock on the valve 

connection

Lock the valve connection

Place the valve connection on the 

valve

You can now fi ll the tyres using the 

compressor

Figure 2

Figure 4

Figure 3

Figure 5

Filling a tyre with the auto valve

If you want to fi ll a tyre with the auto valve (Schrader valve), you do 

not need any of the separate adapters. 

Using the adapter

Open the lock of the valve connection, Figure 2. Insert the right 

adapter for the application into the valve connection. Lock the valve 

connection, Figure 4. Place the adapter onto the fi lling connection of 

your bicycle or recreational article (ball, air toy etc.).

Bicycle valve adapter (for Dunlop and Sclaverand valves) 

(Position 27 in the overview):

For Sclaverand valves:

 Undo the knurled screw of the valve piston 

and push down briefl y once.

Screw the valve adapter, using the knurled crown, down onto the 

bicycle valve.

Place the valve connection of the air hose onto the bicycle valve 

adapter, like the auto valve, Figures 2 to 5. You can now start the 

compressor by pressing the ON/OFF switch and fi ll the bicycle tyres. On 

completion of the fi lling process, remove the air hose and the adapter 

from the valve.

For Sclaverand valves:

 Tighten the knurled screw of the valve piston 

again.

Adapter for balls (Position 26 in the overview):

Place the adapter for balls into the valve connection as shown in Fig-

ures 2 to 5. Insert the adapter into the valve of the ball. Now you can 

switch on the compressor and fi ll the ball. 

Universal adapter for recreational articles (Position 25 in the 

overview):

Place the universal adapter into the valve connection of the air hose 

as shown in Figures 2 to 5. Insert the universal adapter into the 

fi lling connection of your leisure equipment. Depending on version, it 

is possible that the universal adapter will need to be held fi rmly during 

the fi lling process.
Now you can switch on the compressor and start the fi lling process.

Summary of Contents for 21083

Page 1: ...le Operating instructions 6 R f 21083 Mini compresseur rechargeable Manuel de l op rateur 10 Cod art 21083 Mini compressore ricaricabile Istruzioni per l uso 18 Art nr 21083 Minicompressor oplaadbaar...

Page 2: ...htung kann zu Personensch den Sch den am Ger t oder Ihrem Eigentum f hren Bewahren Sie die Originalver packung den Kaufbeleg sowie diese Anleitung zum sp teren Nachschlagen auf Bei der Weiter gabedesP...

Page 3: ...lung Ball 8 Voreinstellung Auto 9 Voreinstellung Motorrad 10 Voreinstellung Fahrrad 11 Anzeige in PSI 12 Anzeige in BAR 13 Anzeige in kPa 14 Anzeige in kg m 15 Anzeige Batterieladezustand 16 Anzeige R...

Page 4: ...erventil bef llen m chten ben tigen Sie keinen der separaten Adapter Verwendung der Adapter ffnen Sie die Verriegelung des Ventilanschlusses Bild 2 Setzen Sie den f r Ihre Anwendung passenden Adapter...

Page 5: ...F llvorgang Zum Starten des F llvorgangs dr cken Sie den EIN AUS Schalter f r den Kompressor Position 20 in der bersicht Der Kompressor startet w hrend des F llvorgangs kann der Druck auf dem Display...

Page 6: ..._______________________ 9 7 2 CARE __________________________________ 9 8 NOTES REGARDING ENVIRONMENTAL PROTECTION______ 9 9 CONTACT INFORMATION ______________________ 9 1 x mini compressor 1 x air ho...

Page 7: ...ycle 10 Presetting Bicycle 11 Display in PSI 12 Display in BAR 13 Display in kPa 14 Display in kg m 15 Display Battery charging status 16 Display tyre pressure 17 Display presetting tyre pressure 18 S...

Page 8: ...lve If you want to fill a tyre with the auto valve Schrader valve you do not need any of the separate adapters Using the adapter Open the lock of the valve connection Figure 2 Insert the right adapter...

Page 9: ...lytous addressinsection9 Filling process Press the ON OFF switch for the compressor Position 20 in the over view to start the filling process Thecompressorstarts thepressurescanbereadonthedisplaydurin...

Page 10: ...rme aux prescriptions implique galement le respect de toutes les informations contenues dans ce mode d emploi en particulier le respect des consignes de s curit Toute autre utilisation est consid r e...

Page 11: ...lig par la loi de remettre l article utilis au revendeur ou un service de collecte pour qu il soit limin conform ment aux dispositions 1 2 3 4 5 6 7 Pr r glage Balle 8 Pr r glage Auto 9 Pr r glage Mot...

Page 12: ...voiture Sivoussouhaitezgonflerunpneuavecvalvedevoiture valveSchrader vous n avez pas besoin d adaptateur s par Utilisation de l adaptateur Ouvrez le syst me de verrouillage de raccord de valve Fig 2...

Page 13: ...esse voir la section 9 pour les liminer gratuitement Gonflage Pour d marrer le gonflage appuyez sur l interrupteur MARCHE ARR T pour le compresseur position 20 dans la vue d ensemble Le compresseur d...

Page 14: ...materi le schade of persoonlijk letsel veroorzaken EAL GmbH is nietaansprakelijkvoorschadealsgevolgvanniet reglementairgebruik 2 LEVERINGSOMVANG 1 x minicompressor 1 x luchtslang met adapter autovent...

Page 15: ...AR 13 Weergave in kPa 14 Weergave in kg m 15 Weergave acculaadtoestand 16 Weergave bandendruk 17 Weergave voorinstelling bandendruk 18 Schakelaar LED lampje 19 Toets druk voorinstelling verhogen 20 Aa...

Page 16: ...n autoventiel Schraderventiel gaat vullen heeft u geen aparte adapter nodig Gebruik van de adapter Opendevergrendelingvandeventielaansluiting afb 2 Plaatsdevoor uw toepassing geschikte adapter in de v...

Page 17: ...op de aan uitschakelaar voor de compressor positie 20 in het overzicht De compressor start tijdens het vullen kunt u de druk op het display positie 16 in het overzicht aflezen Als de ingestelde druk i...

Page 18: ...urezza La mancata osservanza di queste istruzioni pu provocare lesioni perso nali danni al prodotto o alla vostra propriet Conservare la confezione originale la prova d acquisto e queste istruzioni co...

Page 19: ...zione Bicicletta 11 Indicazione in PSI 12 Indicazione in BAR 13 Indicazione in kPa 14 Indicazione in kg m 15 Indicazione livello di carica batteria 16 Indicazione pressione pneumatico 17 Indicazione p...

Page 20: ...ccorrono adattatori a parte Uso degli adattatori Aprire il bloccaggio dell attacco della valvola figura 2 Inserire nell attacco della valvola l adattatore che fa al caso proprio Bloccare l attacco fig...

Page 21: ...tirli gratuitamente Processo di gonfiaggio Peravviareilprocessodigonfiaggiopremerel interruttoreON OFFper il compressore pos 20 dello schema Il compressore si avvia durante il processo di gonfiaggio l...

Page 22: ...oklad o koupi a tento n vod propou it vbudoucnosti P ipostoupen v robku odevzdejte i tento n vod P ed uveden m do provozuzkontrolujte zdanen balen po kozen a zda je obsah balen kompletn Mini kompresor...

Page 23: ...otocykl 10 P edvolba j zdn kolo 11 Zobrazen v PSI 12 Zobrazen v BAR 13 Zobrazen v kPa 14 Zobrazen v kg m 15 Zobrazen Stav nabit baterie 16 Zobrazen tlaku v pneumatik ch 17 Zobrazen p edvolby tlaku v p...

Page 24: ...amostatn adapt r Pou it adapt ru Otev ete uz v r ventilov p pojky obr zek 2 Do ventilov p pojky vlo te adapt r vhodn k pou it Ventilovou p pojku zav ete obr zek 4 Nasa te adapt r na plnic p pojku j zd...

Page 25: ...resa viz odstavec 9 za elem bezplatn likvidace Postup nafukov n Pro spu t n procesu nafukov n stiskn te zap na vyp na kompresoru v p ehledu pol 20 Kompresor se spust b hem hu t n lze na displeji ode s...

Page 26: ......
Page 27: ...27 EAL GmbH Otto Hausmann Ring 107 42115Wuppertal Deutschland 49 0 202 42 92 83 0 49 0 202 42 92 83 160 info eal vertrieb com www eal vertrieb com...

Reviews: