background image

13   

  14

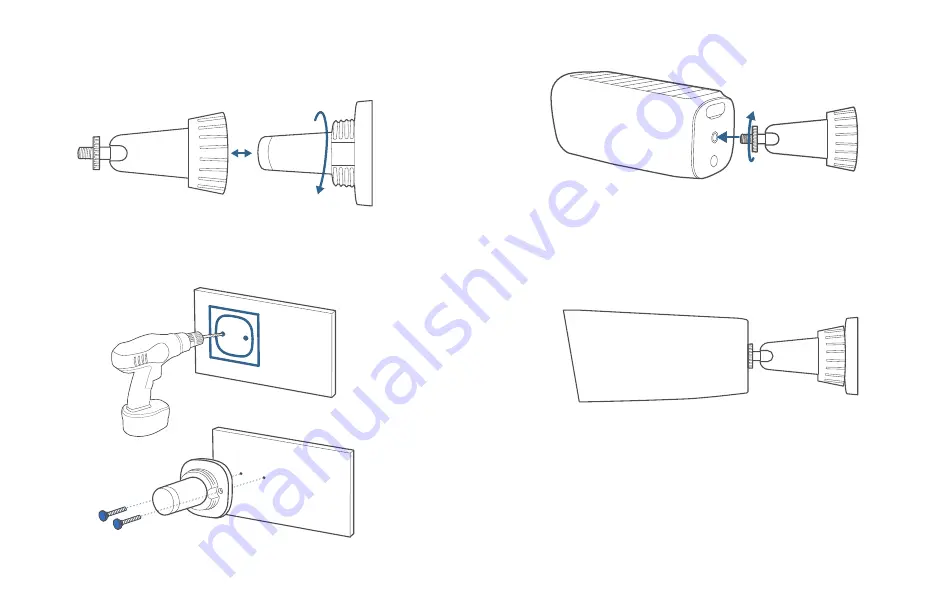
Mount the Camera

1. Turn the knob of the mounting bracket counterclockwise to loosen and 

disassemble it.

2. Drill holes with a 15/64 inch (6 mm) drill bit, then insert the anchors into the 

holes; anchors are necessary for walls that are made out of hard materials such 

as concrete, brick, or stucco.

3. Firmly screw the knob of the mounting bracket into the mounting hole.

4. Hold and screw the camera to the mounting bracket. Rotate the camera to 

adjust the view and check it using the live stream, which you can access in the 

eufy Security app.

For troubleshooting, check Help on the eufy Security app. Refer to the app page 

for LED indicator status.

Summary of Contents for eufyCam S330

Page 1: ...DE Anker Innovations Limited All rights reserved eufy Security and eufy Security Logo are trademarks of Anker Innovations Limited registered in the United States and other countries All other trademarks are the property of their respective owners ...

Page 2: ...ight Solar Panel Speaker Camera Lens LED Indicator SYNC Button Photosensitive Sensor Microphone 2 Mounting Hole Microphone 1 Motion Sensor USB C Charging Port Status LED Hard Drive Bracket USB Port 2 Reset Hole SYNC ALARM OFF Button Ethernet Port Speaker USB Port 1 Power Port ...

Page 3: ...isk EXPANDING STORAGE OPTIONAL S380 HomeBase comes with 16 GB of storage for saving video recordings and allows you to add an additional hard drive to expand the space Transfer all the data in your hard drive to a secure location before adding it to S380 HomeBase Install Your Hard Drive S380 HomeBase must be powered off when you install or remove a hard drive 1 Push down the top lid to remove it 2...

Page 4: ...ow the steps above to expand the storage whenever necessary A new hard drive must be initialized through the eufy Security app to work with S380 HomeBase SETTING UP 1 Power and connect S380 HomeBase to your router The LED indicator will turn blue This may take about 1 min when S380 HomeBase is ready for setup 2 Download and install the eufy Security app then sign up for an account ...

Page 5: ...meras to your device list One S380 HomeBase can pair up to 16 cameras CHARGING THE CAMERA Fully charge both cameras before first use This may take about 8 hours for each 5V USB Charger USB Port 1 LED Indicator Description Blue Charging OFF Fully charged Option 1 Option 2 ...

Page 6: ...ccording to the intensity of the sunlight Don t worry when the battery level goes down It happens when there isn t enough sunlight or the camera is consuming more power than usual You don t need to charge the camera with a cable until a low battery alarm goes off 2 HOURS PER DAY Make sure the solar panel can be fully exposed to direct sunlight for at least 2 hours per day ...

Page 7: ...ces not to install Inside your home or under the porch Under or on a tree Under slanted eaves MOUNTING THE CAMERA Select a Location Select a location where you can get the desired view We recommend hanging the camera 7 10 ft 2 3 m above the ground Motion Detection Zone Camera Field of View Up to 26 ft 8 m 7 10 ft 2 3 m Motion Detection Zone ...

Page 8: ...r walls that are made out of hard materials such as concrete brick or stucco 3 Firmly screw the knob of the mounting bracket into the mounting hole 4 Hold and screw the camera to the mounting bracket Rotate the camera to adjust the view and check it using the live stream which you can access in the eufy Security app For troubleshooting check Help on the eufy Security app Refer to the app page for ...

Page 9: ... AN INCORRECT TYPE DISPOSE OF USED BATTERIES ACCORDING TO THE INSTRUCTIONS ATTENTION RISQUE D EXPLOSION SI LA BATTERIE EST REMPLACÉE PAR UN TYPE INCORRECT ÉLIMINER LES BATTERIES USÉES SELON LES INSTRUCTIONS NOTICE NOTICE United States of America FCC Statement This device complies with Part 15 of the FCC Rules Operation is subject to the following two conditions 1 this device may not cause harmful ...

Page 10: ...tout brouillage radioélectrique subi même si le brouillage est susceptible d en compromettre le fonctionnement This Class B digital apparatus complies with Canadian ICES 003 Cet appareil numérique de la classe B est conforme à la norme NMB 003 du Canada IC RF Statement When using the product maintain a distance of 20cm from the body to ensure compliance with RF exposure requirements Lors de l util...

Reviews: