background image

06

07

Using Your RoboVac

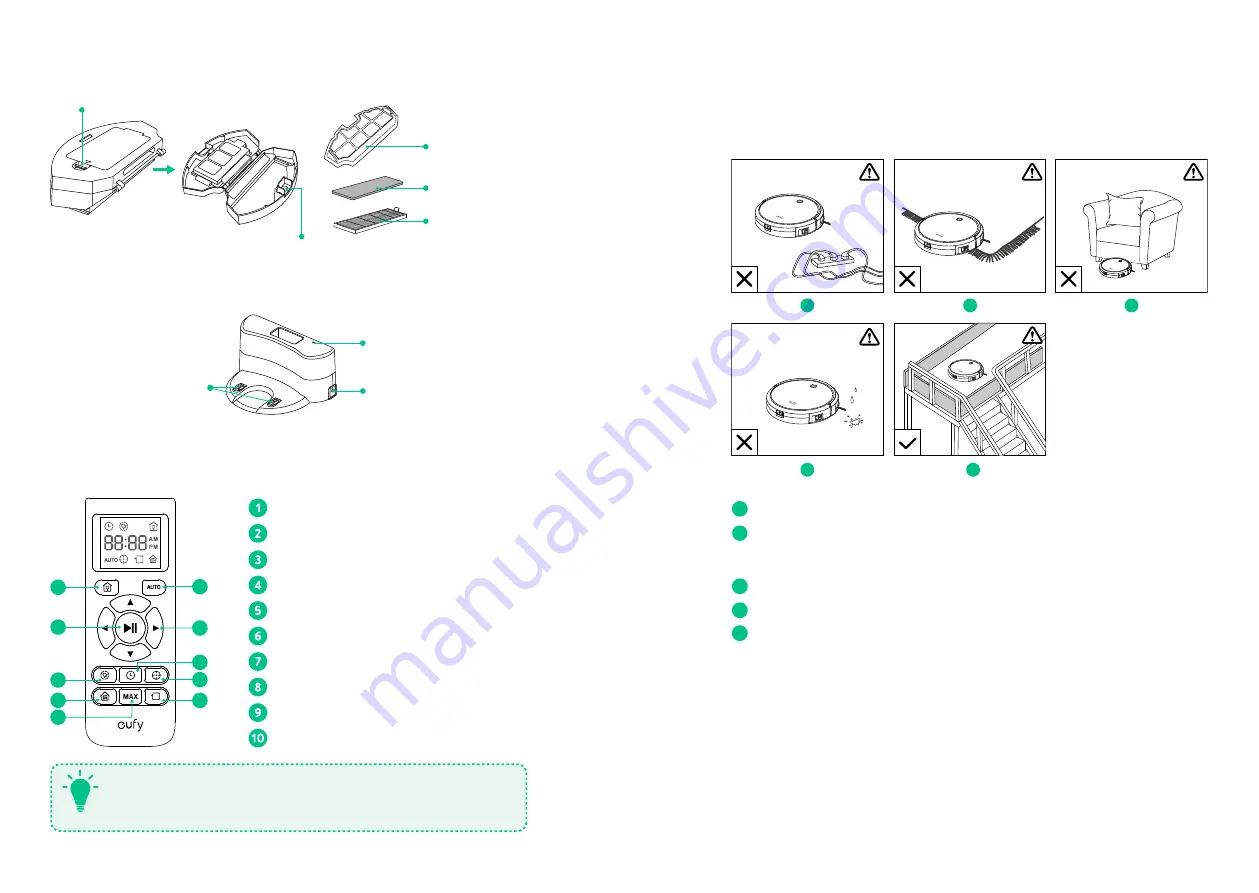
Important tips before use

a

b

c

d

e

a

 Remove power cords and small objects from the floor that may entangle RoboVac.

b

 Remove rugs that are thicker than 0.4 in/10 mm as they may cause RoboVac to 

malfunction. Fold tasseled edges of area rugs underneath to prevent tangling RoboVac. 

Do not use RoboVac on middle or long-pile carpeting.

c

 Avoid cleaning spaces lower than 3.9 in/98 mm to prevent RoboVac from getting stuck .

d

 Prevent liquid from entering RoboVac as it may cause damage.

e

 Anti-drop sensors prevent RoboVac from tumbling down stairs and steep drops. They 

may work less effectively when they are dirty, or on reflective/dark-colored floors. It is 

recommended to place a physical barrier to block off problem areas where the device 

may fall.

Dust Collector

Filter door

Filter door release button

HEPA-style filter

Foam filter

Filter cover

Charging Base

Status light

Power socket

Charging contact pins

Remote Control

10

5

1

3

6

9

4

2

7

8

Return RoboVac to the Charging Base

Start Auto cleaning

Start / Stop cleaning

Adjust direction manually

Schedule cleaning start time

Set the current time

Start Spot cleaning

Start Edge cleaning

Start Max cleaning

Start Single Room cleaning

 Install 2 AAA batteries before using the remote control for the first 
time. Make sure the positive and negative ends are facing the correct 
polarity direction as marked in the battery compartment.

T

Summary of Contents for RoboVac 11

Page 1: ...Cleaning Owner s Manual RoboVac 11 www eufylife com For FAQs and more information please visit SM A438 V03 ...

Page 2: ...e You Start Install the Charging Base Charge Your RoboVac Start Stop Cleaning Cleaning Modes Time Setting Scheduled Cleaning 15 Cleaning and Maintenance Clean the Dust Collector and Filters Clean the Rolling Brush Clean the Sensors and Charging Pins Clean the Side Brushes Replace the Side Brushes 18 Troubleshooting 20 Specifications 20 Notice 21 Customer Service ...

Page 3: ...re cleaning the whole room Important Safety Instructions To reduce the risk of injury or damage read these safety instructions carefully and keep them at hand when setting up using and maintaining this device WARNING SYMBOLS USED This is the safety alert symbol This symbol alerts you to potential hazards that could result in property damage and or serious bodily harm or death This device is not in...

Page 4: ...et Dust collector release button Bottom Drop sensors Charging contact pins Battery cover Brush guard Dust collector Swivel wheel Side brushes Wheels About Your RoboVac What s In the Box RoboVac 11 Power Adapter Spare HEPA style Filter Spare Foam Filter Owner s Manual Cleaning Tool Side Brush 4 Charging Base Remote Control ...

Page 5: ...s effectively when they are dirty or on reflective dark colored floors It is recommended to place a physical barrier to block off problem areas where the device may fall Dust Collector Filter door Filter door release button HEPA style filter Foam filter Filter cover Charging Base Status light Power socket Charging contact pins Remote Control 10 5 1 3 6 9 4 2 7 8 Return RoboVac to the Charging Base...

Page 6: ... RoboVac has a pre installed rechargeable battery that has to be fully charged before use Robovac returns to the Charging Base at the end of a cleaning cycle or when its battery is running low Manually charge RoboVac when its battery is fully discharged or if it fails to reach the Charging Base Method 1 Attach RoboVac to the Charging Base by aligning its charging pins with the charging pins on the...

Page 7: ... in Auto Mode Method 2 Press on the remote control to return RoboVac to the Charging Base Method 3 Charge RoboVac directly by plugging the round connector of the adapter into the charging socket on RoboVac and the other end into a wall outlet RoboVac Status Light Flashing red Low power Flashing blue Charging Solid blue Fully charged Cleaning Returning to Charging Base Flashing Solid red Beeping Ro...

Page 8: ...he Charging Base automatically when the power level becomes low Whenever you turn RoboVac on it will start Auto cleaning T 2 Spot cleaning RoboVac intensively cleans a specific area in a spiral pattern Useful if there is a concentrated area of dust or debris Press on the remote control to start cleaning in Spot Mode 3 Edge cleaning RoboVac reduces its speed when it detects a wall and then follows ...

Page 9: ...tor and filter with a vacuum cleaner or a cleaning brush Time Setting Make sure you point the remote control directly at RoboVac and RoboVac is on Press on the remote control will display on the screen Press to set the hour and minute Press or to save the setting RoboVac will BEEP once to indicate the time has been set To ensure the time is set successfully point the remote control directly at Rob...

Page 10: ... are completely dry T Put the filters and filter cover back together in the dust collector and close it Push the dust collector back into the main unit It is recommended to empty the dust collector and clean the filter after every use You can wash the dust collector filter cover and foam filter with water Be sure to air dry them thoroughly before reassembling Do not wash the HEPA Style filter with...

Page 11: ... is stuck Turn off RoboVac then remove and empty the dust collector Make sure the air inlet is not blocked by any hair or debris Four beeps RoboVac s rolling brush is stuck Turn off RoboVac and remove any hair or debris from the rolling brush Replace the Side Brushes The side brushes may become bent or damaged after using for a period of time Follow the steps below to replace it Pull off the old s...

Page 12: ...ressly approved by the party responsible for compliance could void the user s authority to operate the equipment Note This equipment has been tested and found to comply with the limits for a Class B digital device pursuant to Part 15 of the FCC Rules These limits are designed to provide reasonable protection against harmful interference in a residential installation This equipment generates uses a...

Reviews: