background image

12

How To Replace Bags–Style AA Filteraire

NOTE: Turn off the switch and unplug the electrical cord before changing dust bag. Never operate the vacuum

cleaner without the dust bag or the filter.

NOTE: Style AA Filteraire bags must be used to maintain HEPA grade filtration and prolong the life of the HEPA

filter.

NOTE: Models without HEPA filter option, may use Style AA bags rather than Style AA Filteraire.

It may be more convenient to lower the handle to the floor before changing the bag.

To Remove Bag:

|

|

Front
Cover

A

|

|

B

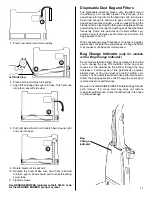
A. Remove front cover. Grasp both sides  of bag cover

near top. Push thumbs  against center of cover and
pull out on sides.

B. Grasp bag collar; pull down slightly  and out to remove

bag.

To Replace New Bag:

C. Fold sides of paper bag below bag collar.

D. Align bag collar hole and notch with hose adapter.

E. Place bag collar corners on ledges. Push collar to rear

of compartment. Check to be sure hose adapter
inserts into bag collar.

F.

Tuck bag into bottom and along sides.

G. Replace front cover. Make sure disposable bag does

not catch under front cover.

Bag
Collar

D

E

C

Bag
Side

E

* We recommend using only Genuine Eureka

Filteraire Bags, part number 58623.

Summary of Contents for 4320 series

Page 1: ...replacement of broken or missing items to be shipped direct to you call 1 800 438 7352 8 a m to 4 45 p m Central Standard Time Monday through Friday En Mexico llame al 5670 6169 Index Important Safeg...

Page 2: ...current carrying capacity Turn off all controls before unplugging Do not unplug by pulling on cord To unplug grasp the plug not the cord Do not handle plug or vacuum cleaner with wet hands Do not put...

Page 3: ...avant de d brancher Ne pas d brancher en tirant sur le cordon Pour d brancher tenez la fiche et non le cordon Ne pas manipuler la fiche ou l aspirateur avec les mains mouill es Ne pas rien ins rer dan...

Page 4: ...SA 1 800 282 2886 Mexico 5670 6169 Canada 1 800 282 2886 If you prefer you can write to The Eureka Company Service Division 807 North Main Street Bloomington Illinois 61701 USA In Canada write to The...

Page 5: ...handle is in place check that the hose adapter tab is completely secure under the ledge of the handle 6 Attach handle with two 5 8 inch screws in the assembly packet Use either a slotted or Phillips h...

Page 6: ...wind the cord around the two cord hooks on the left side of cleaner On some models the upper cord hook turns to release the cord Turn the hook up to store the cord NOTE For easier access to bag compar...

Page 7: ...ull bag clogged hose or clogged filter 4 If a full bag clogged hose or clogged filter is found replace the bag unclog the hose or replace the filters 5 Wait at least 30 minutes before attempting to re...

Page 8: ...any combination of the following accessories 1 Remove hose from rear of cleaner 2 Place desired accessory onto end of hose Turn ridge end to center Push wands together Pull apart Upholstery Side Gras...

Page 9: ...ent cleaning after the first few times you use your new Eureka vacuum the red light should go on less The red light indicates dirt dust etc is still being removed from the area being cleaned NOTE The...

Page 10: ...sh roll belt turns the brush roll to agitate sweep and comb the carpet nap Check the belt regularly to be sure it is in good condition Replace the belt if it stretches cracks or loses tension Cut away...

Page 11: ...an take place regardless of how powerful the unit Change the dust bag and check the filters frequently Some fine particles can restrict airflow very quickly and will decrease performance even before t...

Page 12: ...the bag To Remove Bag Front Cover A B A Remove front cover Grasp both sides of bag cover near top Push thumbs against center of cover and pull out on sides B Grasp bag collar pull down slightly and o...

Page 13: ...ds the rear 3 Once the handle is removed disconnect the attachment hose from the unit by lifting straight up on the hose adapter Check for any obstructions that may be in the hose Any obstructions can...

Page 14: ...using a blunt instrument 5 After the blockage is removed replace the hood and tighten the two hood screws see Fig 2 Raise the handle to the upright position see Fig 3 and replace the hose into the lo...

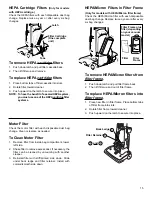
Page 15: ...ge Filters Only for models with HEPA cartridge Check the HEPA filters with each disposable dust bag change Replace twice a year or after every six bag changes HEPA Micron Filters in Filter Frame Only...

Page 16: ...t bulb and socket back so bulb will not touch lens cover 7 Replace lens cover 8 Secure with two screws 3 5 4 1 HOW TO MAINTAIN continued Exhaust Filter Door Micron and HEPA Exhaust Filters Only for mo...

Page 17: ...end of the bonus hose Step 1 Remove the hose attached to the cleaner WARNING Always work with the cleaner below you pulling hose from side of cleaner not the back or the front of the cleaner Ensure it...

Page 18: ...t Replace a cut loose or out of shape belt Cleaner is hard to push Cleaner Height Setting Turn adjustment knob to a higher position Hint Put handle in operating position Tilt the cleaner back to raise...

Page 19: ...D orders Check or money order payable to The Eureka Company Do not send currency Charge to my Visa 13 15 digits MasterCard 13 digits Amer Express 15 digits Acct number Expiration Date Signature full n...

Page 20: ......

Page 21: ...model type and serial number from the data plate on the cleaner Further Limitations and Exclusions Any warranty that may be implied in connection with your purchase or use of the cleaner including any...

Page 22: ......

Page 23: ......

Page 24: ...er handle Accessory Items in This Carton 1 hardware package 2 screws Questions Do Not Return To Store Call 1 800 282 2886 7 a m to 8 p m Central Standard Time Monday thru Saturday Don t Forget to Use...

Reviews: