background image

Eureka Customer Service HELPLINE 1-800-282-2886

www.eureka.com

4

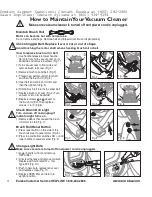
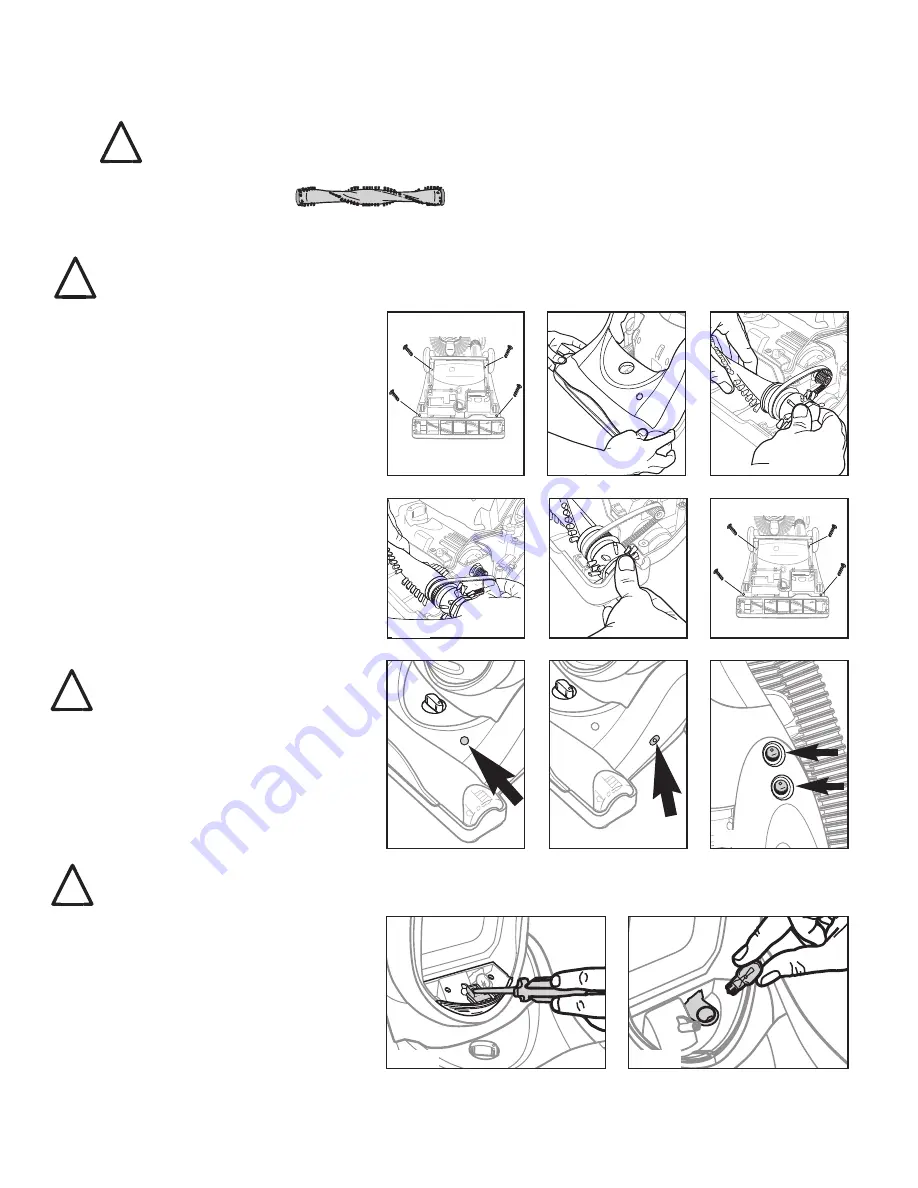
1) Lower handle to floor and remove 

HEPA filter.

2) Unscrew the lens and remove old bulb.

Replace with bulb rated 12v., 10w., 
Type 904 (Fig. 10).

3) Push in new bulb, replace lens cover 

and replace screw (Fig. 11).

4) Replace HEPA filter and return to 

upright position.

Change Light Bulb 

Make sure vacuum is turned off and power cord is unplugged.

How to replace brush roll or belt 

1) Use handle release to lower handle 

flat onto floor. Turn vacuum over on its
backside and remove 4 screws (Fig. 1).

2) Turn vacuum over to front side and

remove brush roll cover (Fig. 2).

3) Remove brush roll and belt (Fig. 3).

4) Thread new belt around motor shaft

and then the brush roll (Fig. 4).

5) Insert left end of brush roll first and 

then the right end (Fig. 5).

6) Rotate brush roll 2 turns to center belt.

7) Replace brush roll cover (Fig. 2). Turn

vacuum over on its backside.

8) Replace screws 

˜

&

™

closest to 

the brush roll first. Then replace 
screws 

Œ

&



(Fig 6).

!

!

Fig. 2

Fig. 4

Fig. 5

Fig. 6

Fig. 1

Œ

Ž



Œ

˜

™





Fig. 7

Fig. 8

Fig. 10

Fig. 11

Fig. 9

Fig. 3

Check Brush Roll Light

Turn vacuum off and unplug if 
indicator light turns on.

1) Remove debris that caused the brush 

roll motor to stall (Fig. 7).

Brush Roll Reset Button

1) Press reset button on the side of the 

brush roll cover to reset motor (Fig. 8).

2) Press top and bottom switches ON (–) and

lower handle to vacuum carpet (Fig. 9).

How to Maintain Your Vacuum Cleaner

Make sure vacuum cleaner is turned off and power cord is unplugged.

Check Cogged Belt. Replace if worn, cut or out of shape

Avoid touching the motor shaft when checking brush roll or belt. 

!

!

Maintain Brush Roll

Motor can become hot with normal use.

Do not remove end caps. Remove hair and threads from brush roll periodically.

Product Support Questions: Contact Eureka at (800) 282-2886
Sales Inquiries: Contact Sylvane at (800) 934-9194

Summary of Contents for 8870 Series

Page 1: ...our new Eureka Vacuum Gracias por la compra de su nueva aspiradora Eureka Merci d avoir acheté votre nouvel aspirateur Eureka Upright Vacuum Cleaner Household Type Aspiradora vertical tipo doméstico Aspirateur vertical de type résidentiel 2010 Electrolux Home Care Products Inc Printed in China PN83150 O OW WN NE ER R S S G GU UI ID DE E 8870 Series Promotional code 8860ser09 Special Offer receive ...

Page 2: ...er for shipping damage Each unit is tested and thoroughly inspected before shipping For instructions regarding any shipping damage call Eureka Customer Service HELPLINE 1 800 282 2886 immediately Follow caution information wherever you see this symbol Table of Contents Important Safeguards 1 How to Identify Parts of Vacuum Cleaner 2 Filter Maintenance Schedule 2 Filter screen and HEPA filter How t...

Page 3: ...dy away from openings and moving parts Do not place vacuum cleaner on furniture or stairs as the brush roll may cause damage Place vacuum cleaner on floor with the handle in storage position while using attachments Do not pick up anything that is burning or smoking such as cigarettes matches or hot ashes Do not use without dust cup filter and screen and HEPA exhaust filter in place Belt pulleys ca...

Page 4: ...eaner before using Moving parts Make sure ON OFF switch is in OFF O position before plugging in power cord DUST CUP Empty after each use HEPA FILTER HF10 Replace within 6 months FILTER DCF21 Clean or replace regularly to maintain suction Close bottom lid until it clicks Align lid at front press down until lid snaps into place Rinse cover filter and screen dry thoroughly Push lever to release botto...

Page 5: ...ilable for purchase Use for furniture and stairs Make sure vacuum is below you pushed against the bottom step 1 If model has additional stair hose attach to end of wand 2 Attach turbo nozzle to the end of wand or hose NOTE Hose length can be increased by releasing the hose from the hose retainer on back of unit Reposition hose inside hose retainer after using accessories Handle must be in upright ...

Page 6: ...s to center belt 7 Replace brush roll cover Fig 2 Turn vacuum over on its backside 8 Replace screws closest to the brush roll first Then replace screws Fig 6 Fig 2 Fig 4 Fig 5 Fig 6 Fig 1 Fig 7 Fig 8 Fig 10 Fig 11 Fig 9 Fig 3 Check Brush Roll Light Turn vacuum off and unplug if indicator light turns on 1 Remove debris that caused the brush roll motor to stall Fig 7 Brush Roll Reset Button 1 Press ...

Page 7: ...ions and Exclusions Any warranty that may be implied in connection with your purchase or use of the vacuum including any warranty of Merchantability or any warranty for Fitness For A Particular Purpose is limited to the duration of this warranty Some states do not allow limitations on how long an implied warranty lasts so the above limitations may not apply to you Your relief for the breach of thi...

Page 8: ... the end of hose Dust cup and filter Filter screen Hose Empty dust cup clean and or change filter Clean or replace filters regularly to maintain suction Page 2 If picking up fine dust the dust cup may not look full but a fine substance tends to reduce suction when it blocks air flow through the filter and screen Refer to page 2 for filter maintenance Make sure filter screen and dust cup are instal...

Reviews: