9
SERBATOIO SOLUZIONE DETERGENTE
Riempire con acqua pulita, ad una temperatura non superiore a 50°C, il
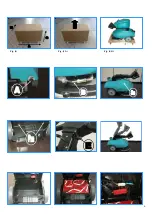
serbatoio soluzione (Fig.2) ed
aggiungere il detersivo liquido nella concentrazione e con le modalità
previste dal fabbricante. Per
evitare la formazione di un’eccessiva quantità di schiuma che
andrebbe a danneggiare il motore di
Aspirazione, usare la minima percentuale di detersivo.
ATTENZIONE:
Usare sempre detersivo a schiuma frenata. Per
evitare con sicurezza la produzione di schiuma, prima di iniziare il
lavoro introdurre nel serbatoio di recupero una minima quantità di
liquido antischiuma. Non utilizzare acidi allo stato puro
.
ATTENZIONE:
Controllare che il tappo sia correttamente inserito
nella propria sede e che il tubo alimentazione soluzione sia
correttamente innestato.
SOLUTION TANK
Fill the solution tank with clean water at a temperature not exceeding
50°C (Pic. 2); and add the liquid detergent in concentration and
according to the manufacturer’s instructions. To prevent an excessive
amount of foam that would damage the vacuum motor, use the
smallest percentage of detergent.
WARNING:
Always use low foam detergent. To safely avoid the
production of foam, before starting the work, add in the recovery tank
a small amount of anti-foaming agent. Do not use acids in pure form.
CAUTION:
Make sure that the cap is properly inserted in its seat and
that the feeding solution tube is properly inserted (B).
PREPARAZIONE AL LAVORO
Eseguire le operazioni di preparazione della macchina descritte in
precedenza e poi come segue :
Macchina a BATTERIA :
1.
Rilasciare la leva di sollevamento della ruota anteriore (Ls) per
procedere al lavoro.
2.
Abbassare la leva di comando tergi (G).
3.
Ruotare l’interruttore generale (K) e controllare che la spia verde
(D) sia accesa.
4.
Premere l’interruttore spazzole (H).
5.
Premere l’interruttore aspirazione (J).
6.
Regolare la quantità di soluzione detergente desiderata tramite
l’apposito rubinetto (A).
7.
Premere l’interruttore elettrovalvola (L).
Macchina a CAVO :
1.
Rilasciare la leva di sollevamento della ruota anteriore (Ls) per
procedere al lavoro.
2.
Abbassare la leva di comando tergi (G).
3.
Collegare la spina alla presa di corrente e controllare che la spia
verde (V) sia accesa.
4.
Premere l’interruttore spazzole (H).
5.
Premere l’interruttore aspirazione (J).
6.
Regolare la quantità di soluzione detergente desiderata tramite
l’apposito rubinetto (A).
7.
Premere l’interruttore elettrovalvola (L).
A questo punto la macchina può lavorare in piena efficienza fino ad
esaurimento della soluzione detergente agendo sulla leva di
funzionamento che aziona tutti i comandi (M).
ATTENZIONE :
il limitatore (I), interviene quando il motore delle
spazzole compie uno sforzo maggiore di quello previsto nel progetto.
Per il ripristino attendere un minuto, dopodiché si può spingere il
pulsante. La macchina è di nuovo pronta per l'uso.
PREPARATION FOR WORK
After the preparation procedures of the machine described above,
proceed as follows:
BATTERY OPERATED MACHINE:
1.
Release the front wheel lift lever (Ls)
2.
Lower the squeegee lever (G).
3.
Rotate the main switch (K) and check that the green led (D)
has turned on.
4.
Press the brushes switch (H).
5.
Press the vacuum switch (J).
6.
Adjust the desired amount of cleaning solution by acting
through the appropriate tap (A).
7.
Press the electro valve switch (L).
CABLE MACHINE:
1.
Release the front wheel lift lever (Ls)
2.
Lower the squeegee control lever (G)
3.
Turn the main switch (K) on and check the green light (D) is
lit.
4.
Press the brush switch (H).
5.
Press the inlet power control (J).
6.
Adjust the desired amount of cleaning solution by acting
through the appropriate tap (A).
7.
Press the electro valve switch (L).
Now the machine can operate at full efficiency - until all the detergent
solution is out - by turning the operating lever that drives all controls
(M).
WARNING:
The limiter (I), comes into operation when the brush
motor makes a greater effort than that required in the project. To reset
wait a minute, then push the button again; the machine is ready for re-
use.
Fig. (2)
Summary of Contents for E 46 B
Page 6: ...6 Fig 1 A Fig 1 Fig 1 B...
Page 14: ...14...
Page 20: ...20...
Page 24: ...24 Fig 1 A Fig 1 Fig 1 B...
Page 32: ...32...
Page 38: ...38...
Page 42: ...42 Fig 1 A Fig 1 Fig 1 B...
Page 50: ...50...
Page 56: ...56...


