background image


USER’S MANUAL 

RIDER 1201 SH


_______________________________________________ 

EUREKA  S.r.l. 

Via dell’Industria 32,  35013  CITTADELLA (PD) ITALY 

Tel. ++39 - 049 - 9481800                  Fax. ++39 -049 – 9481899 

INTERNET

: www.eurekasweepers.com

    E-MAIL: 

info@eurekasweepers.com


Summary of Contents for RIDER 1201 SH

Page 1: ...R 1201 SH _______________________________________________ EUREKA S r l Via dell Industria 32 35013 CITTADELLA PD ITALY Tel 39 049 9481800 Fax 39 049 9481899 INTERNET www eurekasweepers com E MAIL info...

Page 2: ...2...

Page 3: ...HE MAIN BRUSH 31 ADJUSTING THE MAIN BRUSH 32 REPLACING THE RIGHT SIDE RUBBER FLAP 33 REPLACING THE REAR RUBBER FLAP 33 REPLACING THE LEFT SIDE RUBBER FLAP 34 REPLACING THE FRONT RUBBER FLAP 34 REPLACI...

Page 4: ...4...

Page 5: ...public use In this handbook are described and shown various operations of installation Check and maintenance necessary to keep your RIDER 1201 SH in perfect working condition These are normal maintena...

Page 6: ...facturer are identified through three plates on the rear of the dirt container REFER TO THESE DETAILS WHEN ORDERING SPARE PARTS OR MAKING ANY OTHER ENQUIRY TO THE MANUFACTURER EUREKA sweepers conform...

Page 7: ...FOR TOWN AND INDUSTRIAL CLEANING OPERATIONS WITH THE COLLECTION OF MATERIAL AND ITS DISPOSAL THE USER S MANUAL IS AN INTEGRAL PART OF THE SWEEPER AND MUST ACCOMPANY IT UNTIL THE SWEEPER IS DEMOLISHED...

Page 8: ...HOT SURFACES EAR PROTECTORS PLUGS MUFFLERS MUST BE WORN IN PARTICULAR ENVIRONMENTS OR WORKING CONDITIONS SOME MODELS OF THE SWEEPERS COULD PRODUCE AN ACOUSTIC EFFECT THAT WOULD MAKE THE WEARING OF TH...

Page 9: ...rosive and are anyway suitable for electrical circuits Specialised personnel with thorough knowledge of the machine and its components must be called in to carry out maintenance operations Any mainten...

Page 10: ...ot use the machine to clean objects When maintaining the machine do not wear loose fitting or unbuttoned clothing Protect eyes and hair when using compressed air or water guns for cleaning the machine...

Page 11: ...on wet floors The operator is responsible for the day to day servicing of the machine The operator must care for the machine and keep it in good operating condition The operator must inform his or he...

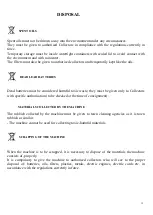
Page 12: ...aste they must be given only to Collectors with specific authorisation to be checked at the time of consignment MATERIALS COLLECTED BY THE MACHINE The rubbish collected by the machine must be given to...

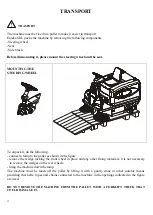
Page 13: ...ect a ramp to the pallet as shown in the figure remove the wedge locking the front wheel in place and any other fixing materials it is not necessary to remove the wedges on the rear wheels bring the m...

Page 14: ...nother you are advised to not load it on the vehicle with a forklift truck in order not to damage it lock the machine in place with the parking brake fix it well to the vehicle using belts ropes and c...

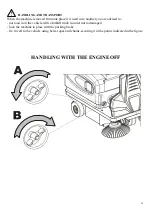
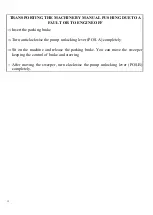
Page 15: ...ert the parking brake Turn anticlockwise the pump unlocking lever POS A completely Sit on the machine and release the parking brake You can move the sweeper keeping the control of brake and steering A...

Page 16: ...16...

Page 17: ...UBBER 9 HYDRAULIC OIL BAR 10 FAN 11 OIL MOTOR CAP WITH BAR 12 AIR FILTER OF HONDE ENGINE 13 HONDA ENGINE 14 HONDA AIR ENGINE PIPE 15 BATTERY 16 MAIN BRUSH REPLACEMENT KEY 17 RH SIDE BRUSH MOTOREDUCER...

Page 18: ...18 PRIMARY FUNCTIONS AND CONTROLS CONTROLS ON THE MACHINE...

Page 19: ...ION KEY 6 MAIN BRUSH 7 UNLOCKING PUMP KNOB 8 BEEPER DEVICE 9 SEAT ADJUSTMENT LEVER 10 FLAP OPENING LEVER 11 LEFT SIDE BRUSH LEVER 12 RIGHT SIDE BRUSH LEVER 13 BRAKE PEDAL 14 LEFT DOOR OPENING LEVER 15...

Page 20: ...N Press this button for few secons to enable the shaker filter 4 STARTER Push the know to enable the STARTER for the cold starting of the engine 5 IGNITION KEY POS 0 turn off the engine POS 1 start th...

Page 21: ...gaged 14 LEFT SIDE OPENING LEVER 15 BRAKE LOCK PARKING BRAKE To activate the parking brake press the pedal and push the locking brake knob To release it push slowly the brake pedal and push back the u...

Page 22: ...ION SIT IN THE DRIVING SEAT INSERT THE KEY START UP THE BRUSH MOTOR OPEN THE SUCTION WITH THE RELEVANT LEVER LOWER THE MAIN BRUSH LOWER THE SIDE BRUSHES PRESS THE RIGHT HAND PEDAL FOR ADVANCEMENT AND...

Page 23: ...Push the throttle lever 1 3 forward Lever POS 7 Pull the starter control completely POS 8 Turn the key clockwise of a notch POS 9 Complete the clockwise rotation until the engine starts for no more th...

Page 24: ...RBATOIO BENZINA FUEL FILLING Lift the machine hood Block it with the appropriate bar Remove the fuel tank cap and fill up the fuel fuel tank capacity 3 6 lt CAUTION Do not go near the machine with lit...

Page 25: ...nner battery s plates close it again REPLACING THE FUSES Lift the hood and block it by the apposite bar Remove the clamps from the battery Find out the faulty fuse A GENERAL FUSE 15A inside the machin...

Page 26: ...26 1 VACUUM CLOSING KNOB 2 SHAKER FILTER BUTTON 3 KEY 4 MAIN BRUSH LEVER 5 RIGHT SIDE BRUSH LEVER 6 FRONT FLAP LEVER 7 RIGHT SIDE BRUSH LEVER...

Page 27: ...he filter shaker is activated this enables the cleaning of the filter NB SWEEPER CLEANING QUALITY IS CLOSELY LINKED TO FILTER CLEANING PLEASE SHAKE IT OFTEN IN PARTICULAR WHEN THE FLOOR IS VERY DUSTY...

Page 28: ...d the brushes The side brush rises and is lowered by working the lever in pos 1 when the lever is vertical the brush is down and is turning when the lever is down the brush is raised and still REPLACI...

Page 29: ...follows Shake often the filter Turn off the engine and insert the parking brake Hold the dirt container using the handle A Unhook the container locking hook turning the lever in the direction shown b...

Page 30: ...30 1 MAIN BRUSH 2 MAIN BRUSH LEFT SUPPORT 3 LOCKING BUSH 4 LEFT SIDE DOOR 5 KEY 6 MAIN BRUSH LEVER...

Page 31: ...B the brush is down and is turning REPLACING THE MAIN BRUSH Turn the engine off and insert the parking brake Lower the main brush lever Open the left side door Pos 4 and remove the key POS 5 Svitare l...

Page 32: ...screws of the main brush hubs and move them forward There should be 10 mm from the support If the brush is worn move the hubs in the direction of the arrow forward If you replace the brush with a new...

Page 33: ...and the left side closure pos 2 Loosen the retention screws of the right rubber flap POS 5 by two turns and remove it Unscrew the 5 fixing screws of the right premigomma metal sheet POS 6 and replace...

Page 34: ...oor Unscrew the 8 fixing screws of the left premigomma metal sheet POS 1 Replace the left side rubber flap POS 2 Put everything back together again REPLACING THE FRONT RUBBER FLAP Turn off the engine...

Page 35: ...plates POS 2 and the blocking mesh POS 3 Raise the filter and disconnect the connector POS 6 Position the filter on a table Undo the locking screws of the filter shaker and remove the filter shaker P...

Page 36: ...36 1 HYDRAULIC OIL FILTER LID 2 HYDRAULIC OIL FILTER CARTRIDGE 3 OIL LEVEL BAR 4 HYDRAULIC OIL FILTER 5 OIL DRAIN CAP 6 TANK...

Page 37: ...e sure that all the oil drains before replacing it Check the oil level Remount everything Do not throw away into the evironment filters or spent oils REPLACING THE HYDRAULIC OIL FILTER AFTER 2000 HOUR...

Page 38: ...38 1 OIL CAP WITH BAR 2 OIL DRAIN HOSE 3 OPENING FOR THE DRAIN HOSE ON THE SIDE 4 TANK...

Page 39: ...ning on the left side of the machine POS 3 Remove the lid from the drain hose POS 2 and let the oil drain in the tank POS 4 The oil drain is easier when the engine is warm Put the lid on the drain hos...

Page 40: ...40 DIMENSIONAL DRAWINGS...

Page 41: ...diameter 500 mm Rpm 79 WEIGHT Weight RIDER 1201 S 340 Kg PACKING Size of packing box 156x110X110 cm 1 9 cub mt Weight of packing box 40 Kg HONDA ENGINE RIDER 1201 S Model GX200 Rated Power at 3600 RPM...

Page 42: ...ing tyre NOISE HONDA ENGINE Average level of acoustic pressure Lpm 83 58 Db Acoustic power level Lwa 98 96 Db Granted acoustic power level Lwa g 101 Db Acoustic pressure level at the operator s ear 77...

Page 43: ...PLAN THE CARE AND THE SERVICING THAT THE MACHINE NEEDS ATTENTION DO NOT CARRY OUT ANY MAINTENANCE ON THE MACHINE OR ITS COMPONENTS WITHOUT HAVING FIRST TURNED IT OFF ENGAGED THE HAND BRAKE BLOCKED THE...

Page 44: ...RVICING RECOMMENDED SPARE PARTS USED FOR SERVICING SERVICING OPERATIONS CAN BE CARRIED OUT BY THE USER HIMSELF ON CONDITON IT HAS PREVIOUSLY BEEN INSTRUCTED BY EITHER THE MACHINE OWNER OR HIS EMPLOYER...

Page 45: ...45...

Page 46: ...eck the rubber flaps wear Check the hopper gaskets wear Check the dust filter efficiency Check the tension of all belts Check the hydraulic system pipes Check the functioning of all instruments and le...

Page 47: ...heck the rubber flaps wear Check the hopper gaskets wear Check the dust filter efficiency Check the tension of all belts Check the hydraulic system pipes Check the functioning of all instruments and l...

Page 48: ...heck the rubber flaps wear Check the hopper gaskets wear Check the dust filter efficiency Check the tension of all belts Check the hydraulic system pipes Check the functioning of all instruments and l...

Page 49: ...ear Check the hopper gaskets wear Check the dust filter efficiency Check the tension of all belts Check the hydraulic system pipes Check the tension of the steering wheel chain Check the functioning o...

Page 50: ...wear Check the hopper gaskets wear Check the dust filter efficiency Check the tension of all belts Check the hydraulic system pipes Change the hydraulic oil filter p n 680159 Check the functioning of...

Page 51: ...heck the rubber flaps wear Check the hopper gaskets wear Check the dust filter efficiency Check the tension of all belts Check the hydraulic system pipes Check the functioning of all instruments and l...

Page 52: ...ER 300 HOURS DATE DAY MONTH YEAR WORKING HOURS THE SCHEDULED SERVICING WAS CARRIED OUT BY NAME _____________________________ SURNAME _____________________________ SIGNATURE ___________________________...

Page 53: ...t or repair it The engine is very noisy and smoky 18 Faulty carburetor 19 Exhaust is broken Repair it Replace it Dust in the bonnet 20 Filter is worn 21 Filter gaskets have not been mounted Replace it...

Page 54: ...he RIDER SH and or parts which have been repaired or altered outside Eureka s plant or the facility of Eureka s Authorized Sales Service Representative This warranty does not apply to routine wearable...

Page 55: ...STALLATION DATE GENERAL INFORMATIONI 1 HAS THE LEAD TIME BEEN RESPECTED 4 HAVE YOU READ THE OPERATION MANUAL PRIOR TO USE THE MACHINE 2 HAVE YOU BEEN SHOWN HOW TO USE THE MACHINE 5 HAVE YOU BEEN OFFER...

Page 56: ...ttrici d uso domestico e similare Parte generale EN 60335 1 1994 A11 1995 A1 1996 A2 2000 A13 1998 A14 1998 A15 2000 A16 2001 Sicurezza degli apparecchi elettrici d uso domestico e similare Parte 2 No...

Page 57: ...57...

Page 58: ...58...

Reviews: