background image

12

HOW TO MAINTAIN 

(continued)

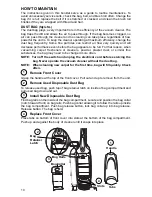
NOTE:  Turn off the switch and unplug the electrical cord before servicing the

cleaner.

Remove the 10 screws on the

bottom of the power nozzle. Flip the
power nozzle back upright and remove
the hood.

NOTE: The reset button cover

(circled) is spring loaded so
it may become displaced
when you remove the hood.
Keep track of reset button and
spring.

Remove broken brush roll belt.

Pinch new brush roll belt together and
position new belt so teeth engage cog
pulley on end of motor shaft.

Place the other end of belt around

brush roll. Align left end of brush roll into
the base by rotating slightly until brush
roll end cap slides into place.

Secure right end of brush roll into base.

The brush roll belt is now installed.

Make sure the reset button

cover (circled) is in position on spring.
Replace hood. Hold body and power
nozzle, turn over so bottom of power
nozzle is facing up. Replace screws.

1

REPLACE BRUSH ROLL BELT

2

Cog

Pulley

3

4

5

Brush Roll

As the brush roll rotates, it sweeps and combs the carpet nap. Remove hair and threads
from the brush roll so it continues brushing the carpet nap. Check brush roll occasion-
ally for hair or string that may have wrapped around dowel. Remove with scissors.

When bristles have worn to about 1/4" in length, carpet cleaning effectiveness will be
reduced. It is time to replace the brush roll. Follow the instructions in the brush roll belt
section to open up the power nozzle and replace the brush roll.

Summary of Contents for SC780 Series

Page 1: ...Guide SC780 Series For location of nearest Eureka Warranty Station or service information call 1 800 282 2886 Index Important Safeguards 2 General Information 6 Use 7 Dust Bag 10 Brush Roll 12 Brush R...

Page 2: ...a properly grounded outlet only refer to Grounding Instructions Do not use extension cords or outlets with inadequate current carrying capacity Turn off all controls before unplugging Do not unplug b...

Page 3: ...outlet installed by a qualified technician This appliance is for use on a nominal 120 volt circuit and has a grounding plug that looks like the plug illustrated in FigureA Atemporary adapter which loo...

Page 4: ...mise la terre Ne pas utiliser des rallonges ou des prises qui n ont pas de capacit suffisante pour transporter le courant Fermer tous les contr les avant d brancher Ne pas d brancher en tirant sur le...

Page 5: ...onsulter un lectricien ou un technicien d entretien qualifi si vous n tes pas certain que la prise est correctement mise la terre Ne pas modifier la fiche fournie avec l appareil si elle ne peut tre i...

Page 6: ...ge Ontario N3H 2N7 Refer to The Eureka Warranty for complete service information DO NOT OIL the motor or the brush roll at any time The bearings are permanently lubricated and sealed MODEL TYPE SERIAL...

Page 7: ...Release When handle is in collapsed position press handle release button and rotate handle into upright position Performance Indicator 1 1 2 2 3 3 The performance indicator light will come on when the...

Page 8: ...winding 4 5 5 6 6 Handle Release Pedal The handle release pedal is located next to the floor between the two wheels on the back of the cleaner Step on the handle release pedal and pull back handle to...

Page 9: ...nd with a built in crevice tool Use the dusting brush to dust furniture blinds books lamps shelves The crevice tool cleans corners base boards between cushions Hose elbow rotates for easy use of the h...

Page 10: ...le at the top of the front cover Pull out and up to remove from the unit Remove Used Disposable Dust Bag To release used bag push top of bag retainer latch on inside of bag compartment and pull used b...

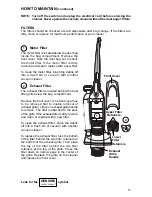
Page 11: ...ormance of your cleaner Front Cover The exhaust filter is located behind the dust filter grille below the bag compartment Remove the front cover The front cover has to be removed first to enable remov...

Page 12: ...roll end cap slides into place Secure right end of brush roll into base The brush roll belt is now installed Make sure the reset button cover circled is in position on spring Replace hood Hold body an...

Page 13: ......

Page 14: ......

Page 15: ...rchase price W arranty Registration Please fill out and return the warranty registration card accompanying your cleaner O btaining Warranty Service To obtain warranty service you must return the defec...

Page 16: ...belts and parts in my Eureka vacuum cleaner A Using Genuine Eureka Products which are made to our exacting specifications and engineered with emphasis on quality performance and customer satisfaction...

Reviews: