

3
Poor Grounding Protection
The computer and the camera can be located in distant areas with individual ground connections. Poor ground interconnection,
ground loop or ground fault may induce unwanted voltage between equipment, causing excessive current in the interconnecting
cables. This faulty situation can damage the frame grabber or the camera electrical interface.
The user must follow proper equipment grounding practices at all ends of the interconnecting cables. In addition, the use of
cable assemblies with overall shield solidly connected to the conductive shell of all connectors is recommended. Besides the
beneficial effect of cable shielding on electromagnetic compatibility, the shield connection can increase the protection level
against grounding problems by temporarily absorbing unwanted fault current.
Picolo HD Card Installation
One or more Picolo HD cards can be physically inserted into your computer. Before operation, check if your computer has the
adequate PCI Express slot:
• Picolo HD One, Picolo HD 3G, and Picolo HD H.264 requires a standard height single-slot with a 1-lane PCIe Gen 1 connector
(or better).
• Picolo HD 3G DVI is a low profile card that can optionally be fitted with a bypass module and with standard- or low-profile
brackets. When fitted with the bypass module, it requires 2 adjacent slots. The first slot must be equipped with a 1-lane PCIe
Gen 2 connector (or better).
Recommended Installation Procedure
• Switch off the computer and all connected peripherals (monitor, printer...).
• Discharge any static electricity that could be accumulated by your body. You can achieve this by touching an unpainted metal
part of the enclosure of your computer with a bare hand. Make sure that the computer is linked to the AC power outlet with
proper earth connection.
• Disconnect all cables from your computer, including AC power.
• Open the computer enclosure, according to the manufacturer instructions, to gain access to the PCI Express slots. Locate an
available PCI slot —Conventional PCI or PCI Express, according to your board.
• Remove the blank bracket associated with this location. To achieve this, remove the securing screw and keep it aside for later
use in the procedure. Keep the blank bracket in a known place for possible re-use.
• Unwrap the Picolo HD card packing, take the board and carefully hold it. Avoid any contact of the board with unnecessary
items, including your clothes.
• For Picolo HD 3G DVI only: install the required brackets and, if required, plug the bypass module on the main board taking
care of the connectors alignment.
• Gently insert the card in the selected PCIe slot, taking care to push it down fully into the slot. If you experience some resistance,
remove the board and repeat the operation. You should attempt to make a perfect board-to-slot mechanical alignment for
best results. Ensure that the lower part of the bracket is inserted into the corresponding enclosure fastening.
• Secure the board with the saved screw.
• If required, install the watchdog cable.
• Close the computer enclosure according to the manufacturer instructions.
• Establish the camera connection, only one video source using any one of the interface is allowed
Board Cooling
• To guarantee proper operation and longer board reliability, ensure an adequate cooling of the board. The cooling is improved
by a higher air flow circulating around the board. This air flow is increased, for example, by using computer case fans.
• In addition, avoid placing a Picolo HD card next to other heat dissipating boards.
MultiCam for Picolo HD Driver Installation
Note: Picolo HD 3G DVI and Picolo HD One since S/N PHO01436 require Version 3.0 or higher of the driver.
The MultiCam for Picolo HD driver is distributed on the Euresys website:
www.euresys.com
. The first time access requires a profile
creation to obtain a user ID and a password.
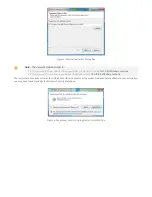
Once the package is downloaded, run the executable to launch the installer tool. If you have an existing MultiCam for Picolo HD
driver already installed, you will be prompted to uninstall it before being able to continue. Otherwise, the tool prompts you for the
selection of the destination folder.