background image

IA31 Motherboard User Manual                                     

12

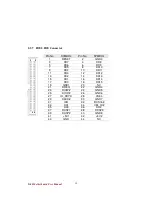
2.5.1


CON1: LVDS Connector 


Pin Number 

Signal Name 

Pin Number 

Signal Name 

LCDVDD 

LVDS_LTX0- 

LCDVDD 

LV 

LCDVDD 

LVDS_LTX1- 

GND 

LV 

GND 

10 

LVDS_LTX2- 

11 

GND 

12 

LV 

13 

GND 

14 

LVDS_LCLK- 

15 

GND 

16 

LCDS_LCLK 

17 

GND 

18 

LVDS_LTX3- 

19 

GND 

20 

LV 

21 

GND 

22 

LVDS_UTX0- 

23 

GND 

24 

LV 

25 

GND 

26 

LVDS_UTX1- 

27 

GND 

28 

LV 

29 

GND 

30 

LVDS_UTX2- 

31 

GND 

32 

LV 

33 

GND 

34 

LVDS_UCLK- 

35 

GND 

36 

LVDS_UCLK 

37 

GND 

38 

LVDS_UTX3- 

39 

GND 

40 

LV 


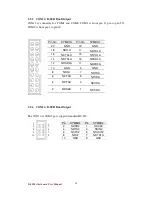
2.5.2


CON20: Digital Panel Backlight Brightness Control 


Pin No. 

SYMBOL 

VCC 

Black Light Control 

GND 

Summary of Contents for IA31

Page 1: ...w Intel ATOM N270 1 6GHz Processor VGA LCD Giga Ethernet and Mini PCI interface USER MANUAL Version 1 0 ZI de St G nault 16 rue Jean Mermoz 91080 Courcouronnes France T l 33 0 1 60 78 97 93 Fax 33 0 1...

Page 2: ...s a digital device pursuant to part 15 of the FCC rules These limits are designed to provide reasonable protection against harmful interference when the equipment is operated in a commercial environme...

Page 3: ...s otherwise specified Applications that are described in this manual are for illustration purposes only We make no representation or warranty that such application will be suitable for the specified u...

Page 4: ...on about the product Second contact with your distributor sales representative or our customer service center for technical support if you need additional assistance You may have the following informa...

Page 5: ...damaged by sudden power surges Only experienced electronic personnel should open the PC chassis Caution Always ground yourself to remove any static charge before touching the CPU card Modern electroni...

Page 6: ...o that people cannot step on it Do not place anything over the power cord 10 All cautions and warnings on the equipment should be noted 11 If the equipment is not used for a long time disconnect it fr...

Page 7: ...IA31 Motherboard User Manual VII Revision History Version Date Note Author 1 0 2009 03 25 Initial Draft Aladin Huang...

Page 8: ...9 2 5 CONNECTORS AND PIN ASSIGNMENT 11 CHAPTER 3 GRAPHIC DRIVER INSTALLATION 3 1 STANDARD CMOS FEATURE 3 2 PANEL RESOLUTION SETTING CHAPTER 4 CHIPSET DRIVER INSTALLATION 28 4 1 STANDARD CMOS FEATURES...

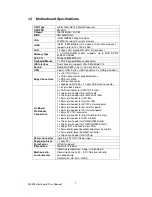
Page 9: ...oard User Manual 1 General Information This chapter includes IA31 Motherboard background information Sections include Introduction Feature Motherboard Specification Function Block Board Dimensions C H...

Page 10: ...ors and four Hi Speed USB connectors Thus IA31 SBC is designed to satisfy most of the applications in the industrial computer market such as Gaming POS KIOSK Industrial Automation and Programmable Con...

Page 11: ...or On Board Pin Header Connectors 1 x 44 pins box header 2 x SATA connector for SATAI II 3 0 Gb s 1 x 13pins pin header for Front Panel2 1 x 10pins pin header for Front Panel1 2x5 1 x 3pins pin header...

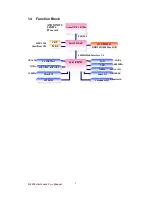
Page 12: ...66MHz Hub Interface 1 5 CRT LVDS 1600 1200 24bit Dual CH SO DIMM x 1 DDR2 533 400 Max 2GB 1 x IDE Host ATA100 Mini PCI 33MHz LAN USB 1GB s 480MB s Audio Super IO Secondary IO W W8 83 32 26 67 7E EH HG...

Page 13: ...IA31 Motherboard User Manual 4 1 5 Board dimensions...

Page 14: ...ions This chapter provides information on how to use the jumps and connectors on IA31 Motherboard The Sections include Memory Module Installation I O Equipment Installation Setting the Jumpers Connect...

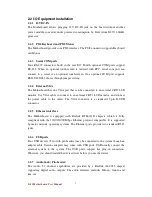
Page 15: ...rts up to 2GB DDR2 400 533 SDRAM Step 2 Press downwards on SODIMM until the retaining clips at both ends fully snap back in place and the SODIMM is properly seated Caution The SODIMM only fits in one...

Page 16: ...al CRT LCD monitor Use VGA cable to connect to an external CRT LCD monitor and connect the power cable to the outlet The VGA connector is a standard 15 pin D SUB connector 2 2 5 Ethernet interface The...

Page 17: ...A31 Motherboard User Manual 8 2 3 Jumpers and Connectors TOP Panel 1 CPU Fan1 ATX12V1 CON1 CON20 CON3 CON10 CON11 IDE1 USB1 CON19 SATA2 SATA1 CON18 CON17 CON16 NB Fan1 JP6 CON14 CON6 CON12 Panel 2 JP7...

Page 18: ...in 2 the setting diagram is shown as the right one The following tables list the function of each of the board s jumpers Label Function Note JP1 Clear CMOS 3x1 header pitch 2 0mm JP2 CF CARD PRIORITY...

Page 19: ...th the 2 4 3 settings 2 4 4 JP7 LCD Panel Voltage Select JP7 can be configured to operate in 3 3Volts 5Volts 12Volts mode Pin No Functions 1 Short 2 Master 2 Short 3 Slave Pin No Functions 1 Short 2 R...

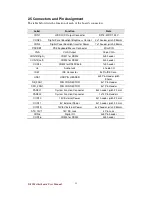
Page 20: ...1 for RS232 2x5 header CON12 Left COM2 for RS232 2x5 header CON14 COM2 for RS422 485 1x5 header J8 Audio Jack 3 Audio I O IDE1 IDE Connector 44Pin IDE Conn USB1 USB PIN HEADER 4x2 Pin Header pitch 2 0...

Page 21: ...11 GND 12 LVDS_LTX2 13 GND 14 LVDS_LCLK 15 GND 16 LCDS_LCLK 17 GND 18 LVDS_LTX3 19 GND 20 LVDS_LTX3 21 GND 22 LVDS_UTX0 23 GND 24 LVDS_UTX0 25 GND 26 LVDS_UTX1 27 GND 28 LVDS_UTX1 29 GND 30 LVDS_UTX2...

Page 22: ...2 5 4 PSKBM1 PS2 Keyboard Mouse Connector Pin Number Signal Name 1 12V 2 12V 3 12V 4 GND 5 Black Light Control 6 GND 7 Black Light EN 5V Signal Name Keyboard Mouse Signal Name Keyboard data 1 1 Mouse...

Page 23: ...Dual Output The CON16 is COM3 port support standard RS 232 Pin No SYMBOL Pin No SYMBOL 20 GND 19 GND 18 NRI1A 17 NDTR1A 16 NCTS1A 15 NTXD1A 14 NRTS1A 13 NRXD1A 12 NDSR1A 11 NDCD1A 10 GND 9 GND 8 NRIA...

Page 24: ...5 DD6 6 DD9 7 DD5 8 DD10 9 DD4 10 DD11 11 DD3 12 DD12 13 DD2 14 DD13 15 DD1 16 DD14 17 DD0 18 DD15 19 GND1 20 NC 21 DREQ 22 GND4 23 DIOW 24 GND5 25 DIOR 26 GND6 27 IO_RDYD 28 CSEL 29 DACK 30 GND7 31 I...

Page 25: ..._FAN1 NB_FAN1 2 5 10 PANEL1 Front Panel System Function Connector Pin Number Signal Name Pin Number Signal Name 2 USBVCC 1 USBVCC 4 USB_P 3 USB_P 6 USB_P 5 USB_P 8 GND 7 GND Pin SYMBOL Pin SYMBOL 2 HD...

Page 26: ...Button 2 Ground 3 Reset Button 4 HD Led 5 5V 6 HD LED 7 PWR LED 8 5V 9 Ground 10 Volume Control 11 Volume Control 12 Brightness Control 13 Brightness Control Not Default Setting 2 5 12 CON10 CON11 CON...

Page 27: ...IA31 Motherboard User Manual 18 2 5 14 CON6 Digital I O Connector Pin SYMBOL Pin SYMBOL 2 Vcc 1 GND 4 Out1 3 Out3 6 Out0 5 Out2 8 IN1 7 IN3 10 IN0 9 IN2 2 4 6 8 10 1 3 5 7 9...

Page 28: ...2 5 15 CON14 RS 422 RS 485 Header 2 5 16 Audio Function Pin No SYMBOL 1 422 RX2 2 422 RX2 3 485 TXRX2 4 485TXRX2 5 Gnd Pin SYMBOL Pin Header C0 C4 Line in B1 B4 Line out A1 A4 Mic in 422 RX2 2 485TXR...

Page 29: ...Motherboard User Manual 20 Graphic Driver Installation This chapter offers information on the chipset software Installation utility Installation of Graphic Driver Panel Resolution Setting C H A P T E...

Page 30: ...on Device The Intel Graphic Drivers should be installed first and it will enable Video Controller VGA compatible Follow the instructions below to complete the installation You will quickly complete th...

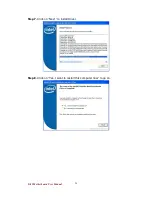
Page 31: ...IA31 Motherboard User Manual 22 Step 3 Click on Next to install Driver Step 4 Click on Next to install Driver...

Page 32: ...IA31 Motherboard User Manual 23 Step 5 Click on Yes to agree License Step 6 Click on Next to install Driver...

Page 33: ...IA31 Motherboard User Manual 24 Step 7 Click on Next to install Driver Step 8 Click on Yes I want to restart this computer now to go on...

Page 34: ...Motherboard User Manual 25 3 2 Panel Resolution Setting Step 1 Right click the desktop and then click Properties Step 2 In the Display Properties dialog box click the Settings tab Step 3 Click on Mon...

Page 35: ...IA31 Motherboard User Manual 26 Step 4 Click on Hide modes that this monitor cannot display to remove this option Step 5 Click on Setting then could choose 32bit color qualify...

Page 36: ...31 Motherboard User Manual 27 Chipset Driver Installation This chapter offers information on the chipset software Installation utility Installation of Chipset Driver Further information C H A P T E R...

Page 37: ...er Manual 28 Chapter 4 Chipset Driver Installation 4 1 Standard CMOS Features Setp 1 Insert the CD that comes with the motherboard Open the file document Chipset Driver Setp 2 Click on infinst_auto ex...

Page 38: ...IA31 Motherboard User Manual 29 Setp 3 Click on Next to install driver Setp 4 Click on Yes to agree License...

Page 39: ...IA31 Motherboard User Manual 30 Setp 5 Click on Next to install driver Setp 6 Click on Next to install driver...

Page 40: ...IA31 Motherboard User Manual 31 Step 7 Click on Yes I want to restart this computer now to go on...

Page 41: ...herboard User Manual 32 Ethernet Driver Installation This chapter offers information on the Ethernet software installation utility Sections include Introduction Installation of Ethernet Driver C H A P...

Page 42: ...0Mbps only cable Functions such as Crossover Detection Auto Correction polarity correction adaptive equalization cross talk cancellation echo cancellation timing recovery and error correction are impl...

Page 43: ...ng in the IA31 Motherboard before installing the Ethernet drivers Follow the steps below to complete the installation of the Realtek RTL8111B LAN drivers You will quickly complete the installation Ste...

Page 44: ...IA31 Motherboard User Manual 35 Step 3 Click on Next to install driver Step 3 Click on Install to install driver...

Page 45: ...IA31 Motherboard User Manual 36 Setp 3 Click on Finish and go on...

Page 46: ...Motherboard User Manual 37 Audio Driver Installation This chapter offers information on the Audio software installation utility Sections include Introduction Installation of Audio Driver C H A P T E...

Page 47: ...a mono output and multiple stereo and mono inputs along with flexible mixing gain and mute functions to provide a complete integrated audio solution for PCs 6 2 Installation of Audio Driver The users...

Page 48: ...IA31 Motherboard User Manual 39 Step 2 Click on Next to install driver Step 3 Click on Yes I want to restart my computer now to finish installation...

Page 49: ...IA31 Motherboard User Manual 40 AMI BIOS Setup This chapter describes how to set BIOS configuration C H A P T E R 7...

Page 50: ...led devices and establish special features ENTERING BIOS SETUP You can access the BIOS program just after you turn on your computer Just press the DEL key when the following prompt appears Press DEL t...

Page 51: ...When an option is selected in the left frame it is highlighted in white Often a text message will accompany it 7 2 System Overview Use this option to change the system time and date Highlight System...

Page 52: ...vanced Setting CPU Configuration Press Enter to CPU Configuration setting CPU configuration differs from writing an executable program It is equivalent to setting dip switches or jumpers on a circuit...

Page 53: ...r Manual 44 to change this configuration IDE SATA Configuration IDE Channel IO Master While entering setup the BIOS automatically detects the presence of IDE devices This displays the status of IDE de...

Page 54: ...rive Setting to Auto allows automatic selection of the appropriate IDE device type Select CDROM if you are specifically configuring a CD ROM drive Select ARMD ATAPI Removable Media Device if your devi...

Page 55: ...IA31 Motherboard User Manual 46 Block Multi Sector Transfer Controls enabling of multi sector transfer if supported The options Disabled Auto PIO Mode Indicates the type of PIO Programmed Input Output...

Page 56: ...IA31 Motherboard User Manual 47 DMA Mode Indicate the type of Ultra DMA The options Auto SWDMan MWDMAn UDMAn S M A R T This allows you to activate the S M A R T Self Monitoring Analysis Reporting...

Page 57: ...that monitors your disk status to predict hard disk failure This gives you an opportunity to move data from a hard disk that is going to fail to a safe place before the hard disk becomes offline 32Bit...

Page 58: ...IA31 Motherboard User Manual 49 Super IO Configuration Serial Port 1 Address Allows you to select the Serial Port1 base address Configuration options Disabled 3F8 IRQ4 2F8 IRQ3 3E8 IRQ4 2E8 IRQ3...

Page 59: ...ect the Serial Port2 base address The options Disabled 3F8 IRQ4 2F8 IRQ3 3E8 IRQ4 2E8 IRQ3 Serial Port 3 Address Allows you to select the Serial Port3 base address The options Disabled 3E8 2E8 Serial...

Page 60: ...otherboard User Manual 51 Serial Port 4 Address Allows you to select the Serial Port4 base address The options Disabled 3E8 2E8 Serial Port 4 IRQ Allow BIOS to select Serial Port 4 IRQ The options 3 9...

Page 61: ...User Manual 52 Hardware Health Configuration CPU Temperature The onboard hardware monitor automatically detects and displays the CPU temperatures Select Disable if you do not wish to display the detec...

Page 62: ...IA31 Motherboard User Manual 53 ACPI Configuration General ACPI Configuration...

Page 63: ...choose to enter the Standby mode in S1 POS or S3 STR fashion through the setting of this field These options S1 POS The S1 sleep mode is a low power state In this state no system context is lost CPU...

Page 64: ...The information stored in memory will be used to restore the system when a wake up event occurs Repost Video on S3 Resume Determine whether to invoke VGA BIOS post on S3 STR resume The options No Yes...

Page 65: ...enable or disable the Advanced Configuration and Power Interface ACPI support in the Application Specific Integrated Circuit ASIC When set to Enabled the ACPI APCI table pointer is included in the RS...

Page 66: ...uto allows the system to detect the presence of USB devices at startup If detected the USB controller legacy mode is enabled If no USB device is detected the legacy USB support is disabled The options...

Page 67: ...ou to configure the USB 2 0 controller in HiSpeed 480 Mbps or Full Speed 12 Mbps The options FullSpeed HiSpeed BIOS EHCI Hand Off Allows you enable support for operating systems without an EHCI hand o...

Page 68: ...PnP devices The menu includes setting IRQ and DMA channel resources for either PCI PnP or legacy ISA devices and setting the memory size block for legacy ISA devices Clear NVRAM Clear NVRAM during sy...

Page 69: ...Plug and Play devices not required for boot The options No Yes PCI Latency Timer Allows you to select the value in units of PCI clocks for the PCI device latency timer register The options 32 64 96 1...

Page 70: ...ed The options No Yes Palette Snooping When set to Enabled the palette snooping feature informs the PCI devices that an ISA graphics device is installed in the system so that the latter can function c...

Page 71: ...PCI ISA IDE Card Allows you to set the PCI slot number The options Auto PCI Slot1 PCI Slot2 PCI Slot 3 PCI Slot4 PCI Slot5 PCI Slot6 IRQ3 4 5 7 9 10 11 14 15 Allows you to specify IRQ that is availab...

Page 72: ...ser Manual 63 DMA Channel 0 1 3 5 6 7 DMA Channel PCI PMP functions The options Available Reserved Reserved Memory Size Set the size of memory block to reserve for legacy ISA devices The options Disab...

Page 73: ...IA31 Motherboard User Manual 64...

Page 74: ...Setting Configuration Quick Boot Enable this item allows the BIOS to skip some power on self test POST while booting to decrease the time needed to boot the system When set to Disabled BIOS performs a...

Page 75: ...message or OEM logo The options Disabled Enabled Boot up Num Lock Allows you to select the power on state for the NumLock The options Off On Wait for F1 If Error When set to Enabled the system waits...

Page 76: ...IA31 Motherboard User Manual 67 Boot Device Priority Boot Device Priority Select the priority of Boot devices...

Page 77: ...IA31 Motherboard User Manual 68...

Page 78: ...Setup options such as password protection and virus protec tion are described in this section To access the sub menu for the follow ing items select the item and press Enter Change Supervisor Password...

Page 79: ...Motherboard User Manual 70 7 7 Chipset DVMT model select This function displays the active system memory mode DVMT FIXED Memory Specify the amount of DVMT FIXED system memory to allocate for video me...

Page 80: ...IA31 Motherboard User Manual 71 Boot display device Select boot display device at post stage You could select Auto VGA LVDS only LVDS VGA Flat panel type Select panel resolution...

Page 81: ...for the BIOS items and save or discard your changes to the BIOS items Discard Changes and Exit Select this option only if you do not want to save the changes that you made to the setup program If you...

Page 82: ...K to discard any changes and load the previously saved values Load Optimal Defaults This option allows you to load the optimal default values for each of the parameters on the Setup menus When you sel...

Page 83: ...ilsafe Defaults This option allows you to load the failsafe default values for each of the parameters on the Setup menus When you select this option or if you press F5 a confirmation window appears Se...

Page 84: ...HG_REG_LD 0x07 define W83627EHG_UNLOCK 0x87 define W83627EHG_LOCK 0xAA void ClrKbBuf void void Unlock_W83627EHG void void Lock_W83627EHG void void Set_W83627EHG_Reg unsigned char unsigned char unsigne...

Page 85: ...uf 0x01 Activate GPIO1 Set_W83627EHG_Reg 0xF0 0x0F switch GPIO Input 1 Output 0 port Set_W83627EHG_Reg 0xF1 0x00 clear ucDI Get_W83627EHG_Reg 0xF1 0x0F ClrKbBuf while 1 ucDO Set_W83627EHG_Reg 0xF1 ucD...

Page 86: ...tb W83627EHG_INDEX_PORT W83627EHG_LOCK void Set_W83627EHG_Reg unsigned char REG unsigned char DATA Unlock_W83627EHG outportb W83627EHG_INDEX_PORT REG outportb W83627EHG_DATA_PORT DATA Lock_W83627EHG u...

Page 87: ...3627_UNLOCK 0x87 define W83627_LOCK 0xAA define Watchdog_timeout 10 void Unlock_W83627 void void Lock_W83627 void void Set_W83627_Reg unsigned char unsigned char unsigned char Get_W83627_Reg unsigned...

Page 88: ...Dog Timer Time out value Set_W83627_Reg 0xF7 0xC0 Clear Watchdog timer event int i Watchdog_timeout while 1 if kbhit if getch 0x1B Esc break else i Watchdog_timeout Reset Watchdog timer Set_W83627_Re...

Page 89: ..._UNLOCK void Lock_W83627 void outportb W83627_INDEX_PORT W83627_LOCK void Set_W83627_Reg unsigned char REG unsigned char DATA Unlock_W83627 outportb W83627_INDEX_PORT REG outportb W83627_DATA_PORT DAT...

Page 90: ...X standard CF Card is not founded 2 Master CF Card InnoDisk Slave IDE CD ROM Plextor PX 760A CD ROM is not founded 3 Master CF Card InnoDisk Slave IDE CD ROM PIONEER CF Card is not founded 4 Master CF...

Reviews: