background image

Warning: 

DO NOT 

attempt to defeat 

the magnetic cord connection by 
attempting to permanently attach the 
power cord to the deep fryer.

Cleaning Instructions
Warning: 

Always turn unit “Off” and 

remove the plug from the wall socket 
and the deep fryer before cleaning.  

Note: 

Allow the deep fryer and the oil 

to cool completely (approximately 2 
hours) before cleaning.  Never 
immerse the break-away safety cord, 
plug, filter or deep fryer in water or 
any other liquid.  
Please read and follow all instructions 
in this manual for best results with 
your deep fryer: 

• 

Never immerse the break-away 
cord plug, or deep fryer in water or 
any other liquid or in dishwasher.

• 

Wipe the oil reservoir with a damp, 
soapy cloth. To rinse, wipe the 
reservoir with a cloth dampened 
with water only.

• 

The fryer basket, detachable 
handle, and removable lid can be 
washed on the top rack of the 
dishwasher.

• 

NEVER place the deep fryer in 
the dishwasher.

• 

DO NOT 

use any type of abrasive 

pad or steel wool to clean the 
power cord magnetic socket.

• 

DO NOT 

use alcohol or cleaning 

solutions to clean the deep fryer.

CLEANING INSTRUCTIONS

7

If the cord should be disconnected 
from the unit during operation, the user 
should 

immediately unplug the 

power cord 

from the electrical wall 

outlet before any attempt to reconnect 
the magnetic cord back to the deep 
fryer unit.

Warning: 

DO NOT 

come in contact 

with the magnetic connection of  the 
power cord while it is plugged into 
electrical wall outlet. Injury can occur.

Fig. 9

“THIS SIDE UP”

The Detachable Break-away Cord

Your deep fryer has been specifically 
designed with your safety in mind. Your 
deep fryer has a unique detachable 
power supply cord.  This power supply 
cord is designed to “break-away” from 
the fryer in the event that the power cord 
or fryer is inadvertently pulled or tugged. 

Warning: 

This is intended to prevent 

the tipping of the appliance and 
hazardous spillage of hot oil. It is 

NOT 

intended to disconnect the fryer during 
normal use.
To connect the power cord - note the 
instructions on the cord plug area - 

THIS SIDE UP

”. Place plug into 

opening - you will feel the magnetic pull. 
Slide the plug into the slot until it 
connects. (Fig. 9)


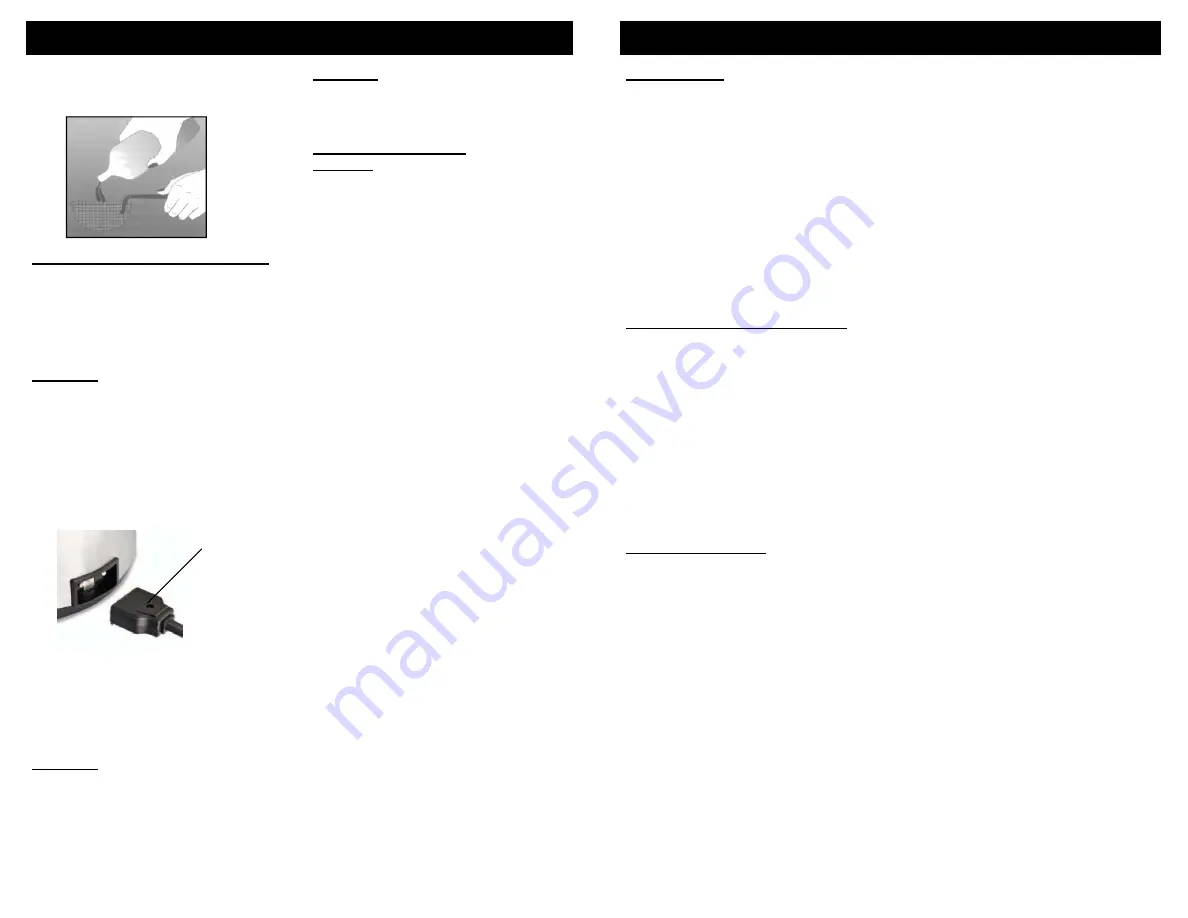
To reuse, refill the oil reservoir with the 
oil, pouring the oil through a wire 
strainer or paper filter. (Fig. 8)

Fig. 8

RECIPES

Apple Fritters

3 cups all-purpose flour 
2 teaspoons baking powder 
1/2 teaspoon salt 
1 cup sugar 
1 egg, lightly beaten

4 tablespoons cooking oil 
1 teaspoon vanilla extract 
juice of 1 orange (1/3 cup) 
1 cup chopped apple

Preheat oil to 375°F. Combine flour, baking powder, salt and sugar: set aside. 
Combine egg, cooking oil and vanilla. Combine dry and liquid ingredients, stir to blend 
thoroughly. Add orange juice and apple, mix well. Drop from teaspoon into hot oil. 
(Basket should be lowered into oil so drop carefully - avoiding splattering oil). Fry 
approximately 2 minutes or until crisp and very brown. Remove from oil and drain. 
Dust with powered sugar or a mixture of granulated sugar and cinnamon. Serve warm 
for best results. 
Try topping with a scoop of vanilla ice cream for an added treat.

Beer Batter for Fish or Chicken

2 eggs(separated 
1 tablespoon oil or butter 
1 teaspoon salt 
1/4 teaspoon ground black pepper

1 1/3 cup all-purpose flour 
3/4 cup flat beer 
Boneless chicken breasts (optional) 
Fish fillets or frying fish (optional)

Preheat oil to 360°F. Beat egg yolks with oil or butter,salt and pepper. Alternately add 
the beer and flour to the mixture. Beat ingredients well, refrigerate for 3 to 12 hours. 
When you are ready to use mixture, gently fold in 2 stiffly beaten egg whites. Pat fish 
or boneless chicken breasts to remove excess liquid. Coat lightly with flour then dip 
into beer batter. Place fish or chicken in hot oil carefully (basket should already be 
lowered into oil). Fry fish for 3 to 5 minutes or until golden brown. Fry chicken 5 to 10 
minutes (depending on thickness) or until brown and  fully cooked.

Deep Fried Chicken

1 fryer chicken (2 to 3 lbs.) 
1 1/2 cup all-purpose flour 
1 teaspoon seasoned salt

1/4 teaspoon salt 
1/4 teaspoon garlic powder (optional) 
1/4 teaspoon poultry seasoning(optional) 
1 1/2 cup milk)

Preheat oil to 360°F. Combine flour and seasonings, mixing well. Dip or roll chicken in 
seasoned flour, dip into milk, and then flour again. Place into Frying Basket, lower 
basket into preheated oil. Fry for 15 to 20 minutes or until golden brown and fully 
cooked.

8

Summary of Contents for F1045

Page 1: ...NUAL MANUAL DEL USUARIO Model Modelo F1045 120V 60Hz 1000 Watts Vatios Deep Fryer Freidora de Inmersión EURO PRO Operating LLC Boston MA 02465 1 800 798 7398 www euro pro com Copyright EURO PRO OPERATING LLC 2008 ...

Page 2: ...Extreme caution must be used when moving any appliance containing hot oil or other hot liquids 12 DO NOT leave appliance unattended while in use 13 DO NOT use outdoors 14 DO NOT let cord hang over the edge of the table counter or touch hot surfaces 15 DO NOT place on or near a hot gas or electric burner or in a heated oven 16 DO NOT use appliance for other than intended household use 1 REV 11 07A ...

Page 3: ...be taken to ensure the filter compartment and removable lid are dry otherwise steam may become dangerously trapped inside the fryer during use Caution Never turn on the deep fryer when the oil reservoir is empty Always ensure the deep fryer is out of the reach of children Always use the deep fryer on a flat heat resistant surface 1 Place the basket in the deep fryer 2 Close the lid of the deep fry...

Page 4: ...e food in the fryer basket Do not drop food into hot cooking oil Never exceed the maximum line in the fryer basket For optimum results and shorter frying time basket should be only 1 2 full Frying Food Note When the temperature control is set to Min the heating element is off and does not heat the cooking oil To preheat the oil turn the temperature control dial to the desired temperature and the t...

Page 5: ...magnetic pull Slide the plug into the slot until it connects Fig 9 To reuse refill the oil reservoir with the oil pouring the oil through a wire strainer or paper filter Fig 8 Fig 8 RECIPES Apple Fritters 3 cups all purpose flour 2 teaspoons baking powder 1 2 teaspoon salt 1 cup sugar 1 egg lightly beaten 4 tablespoons cooking oil 1 teaspoon vanilla extract juice of 1 orange 1 3 cup 1 cup chopped ...

Page 6: ...uro pro com If the appliance is found to be defective in material or workmanship EURO PRO Operating LLC will repair or replace it free of charge Proof of purchase date and 7 95 to cover the cost of return shipping and handling must be included The liability of EURO PRO Operating LLC is limited solely to the cost of the repair or replacement of the unit at our option This warranty does not cover no...

Page 7: ...o que contenga aceite u otros líquidos calientes 12 NO deje el artefacto desatendido mientras esté en funcionamiento 13 NO la use en el exterior 14 NO permita que el cable cuelgue sobre el borde de la mesa o mesada o que toque superficies calientes 15 NO la coloque sobre o cerca de un quemador eléctrico o a gas o dentro de un horno caliente 16 NO utilice el artefacto para ningún otro uso distinto ...

Page 8: ...o se calentará y el aceite no se precalentará Nota Ajustando el temporizador la freidora se encenderá automáticamente La luz indicadora de temperatura también se encenderá indicando que la unidad está encendida Nota La luz indicadora de temperatura se encenderá y apagará alternadamente durante el ciclo de cocción mientras la unidad mantiene la temperatura seleccionada 4 El temporizador emitirá un ...

Page 9: ...tapa al freír 5 Evite estar demasiado cerca de la freidora mientras esté cocinando 6 Gire el control de temperatura en sentido contra horario para disminuir la temperatura 7 Presione el botón para abrir la tapa y aléjese para evitar el vapor caliente INSTRUCCIONES DE USO 16 Ajuste de Temperatura Los siguientes tiempos de cocción son los aproximados para freír una canasta llena hasta la mitad Los t...

Page 10: ...ubierta Para vaciar el aceite asegúrese de se haya enfriado y luego vacíe el aceite en otro recipiente o botella por la esquina posterior Note que el recipiente del aceite no se puede quitar de la freidora Fig 7 RECETAS Buñuelos de Manzana 3 tazas de harina común 2 cucharaditas de polvo de hornear 1 2 cucharadita de sal 1 taza de azúcar 1 huevo ligeramente batido 4 cucharadas de aceite de cocina 1...

Page 11: ...icas normales dentro del período de garantía devuelva el artefacto completo y los accesorios con envío prepagado Para Servicio al Cliente llame al 1 800 798 7398 o visite nuestro sitio Web www euro pro com Si el artefacto presenta un defecto de materiales o mano de obra EURO PRO Operating LLC lo reparará o remplazará sin cargo El envío debe incluir un comprobante de la fecha de compra y 7 95 para ...

Reviews: