

5)Service
• Have your machine serviced by a qualified repair person using only identical replacement parts. This will ensure that the safety of the machine
is maintained.
Safety warning specific for grinding operations:
1.
use only wheel types that are recommended for your power tool and the specific guard designed for the selected wheel. Wheels for which
the power tool was not designed can not be adequately guarded and are unsafe.
2.
the guard must be securely attached to the power tool and positioned for maximum safety, so the least amount of wheel is exposed
towards the operator. The guard helps to protect operator from broken wheel fragments and accidental contact with wheel.
3.
wheels must be used only for recommended applications. For example: do not grind with the side of cut-off wheel. Abrasive cut-0off wheels
are intended for peripheral grinding, side forces applied to these wheels may cause them to shatter.
4.
always use undamaged wheel flanges that are of correct size and shapes for your selected wheel. Proper wheel flanges support the wheel
thus reducing the possibility of wheel breakage. Flanges for cut-off wheels may be different from grinding wheel flanges.
5.
do not use worn down wheels from larger power tools. Wheel intended for larger power tool is not suitable for the higher speed of a samller
tool and may brust.
Hearing protection
• In case of a sound pressure greater than 85.0 dB(A) wear hearing protection to avoid damage to your hearing!
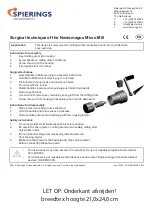
Switch action
This model is safety switch, this means the switch can’t be locked on, and need two action to power on.
If you need power on, press the lock off button (11), then press the switch trigger (1). If you need power off, just release the switch trigger (1)
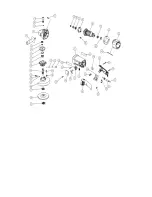
Mounting the Side Handle
During operation, keep one hand on the housing handle (5) and the other on the side handle (3). In order to mount the side handle, screw it into
the screw hole of the gear box (4).
Correct Fitting of the Protective Device
Ensure that the protective cover (6) is fitted correctly and that the fixing screws have been tightened! Before tightening the fixing screws,
switch
off the machine and remove the mains plug!
Grinding and Surface Processing
In order to grind surfaces you should use a coarse abrasive disk with a sunken centre. You can use abrasive disks with diameter of 125mm. The
maximum thickness is 6mm.
Inserting the Wheels/Disks
Please proceed as follows when inserting the wheel/disk:
1. Before mounting, remove the mains plug from the socket
release the switch trigger (1) to power off the tool
! Ensure that the protective
device is correctly installed.
2. Place the internal flange (10) on the drive shaft (2). Ensure that it is in contact with the two flat areas.
3. Now place the abrasive disk on the drive shaft (2) and the internal flange (10). Ensure that it is correctly in place.
4. Now attach the external flange with the thread (9), ensuring that it is facing the right direction according to the type of disk/wheel used. In the
case of abrasive disks, the flange (9) is inserted with the higher side pointing towards the disk. In the case of cutting off wheels, the flange (9)
is inserted with the flat side pointing towards the wheel.
5. Depress and hold the lock button (7) so that cannot turn and then tighten the external flange (9) with the external flange spanner (8).
Abrasive Disks
• Ensure that the speed to which the machine is set is sufficient for the accessories chosen.
• Use only abrasive disks with a diameter of 125 mm!
• Before mounting the disk, remove the mains plug from the socket and push the on and
release the switch trigger (1) to power off the tool
1. Place the internal flange (10) on to the drive shaft (2).
2. Place the abrasive disk on the drive shaft (2) and ensure that it is correctly in place.
3. Attach the external flange with the thread (9) and tighten it as described above with the external flange spanner (8).
NOTE:
Expect a "rain of sparks" when the disk comes into contact with metal. While grinding, always maintain the correct angle between the
disk and the working surface of 15°. This produces ideal results and avoids overloads.
NOTE:
After operation, always switch off the tool and wait until the wheel has come to a complete stop before putting the tool down.
Summary of Contents for AGR.1400
Page 1: ...MANUAL AGR 1400 Euroboor Angle Grinder ...
Page 5: ......