16
GB
17
GB
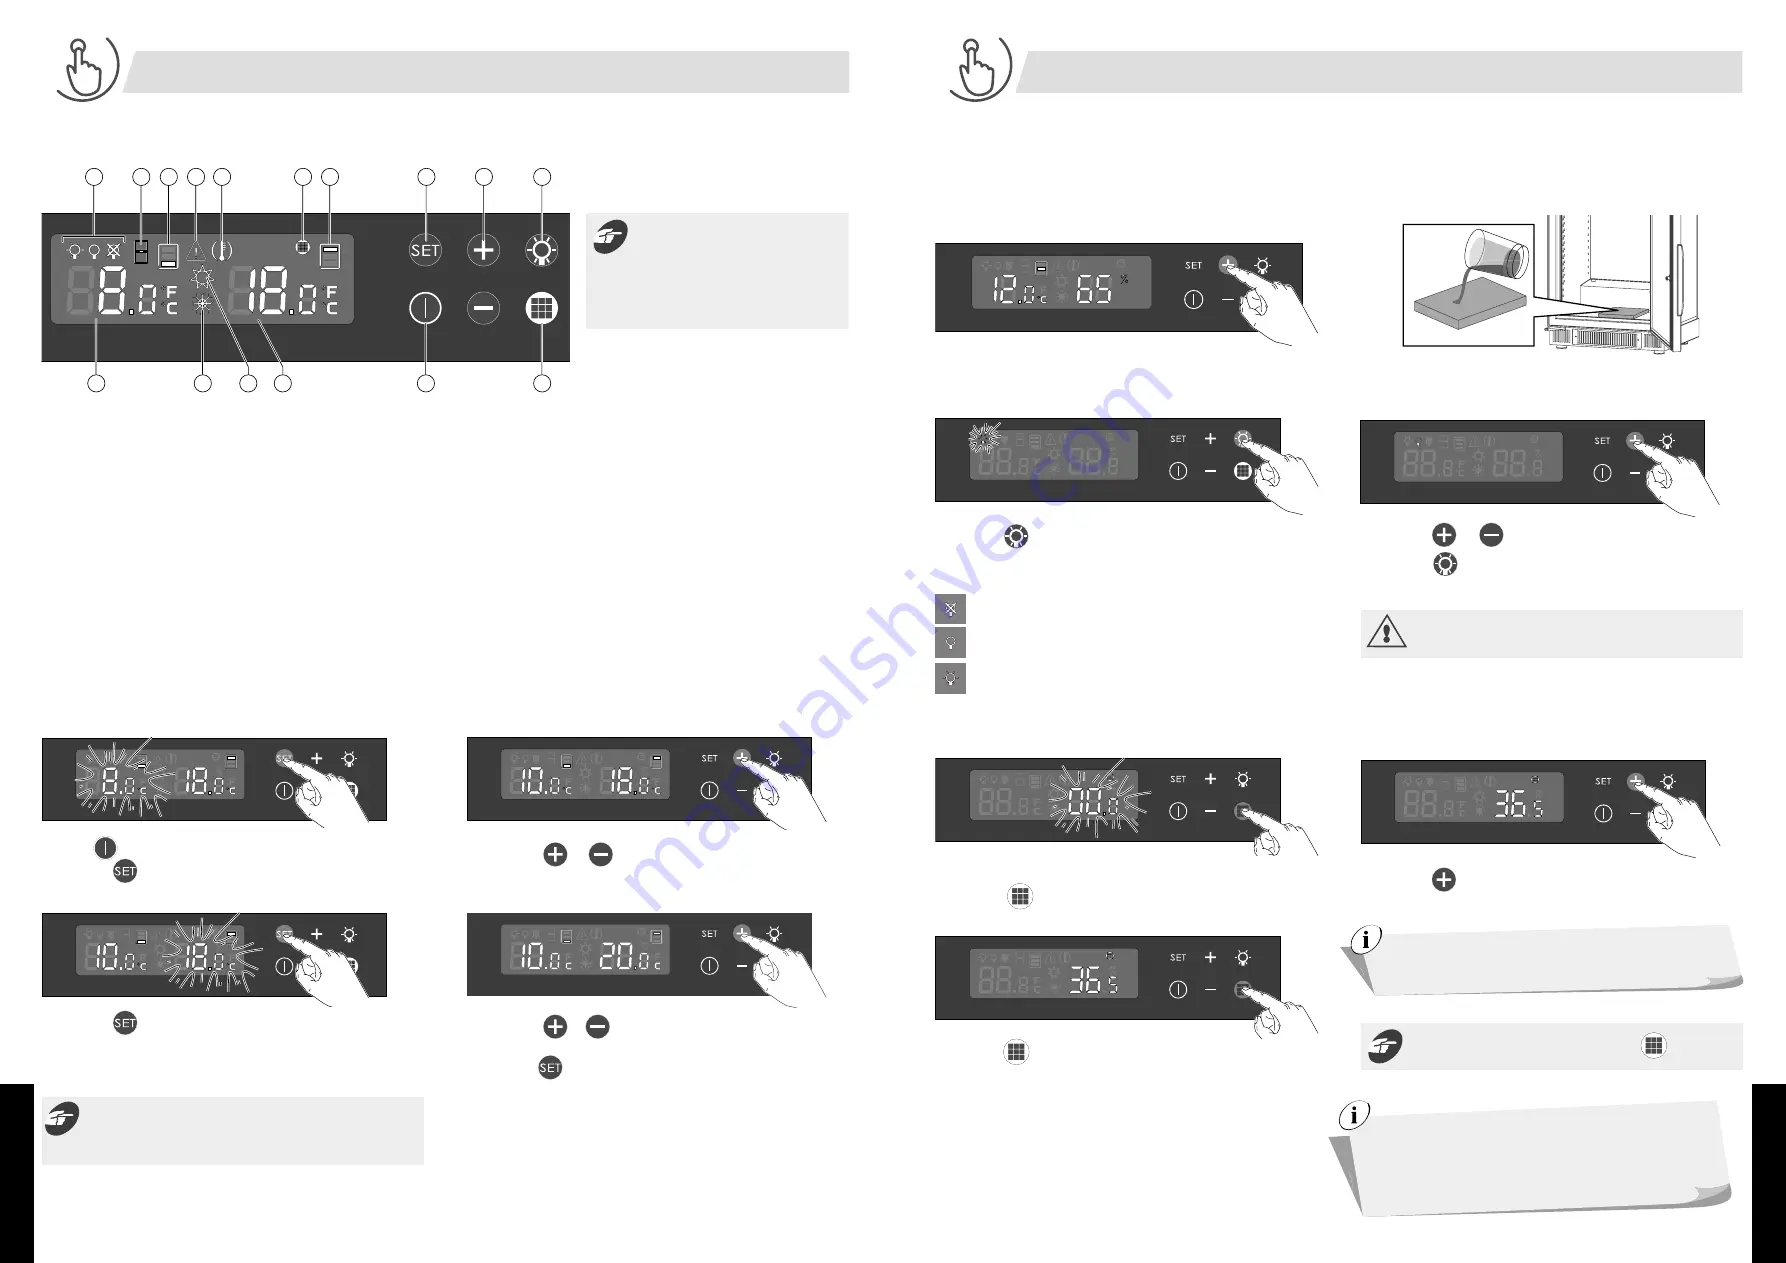
III-A. Description
(multi-temperatures model 5059S - 5259S)
O
N
F
C
E
D
C
B
A
G
H
I
M
L
K
J
A
Lighting mode
B
Door open alarm
C
Temperature zone concerned
D
Fault sensor alarm
E
Temperature alarm
F
Carbon filter alarm
G
Validation and settings access button
H
Selection and adjustment buttons
I
Lighting mode validation and access button
J
Carbon filter counter log access button
K
Power button
L
Highest cabinet temperature display
M
Hot circuit indicator light
N
Cold circuit indicator light
O
Lowest cabinet temperature display
III-B. Temperature settings
5 sec.
Press the
key for 5 s to activate.
1
Press the
key about 5 s.
The display starts to flash.
3
Press the
button to validate.
The right-hand display is flashing.
4
Press the
or
keys set the temperature of the upper section
of the cabinet
5
Press the
button to validate.
2
Press the
or
keys to set the temperature of the lower
section of the cabinet.
•
The default setting for the lowest temperature range is 8 °C (46 °F).
However, this setting can be adjusted between 5 and 12 °C (41° and
54 °F).
•
The default setting for the highest temperature range is 18 °C (64 °F).
However, this setting can be adjusted between 15 and 22 °C (59° and
72 °F).
WARNING: to operate correctly your cabinet should be located in a
room with a temperature between 12 and 30 °C (54° and 95 °F).
The value on the display is the actual temperature inside the
cabinet, it is therefore necessary to wait before your new setting
takes effect.
Recommended setting range for the lowest temperature: 7 to 9 °C (45° to 48 °F).
Recommended setting range for the highest temperature: 17 to 20 °C (62° to 68 °F).
The touch keys are very sensitive. There
is no need to push the keys very hard. A
simple, gentle touch is enough to
register the setting. Think to lift your
finger from the control panel between
each touch.
6/ USING YOUR WINE CABINET FOR THE FIRST TIME
You can consult the counter by pressing the
key.
VI. Carbon filter counter log display
V. Lighting mode adjustment
When activating or replacing the filter, adjust the counter to 365.
1
Press the
key.
The display is flashing.
3
Press the
button to validate.
The alarm display go out.
2
Press the
key to adjust to 365.
1
Press the
button.
The active mode light flashes.
2
Press the
or
keys to set the desired mode.
3
Press the
button to validate.
The alarm display go out.
The carbon filter must be changed annually
.
There are 3 possible lighting settings:
Lighting all the time (for mood lighting when using a glass door
cabinet, for example).
Lighting when door opens (it goes out when the door is closed).
Lighting disabled.
Usage precautions: intense light, never look directly into
the beam.
IV. Humidity level display
Your wine cabinet is fitted with a function for measuring the level of
hygrometry, enabling you to visualise the level of relative humidity inside
the appliance, when the setting is 9 - 15° C.
The ideal level of hygrometry is above 50 %, ideally located between 60
and 75 %.
If you would like to increase the level of relative humidity in your cabinet,
pour the equivalent of a glass of water on the humidity cassette. You need
to remove the bottles before.
2 sec.
In a particularly dry environm
ent and/or in climatic
conditions that are not very f
avourable (e.g. winter),
you can use the “Hygro+” humidity
kit which allows
you to increase the level of
humidity inside your wine
cabinet.
6/ USING YOUR WINE CABINET FOR THE FIRST TIME


